Bind stores, synchronize information, and configure your operating environment
1.
Add and bind a store
1.1
Sign in to the HuaYoung TK portal
First, open the HuaYoung TK portal in a regular browser: tkshop.szdamai.com Then click “Home – TikTok Stores” to open the store list page.
Important: Using a regular browser to access the HuaYoung TK portal has no impact on your store’s network security. The portal only handles adding stores. When flows such as “Information sync”, “Targeted invitations”, or “In-platform messages” run, the HuaYoung TK portal wakes up the HuaYoung TK extension in Ziniao, Zhanfu, or other fingerprint browsers, and those browsers actually access the store and run the flow—fully protecting the network environment for accessing and managing your store.
1.2
Add a store
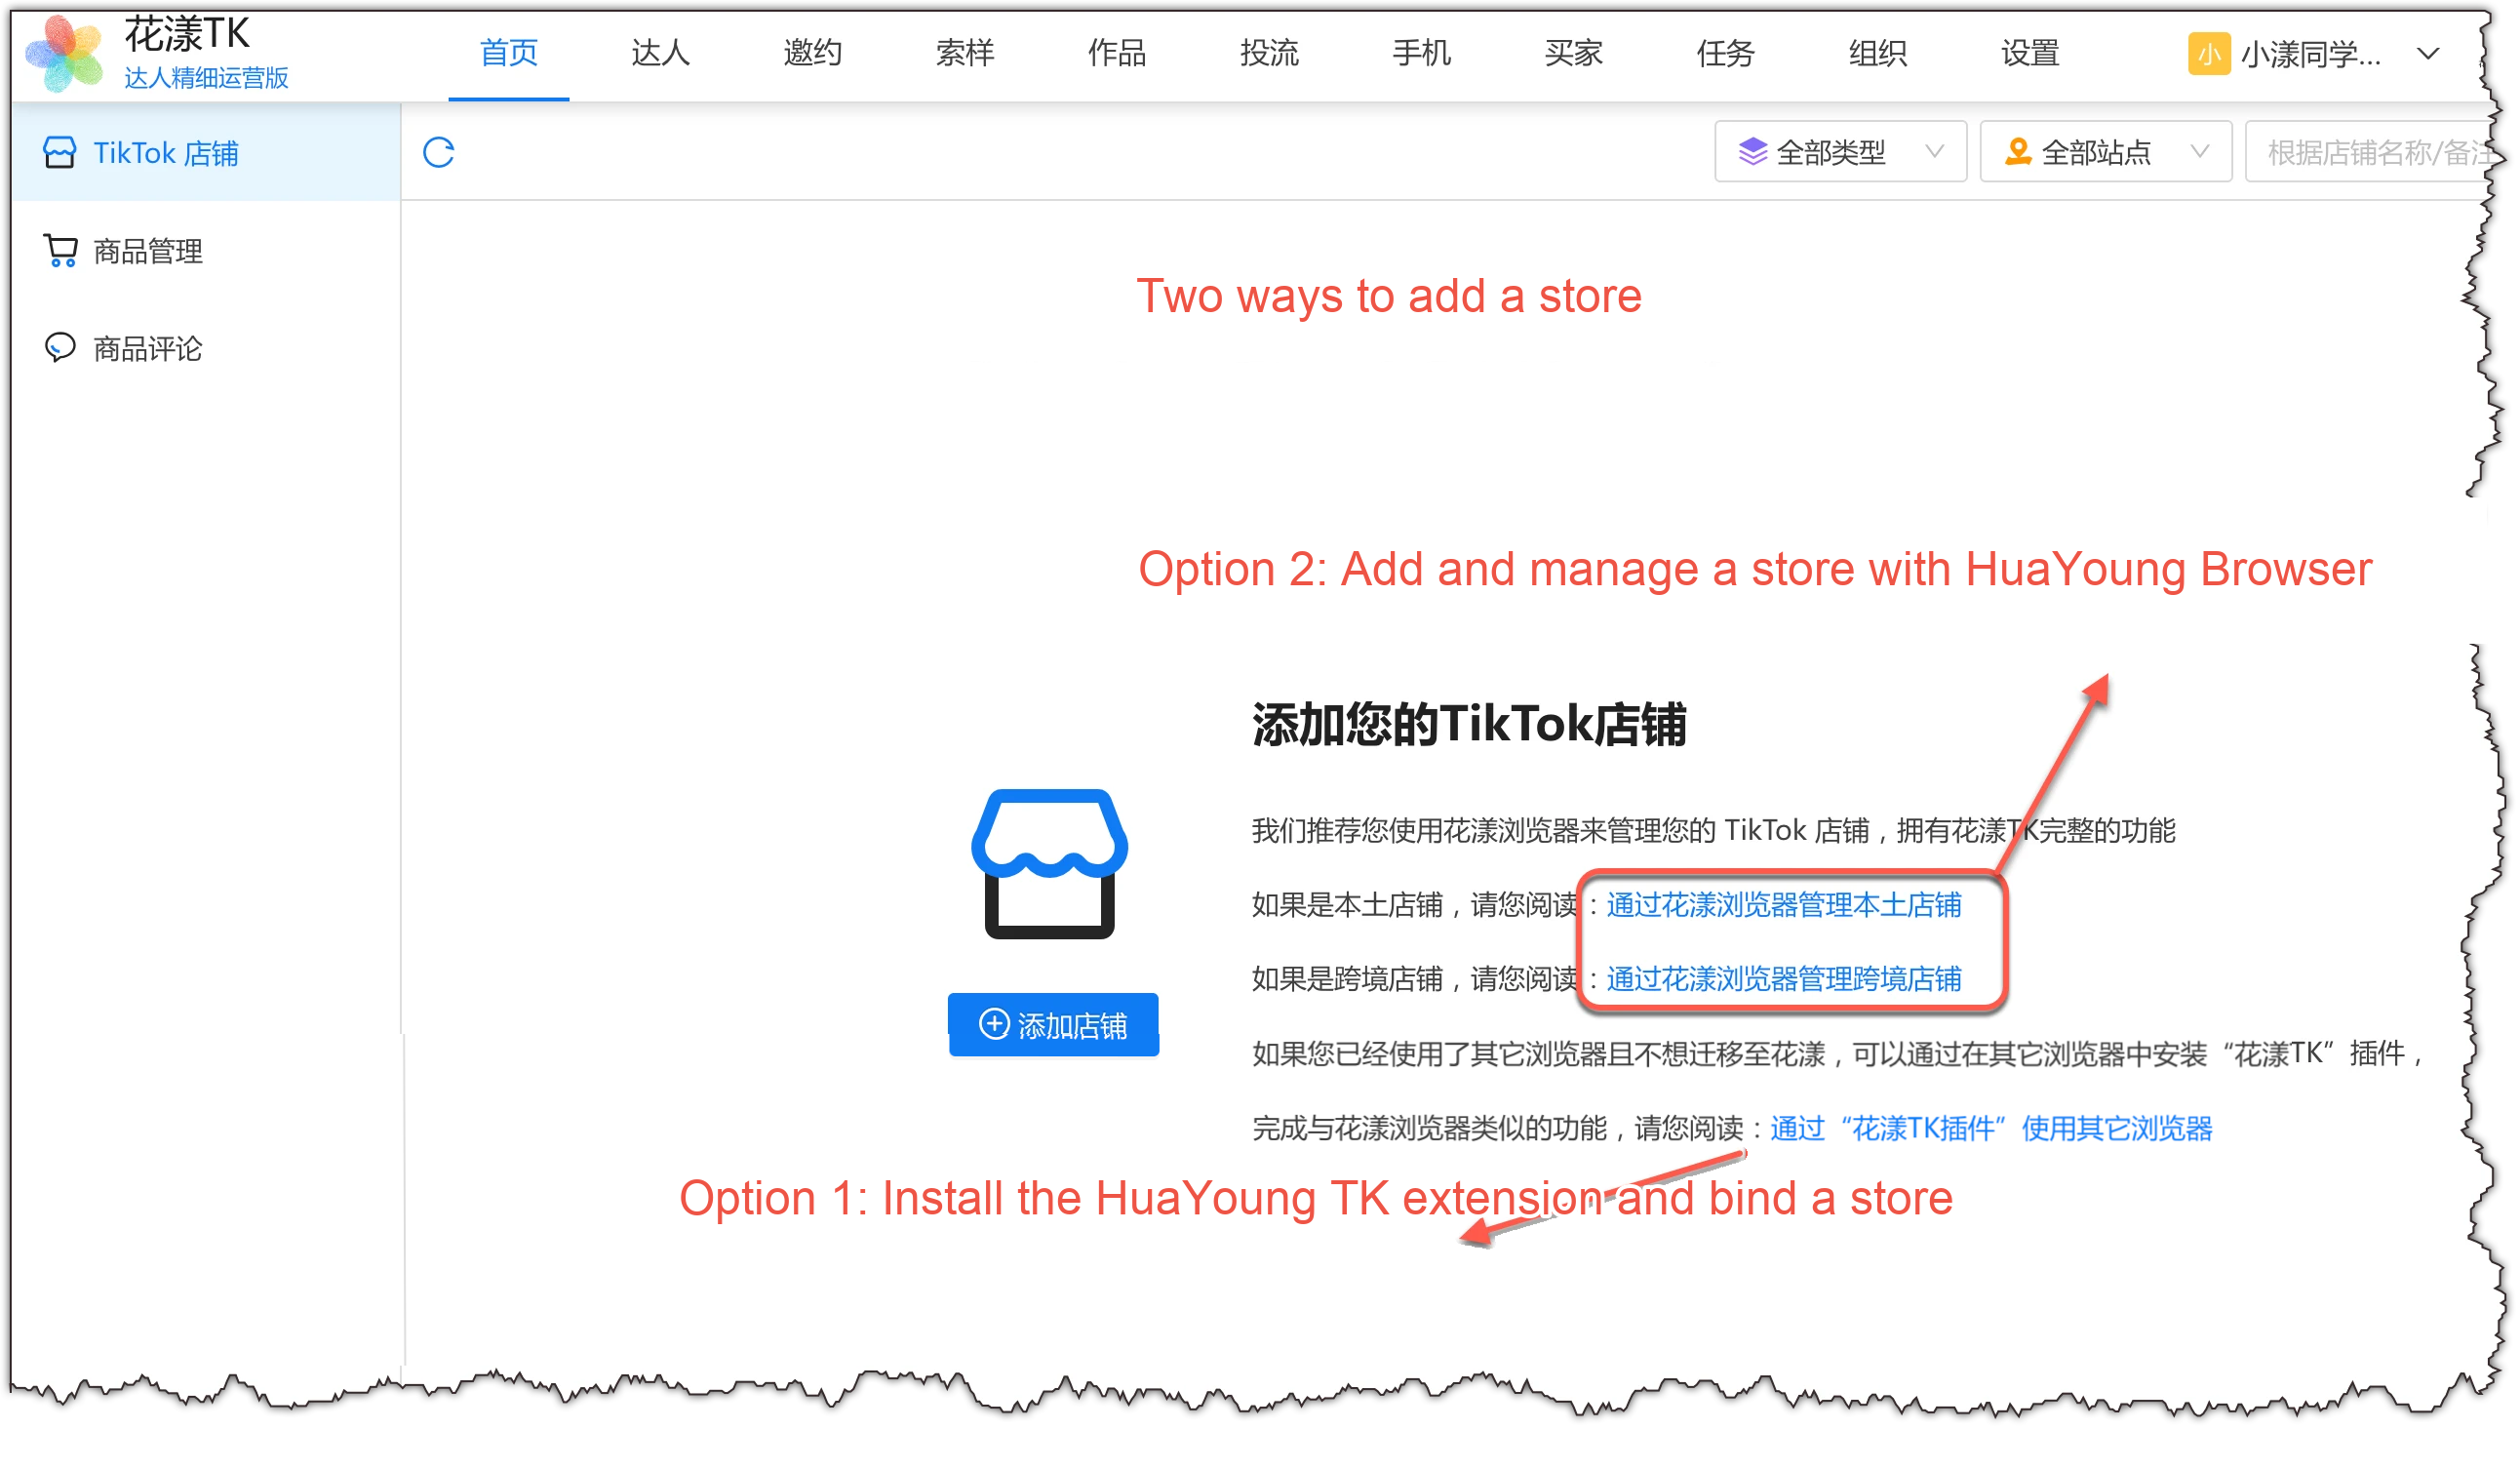
There are two ways to add a store:Two ways to add a store
Follow the instructions below based on your situation to add the store.
1.2.1 Option 1: Install the HuaYoung TK extension and bind a store
If you already use Ziniao, Zhanfu, AdsPower, or other third-party fingerprint browsers to access your store, click the matching link to install the HuaYoung TK extension and bind your store:
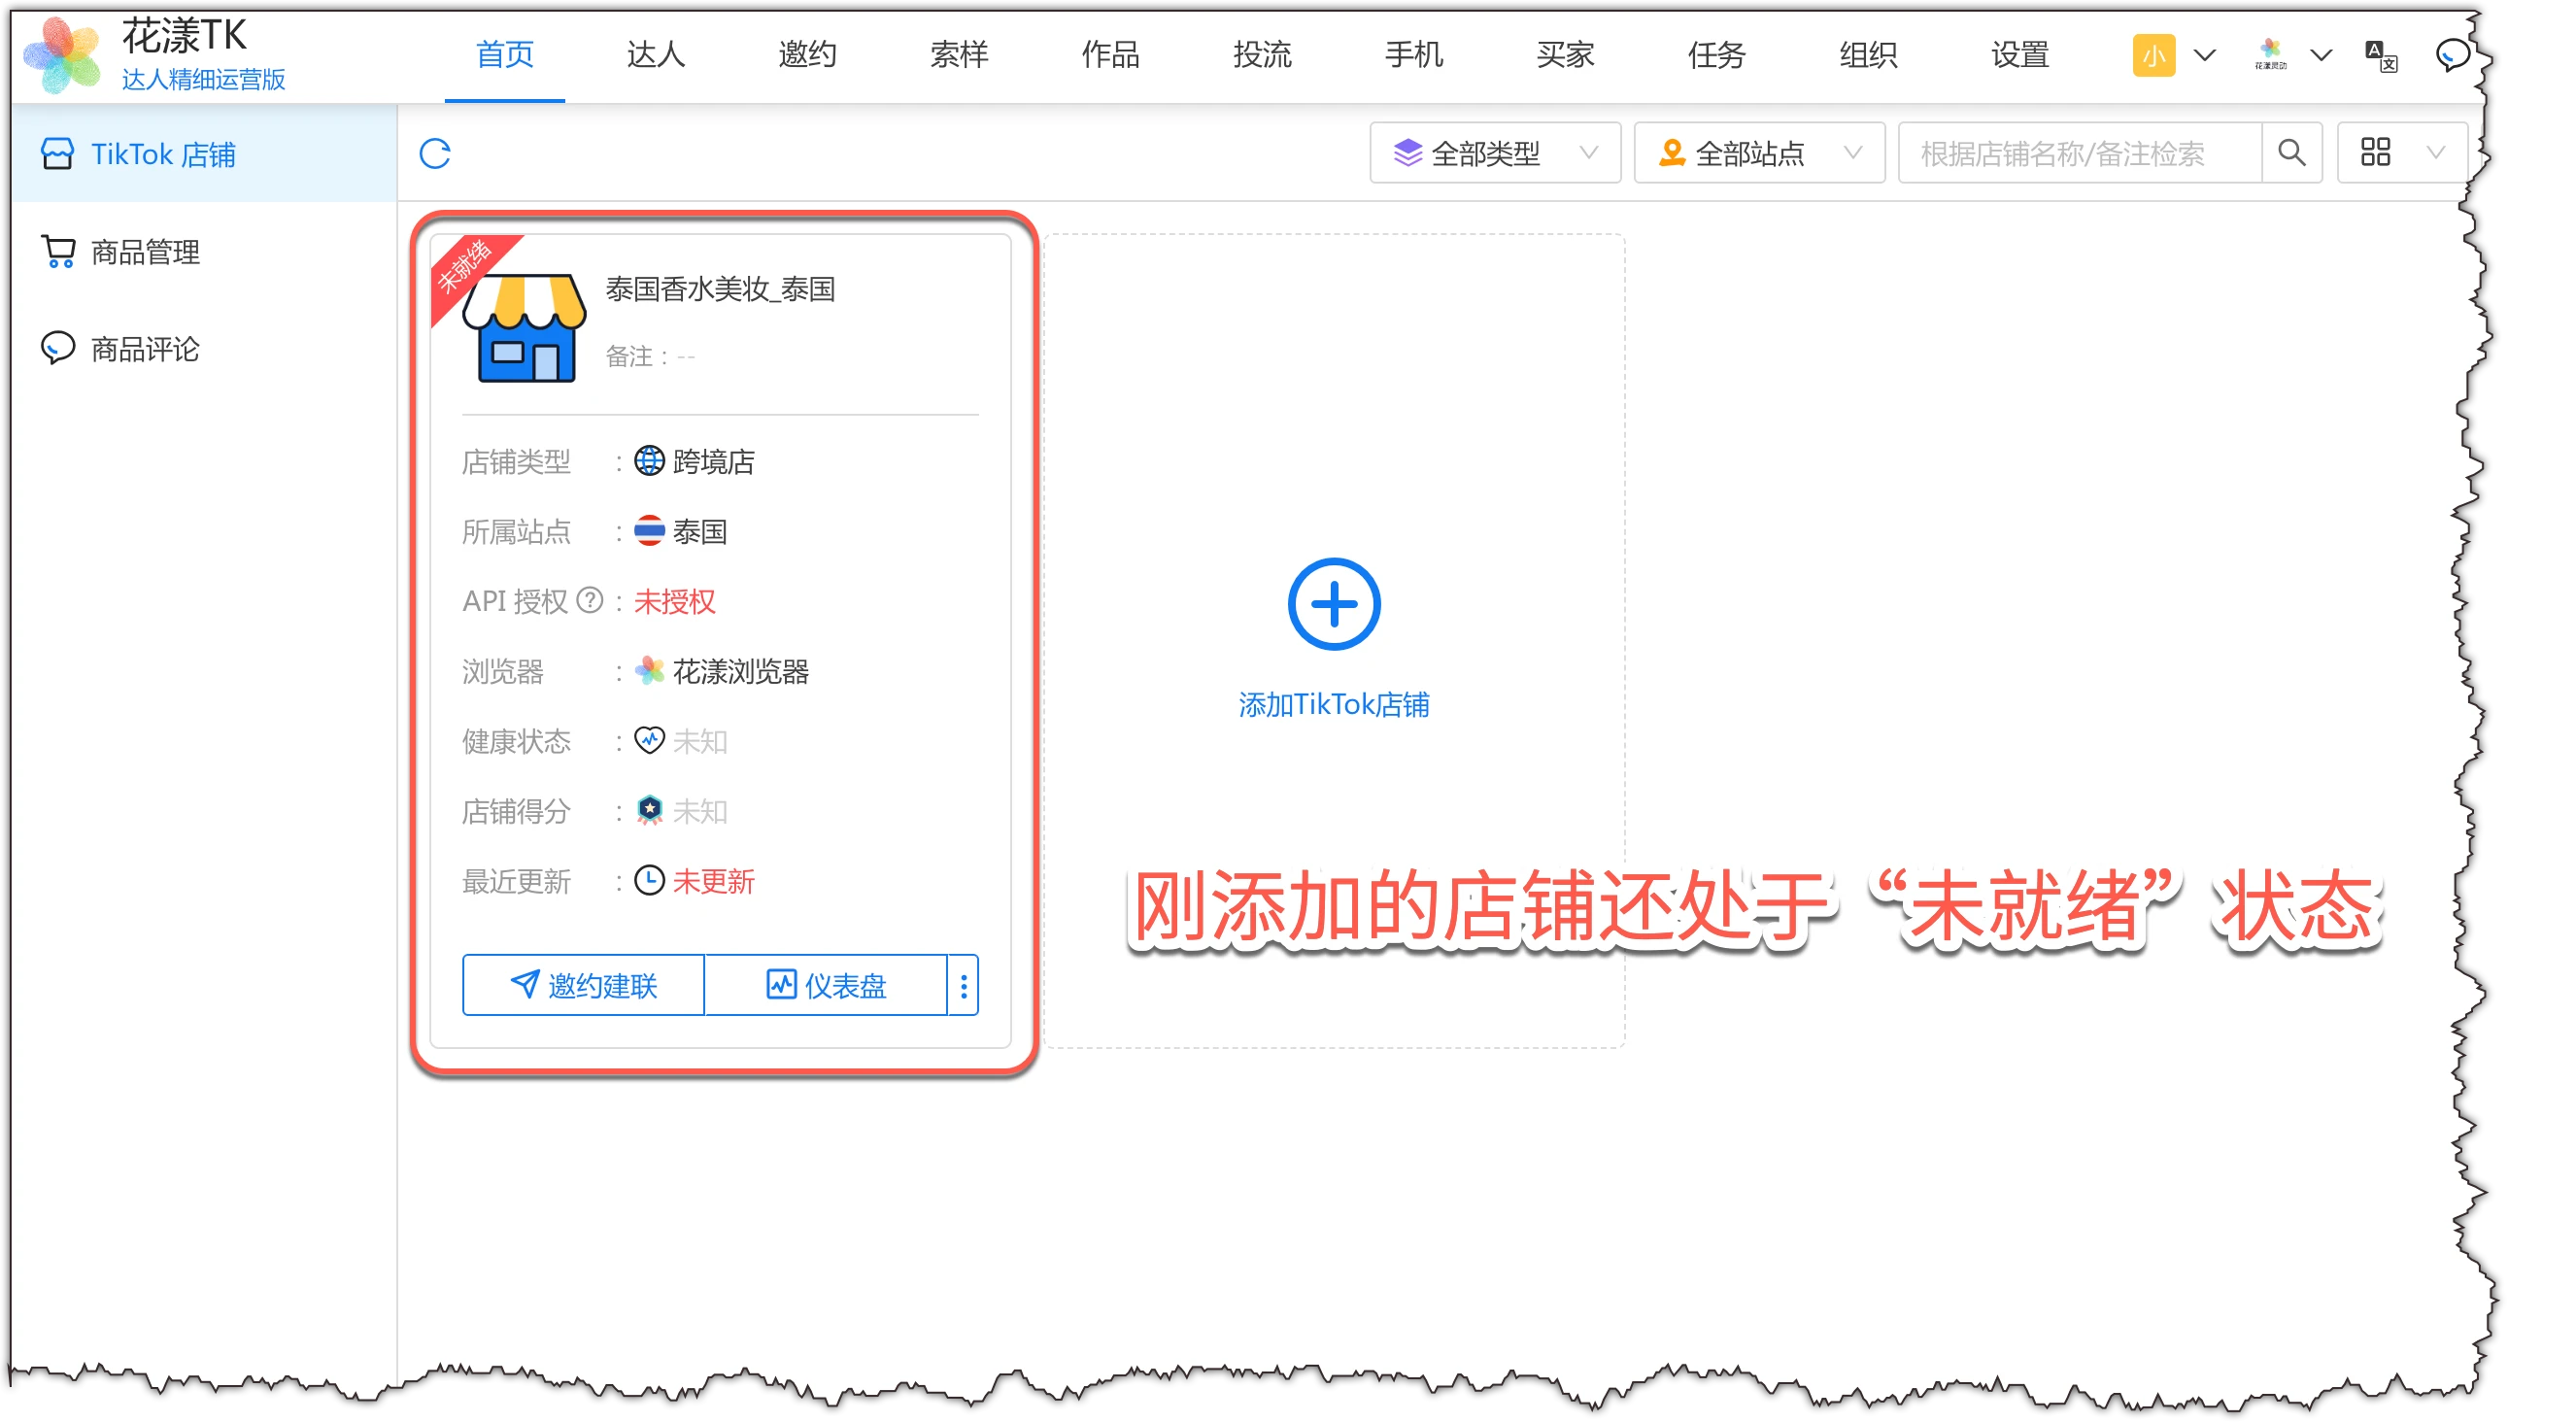
Open the HuaYoung TK portal in a regular browser: tkshop.szdamai.comThe newly added store is in the “Not ready” state
After refreshing, you can see the newly added store, along with red status messages: API authorization: Not authorized Last updated: Not updated
This means the store is still in the “Not ready” state, so you need to complete “API authorization” and “Store information sync”.
2.
Enable Open API authorization
HuaYoung is an officially certified TikTok Shop service provider and has been authorized to access the official TikTok Shop API.
A core capability of HuaYoung TK is pulling data from TikTok Shop stores into the HuaYoung TK system for organization and analysis. HuaYoung TK interacts with stores in two ways: RPA robot mode and Open API calls.
1) The benefit of RPA workflow mode: It offers rich functionality: anything you can do in the store backend can be automated through an RPA robot.
Its drawbacks are:
The browser must be open while a flow runs (HuaYoung Browser opens automatically; other browsers with the HuaYoung TK extension must be opened manually beforehand);
Frequent flow runs may trigger CAPTCHAs (HuaYoung handles them automatically, but they reduce execution efficiency).
2) The benefit of API calls: you do not need to open a browser. All requests are completed in the cloud (this method is recommended when running flows).
Current limitations (these will gradually improve as official features are released):
The official TikTok Shop Open API currently exposes only some capabilities, so other functions still need to be supplemented with RPA;
API calls are subject to QPS (queries per second) rate limits. If calls are made too frequently, TikTok Shop may block them.
Follow these steps to enable authorization:
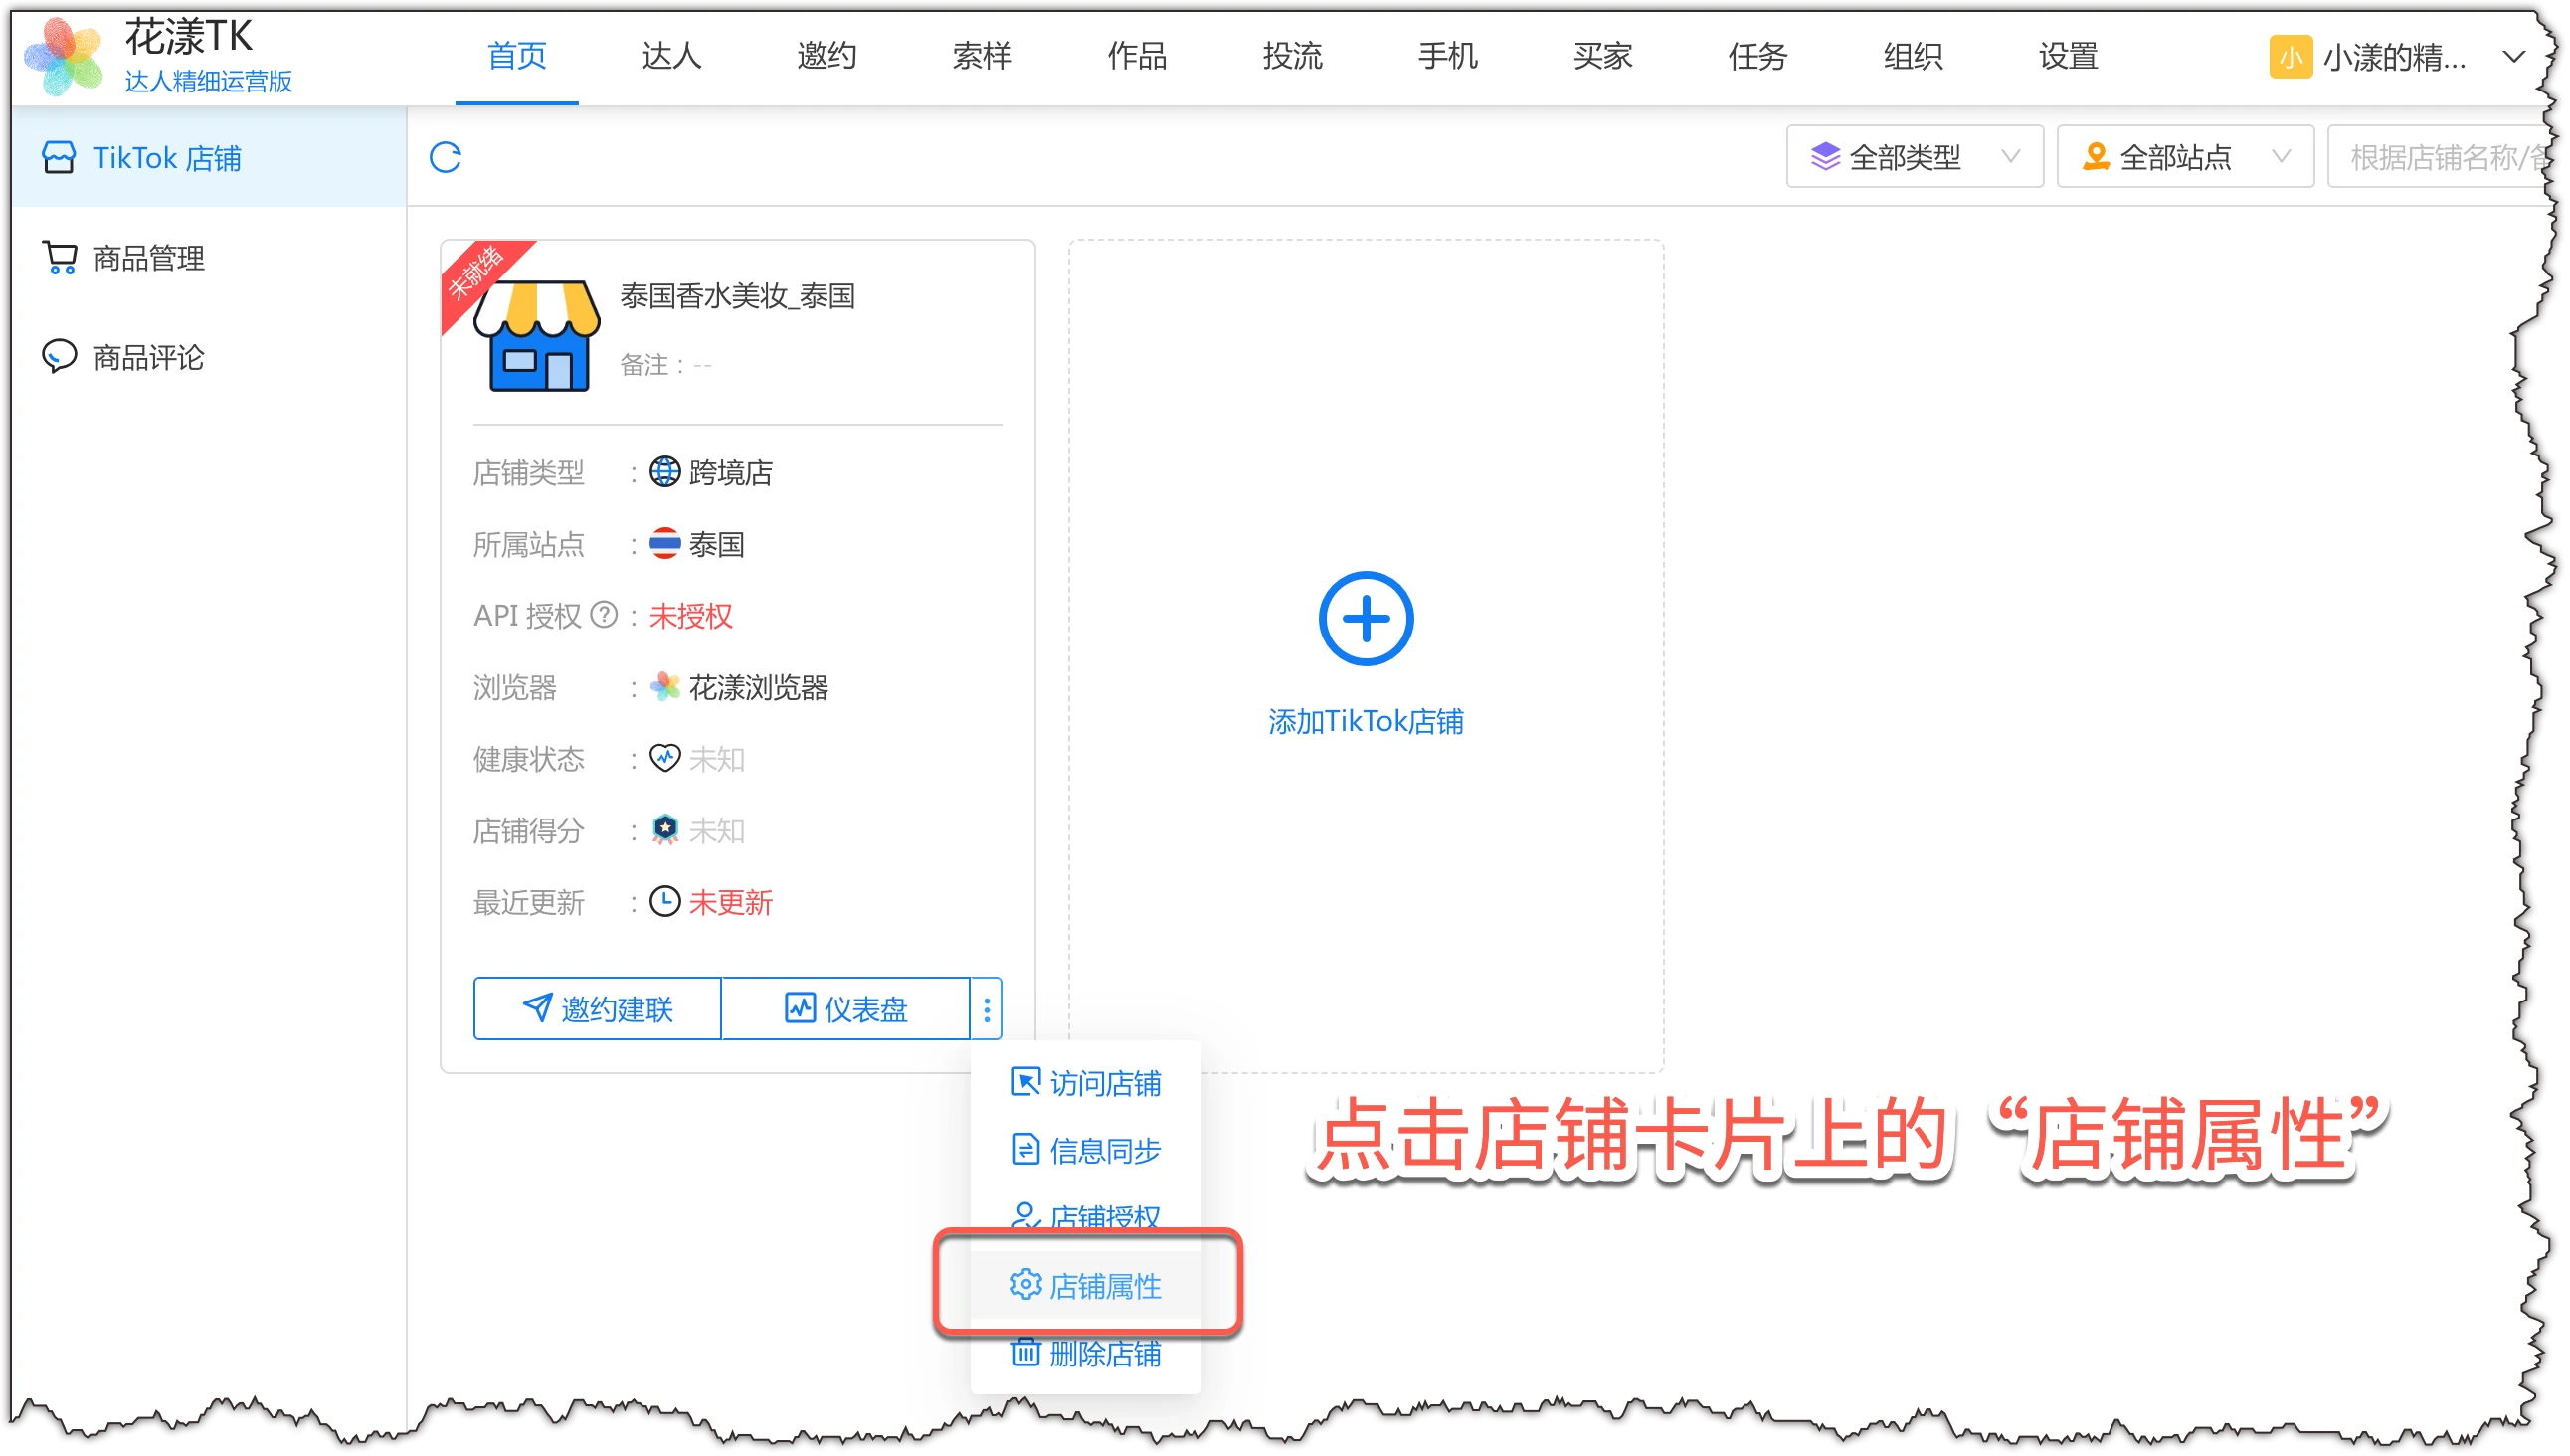
Step 1: Open Store properties
First, click “Store properties” on the store card.
Click “Store properties” on the store card
Step 2: Get the authorization link
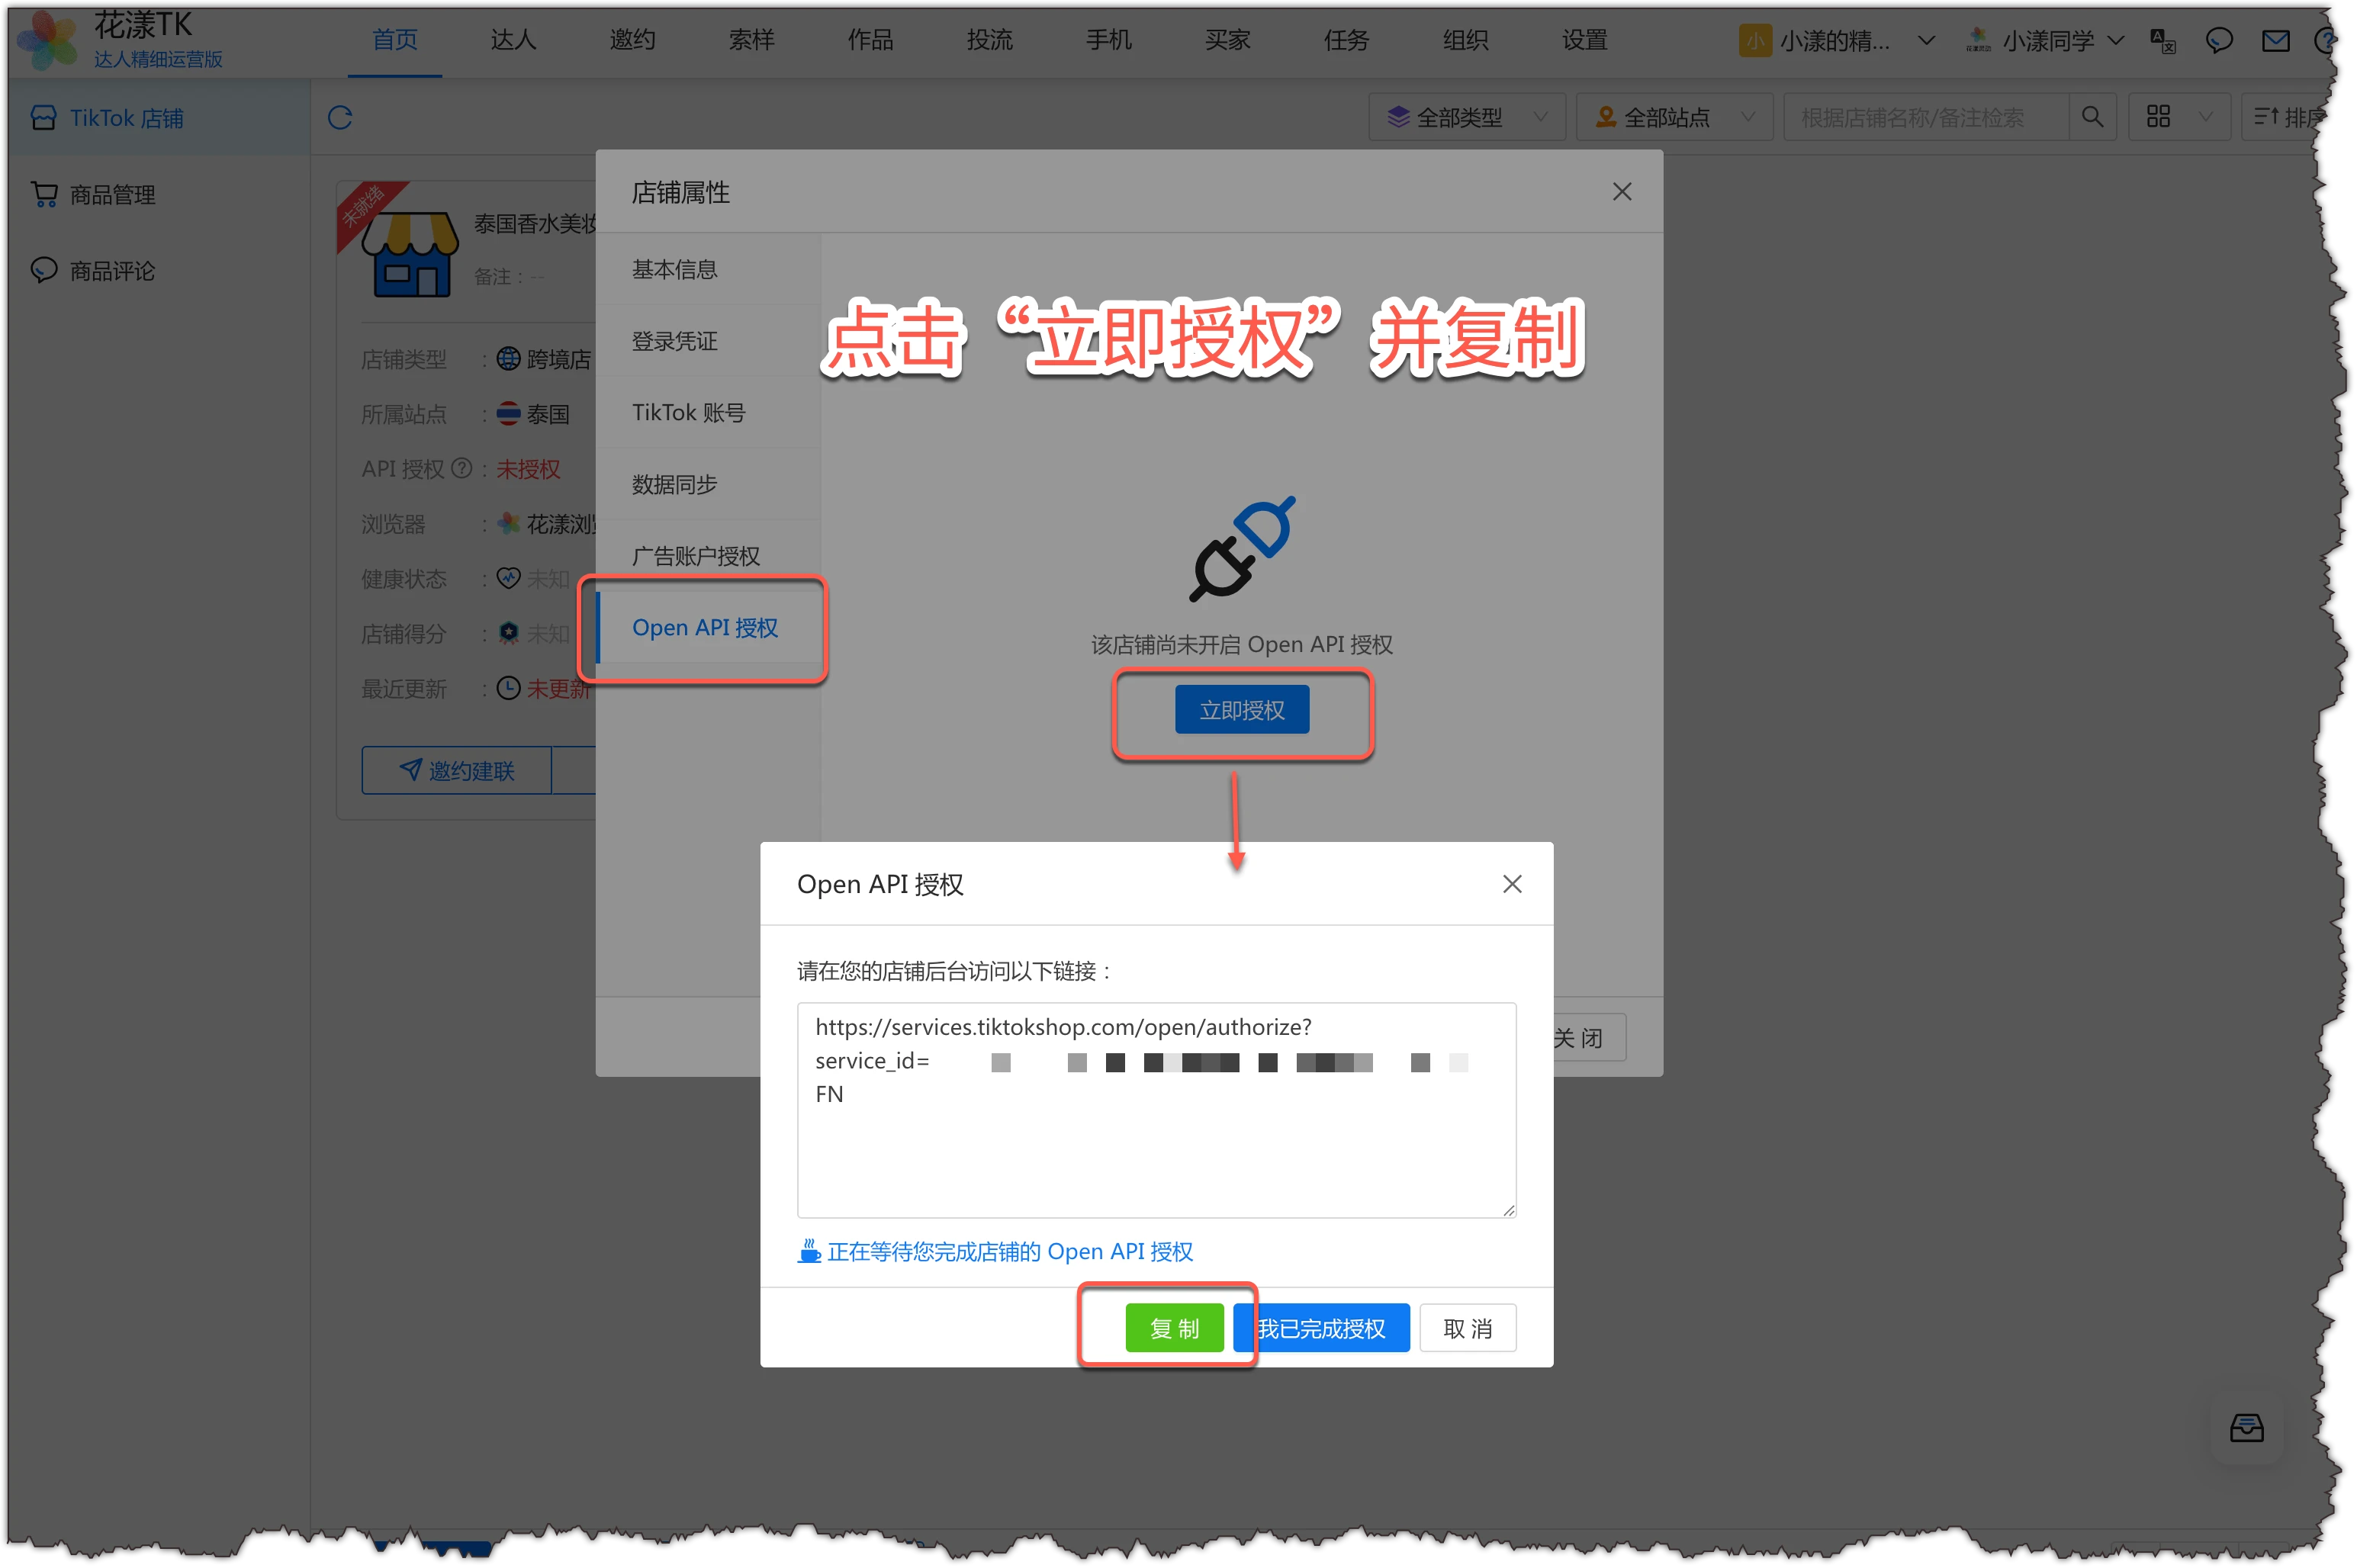
In the dialog, open the “Open API authorization” tab, click “Authorize now”, and then click “Copy” in the dialog to get the authorization link.
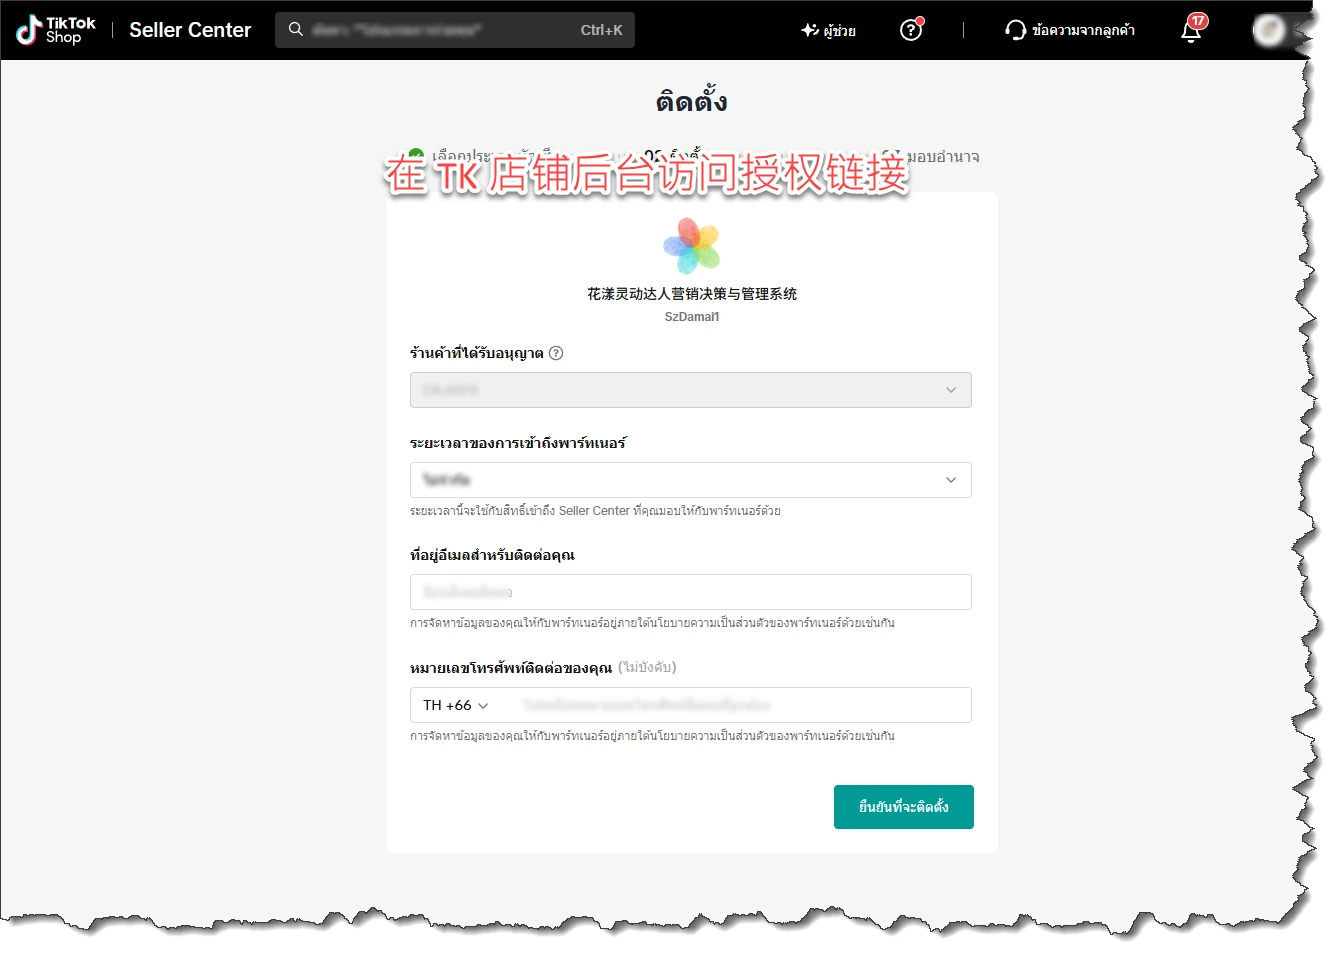
Open a new tab in a browser with the HuaYoung TK extension installed and the TikTok Shop backend open (such as Ziniao or Zhanfu), then paste and visit the authorization link.
Click “Authorize now” and copy the authorization link
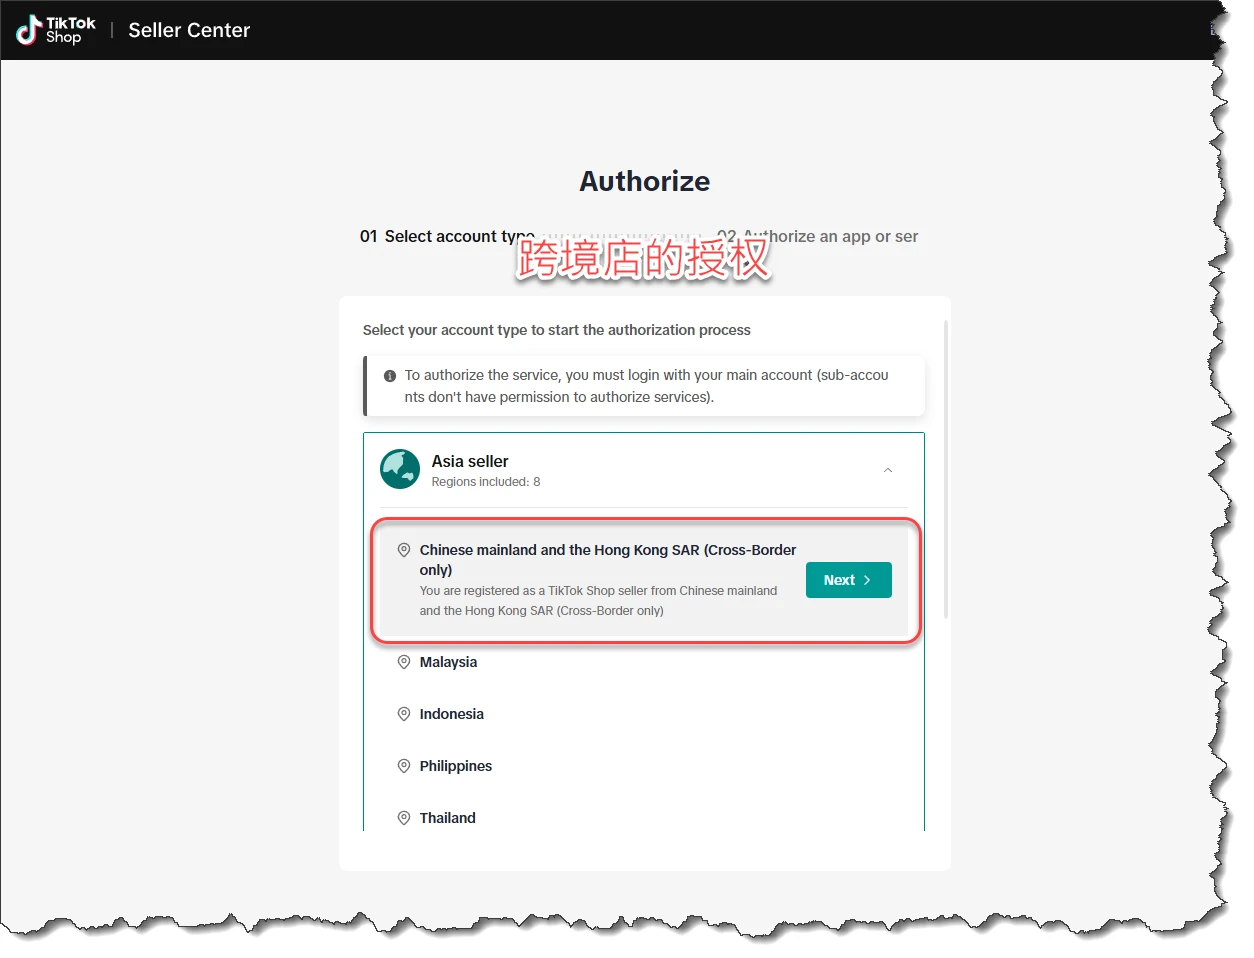
Step 3: Authorize a cross-border store
For a cross-border store, select “Chinese mainland and the Hong Kong SAR (Cross-Border only)”.
Open API authorization for a cross-border store
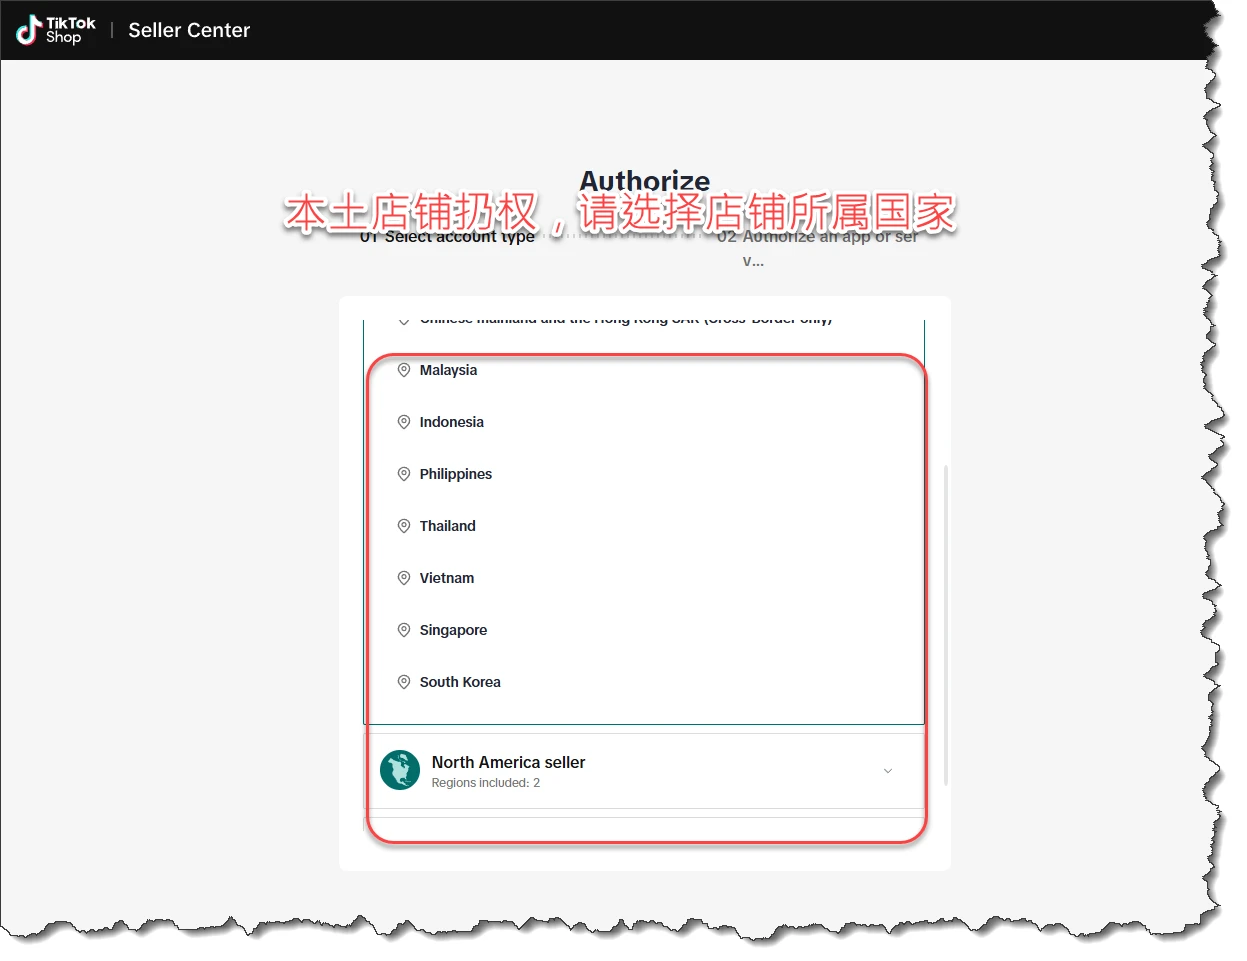
Step 4: Authorize a local store
For a local store, select the country where the store is located.
Open API authorization for a local store
Step 5: Confirm authorization
Follow the instructions to complete the authorization confirmation.
After confirmation, the store’s Open API authorization is complete. For flows such as targeted invitations and in-platform messages, API mode is recommended.
Open the authorization link in the TikTok Shop Seller Center
3.
Run the first store information sync
HuaYoung TK uses the “Store information sync” process to pull your store’s products, affiliate orders, and Creators into the HuaYoung TK portal. This powers your automated operations, deep analytics, and decision-making for store operations.
Step 1: Click “Information sync”
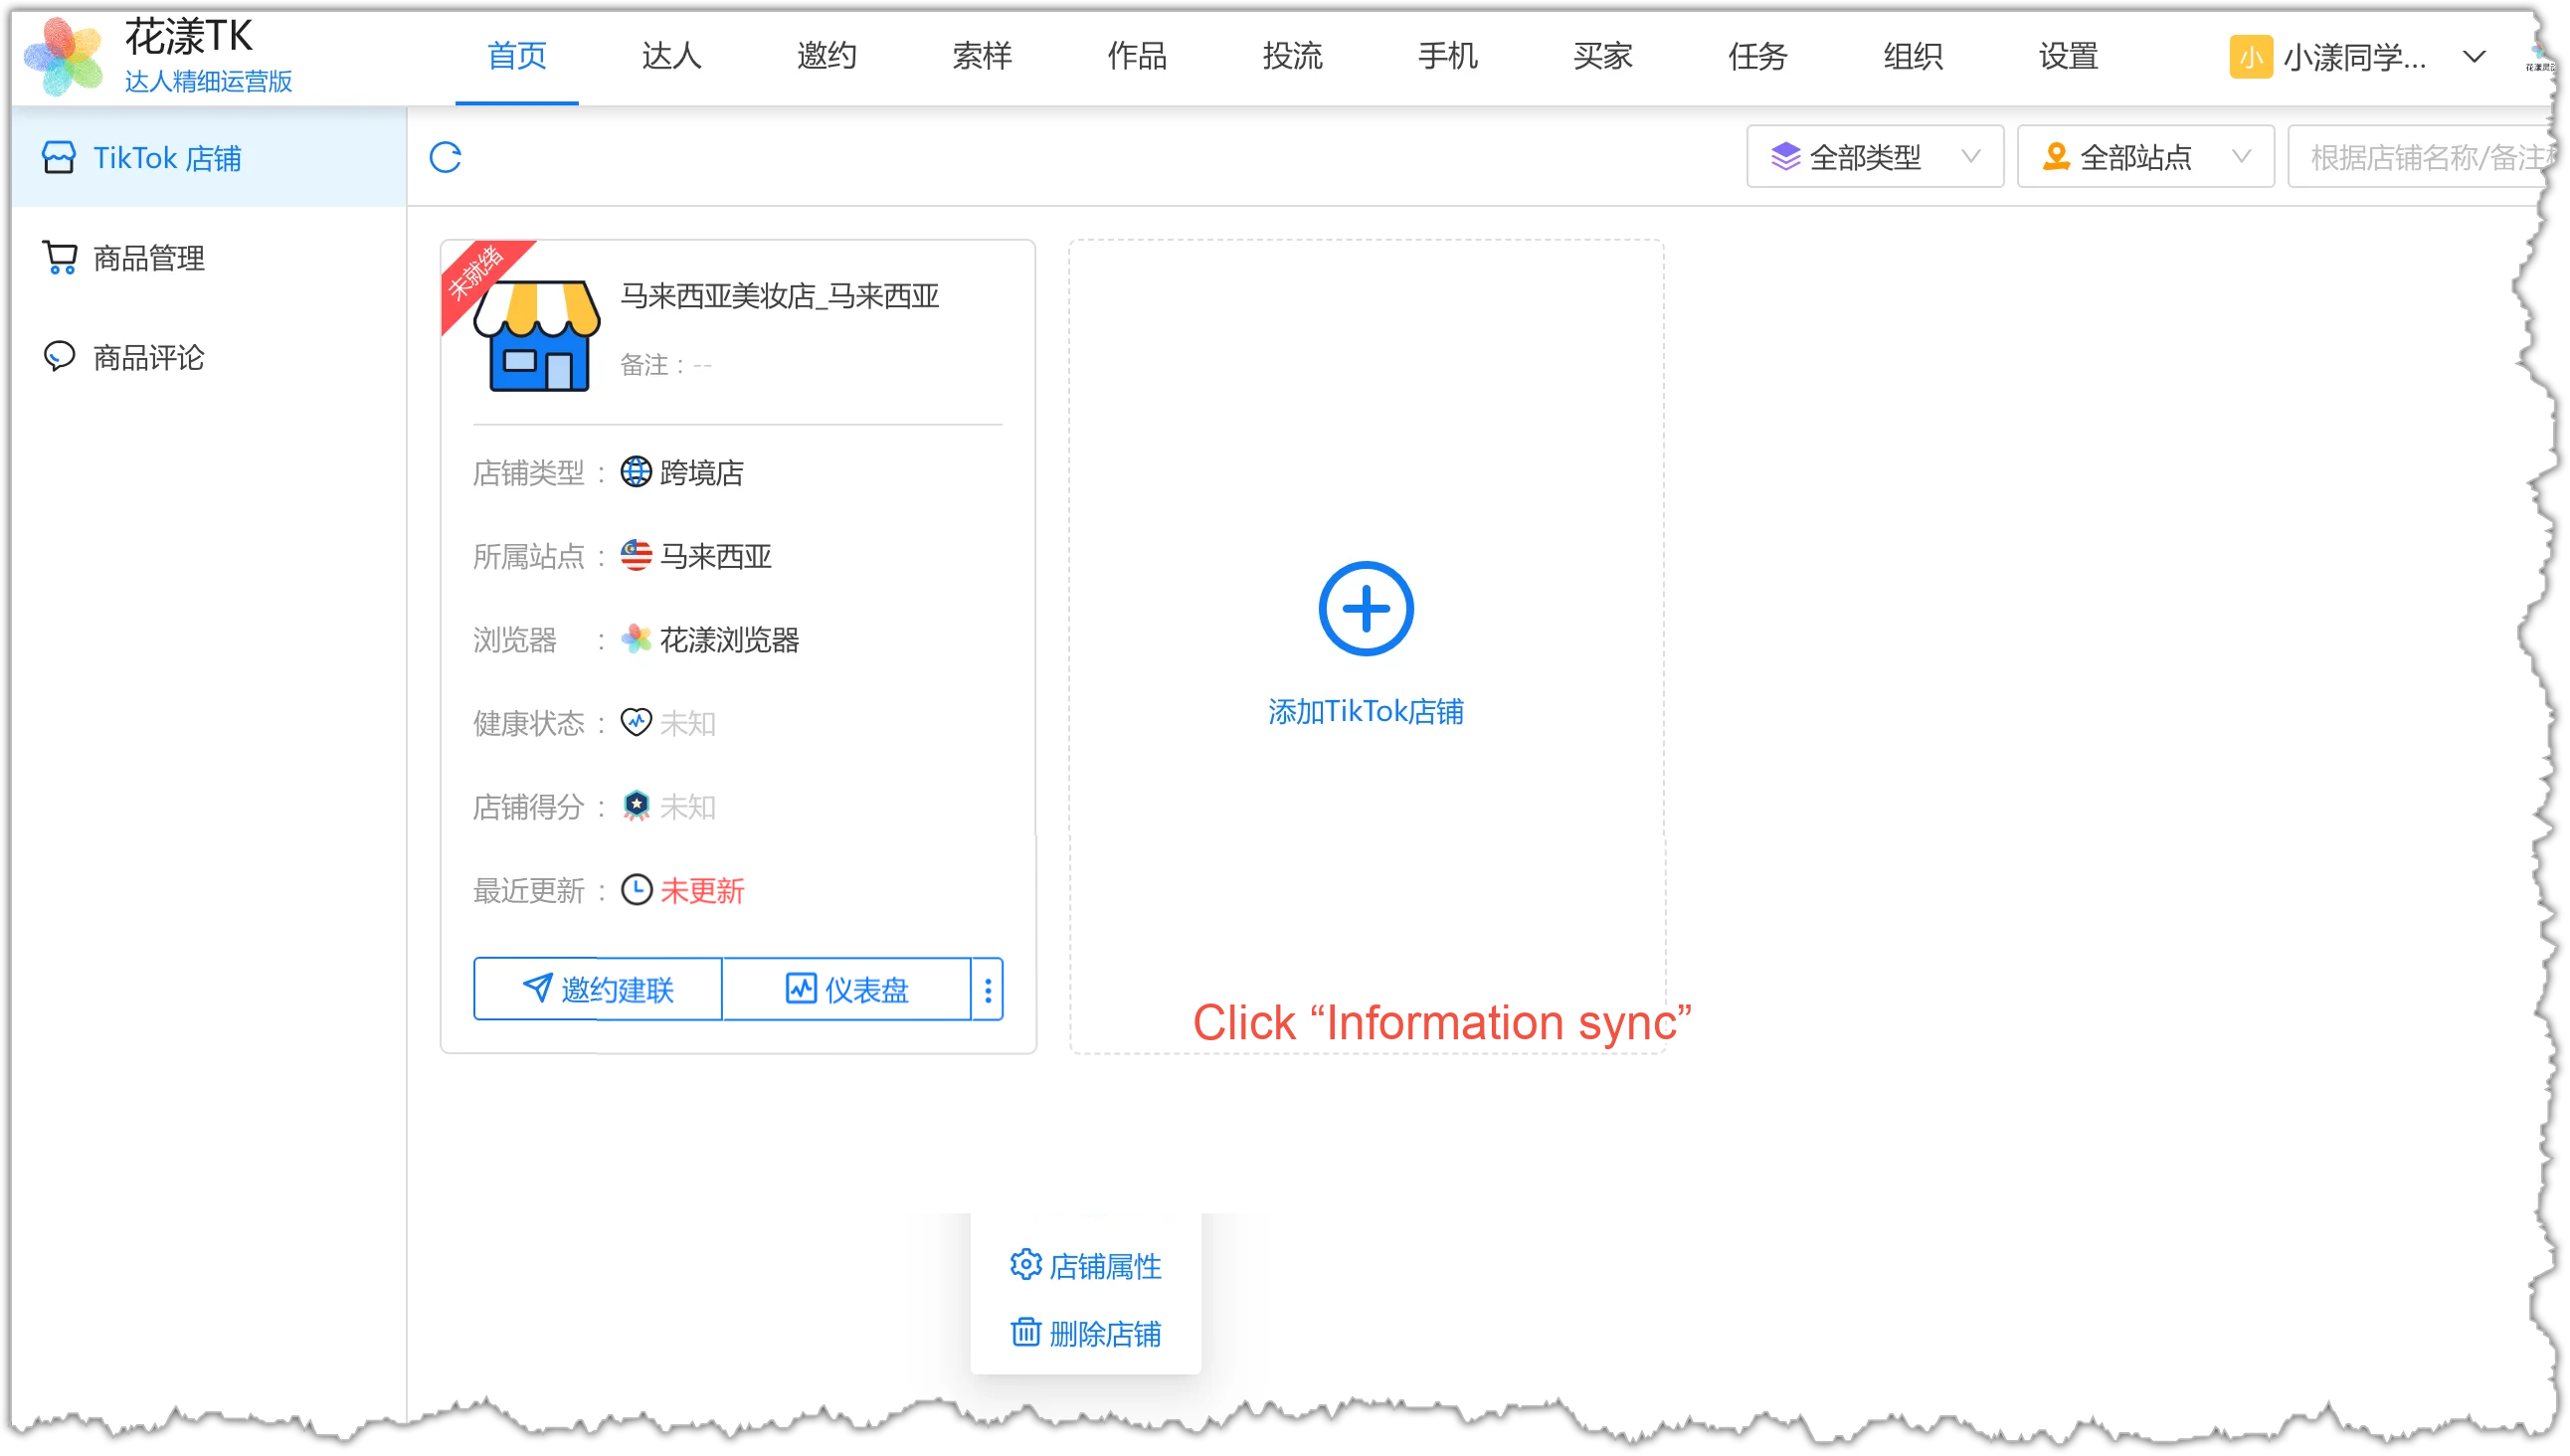
In the HuaYoung TK portal, choose “TikTok Stores” from the left menu, click the “More” dropdown on the store card, then click “Information sync”.Click “Information sync”
Step 2: Choose the synchronization scope
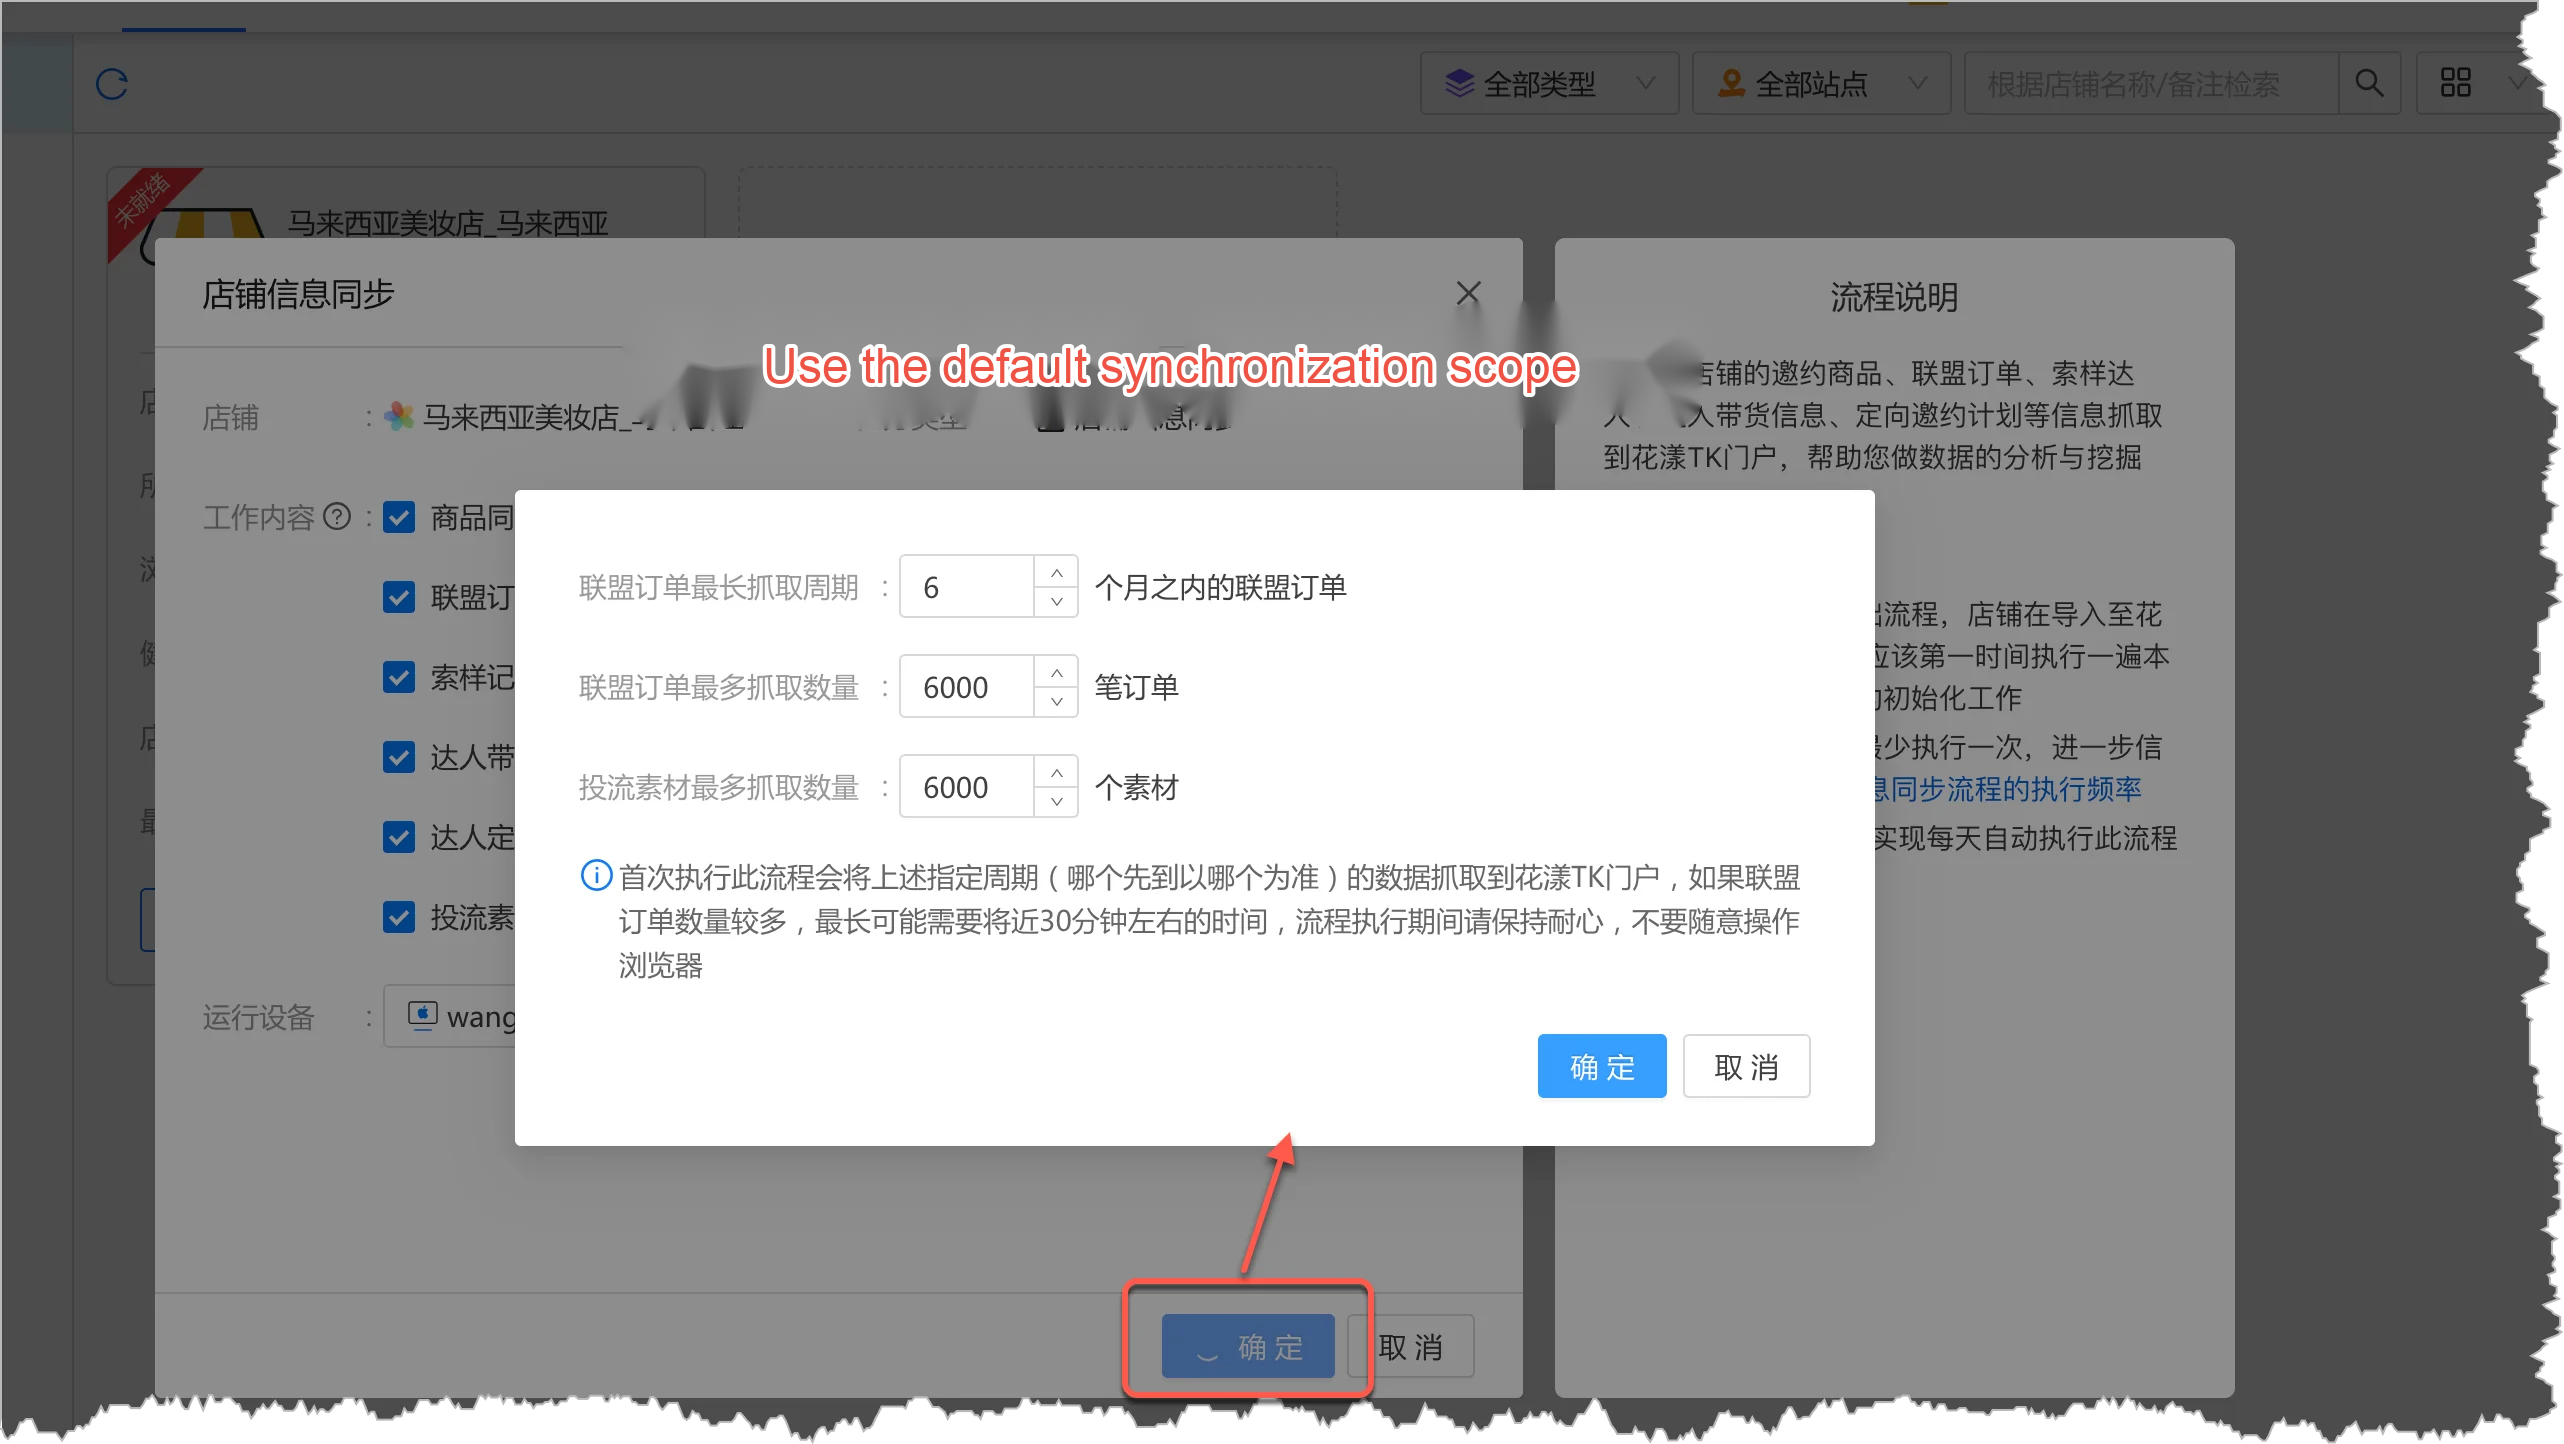
In the dialog that opens, keep the default options and click “OK”.Use the default synchronization scope
Step 3: The system starts scheduling tasks
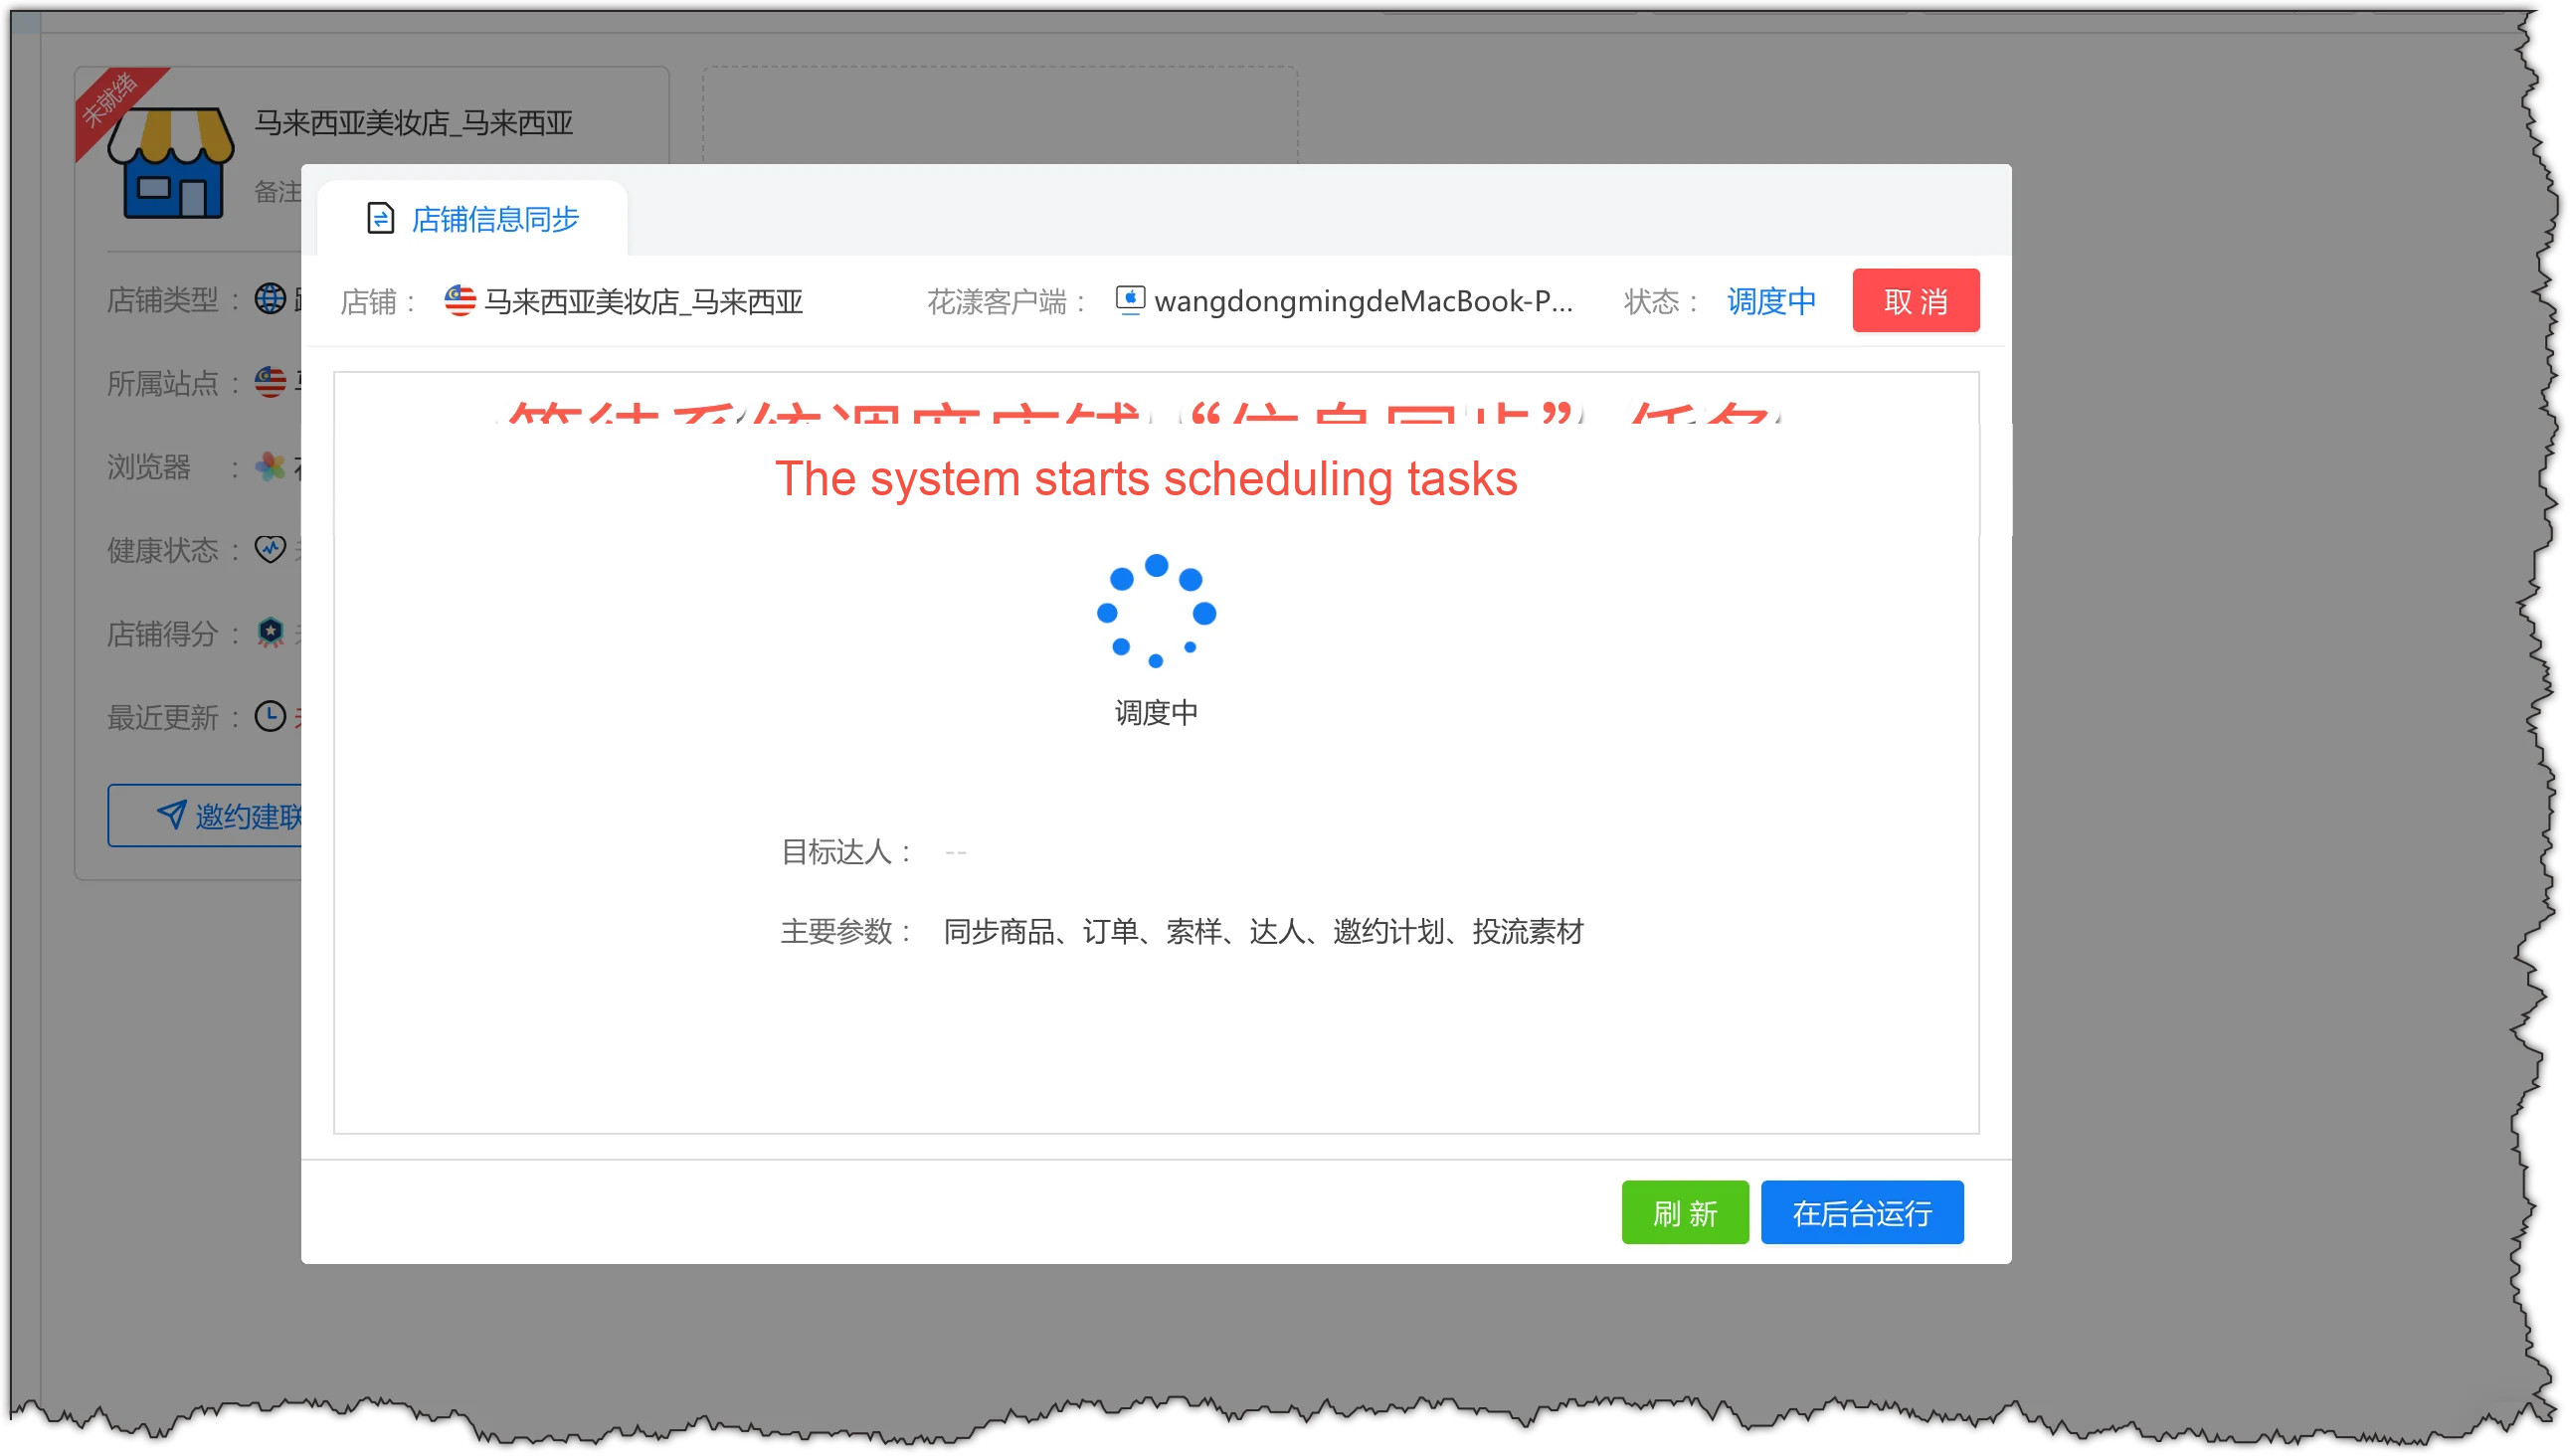
The system schedules the “Information sync” task. No action needed—wait for the system to dispatch it.The system starts scheduling tasks
Step 4: The system starts synchronization
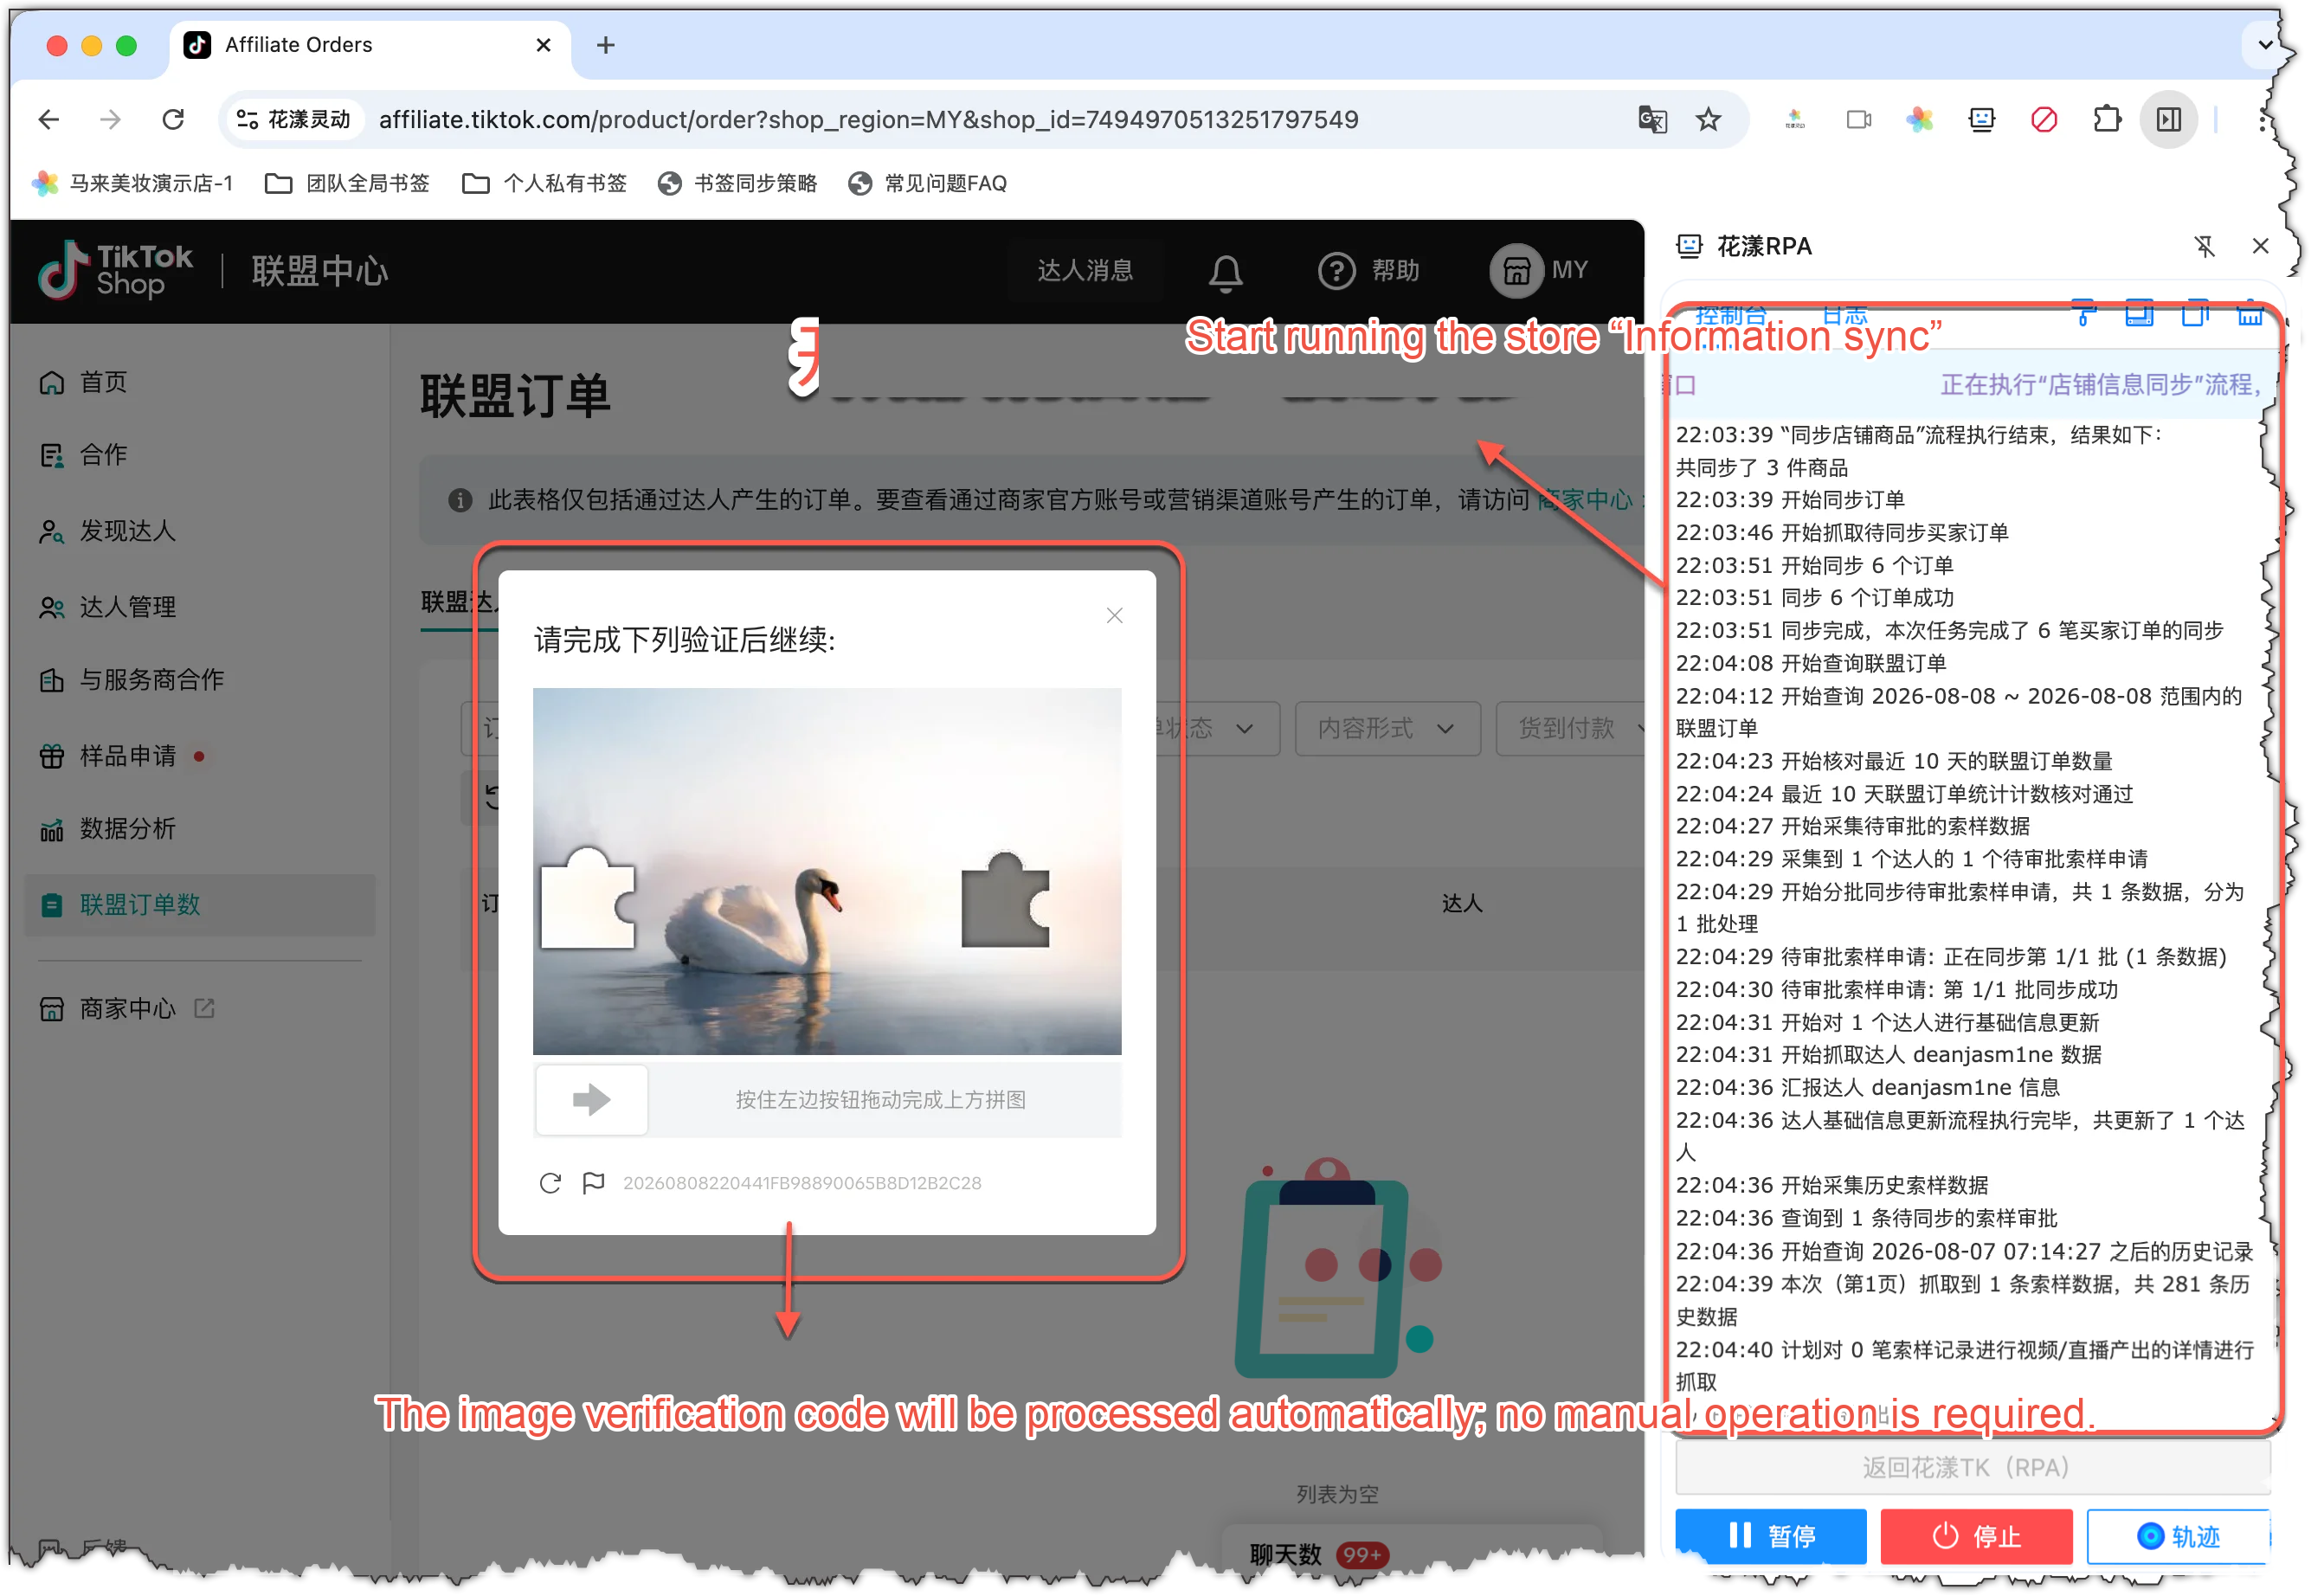
After dispatching, the system automatically opens a browser, accesses the store, and runs the “Store information sync” flow.The system starts synchronization, with auto CAPTCHA pass-throughWhile the flow runs, do not close the browser, open new tabs, or minimize the window. If a CAPTCHA appears, the system handles it automatically—no manual action needed. Note: The first sync takes 5–60 minutes depending on store size—please be patient. Day-to-day “Store information sync” runs incrementally and is much faster.
Step 5: Store ready
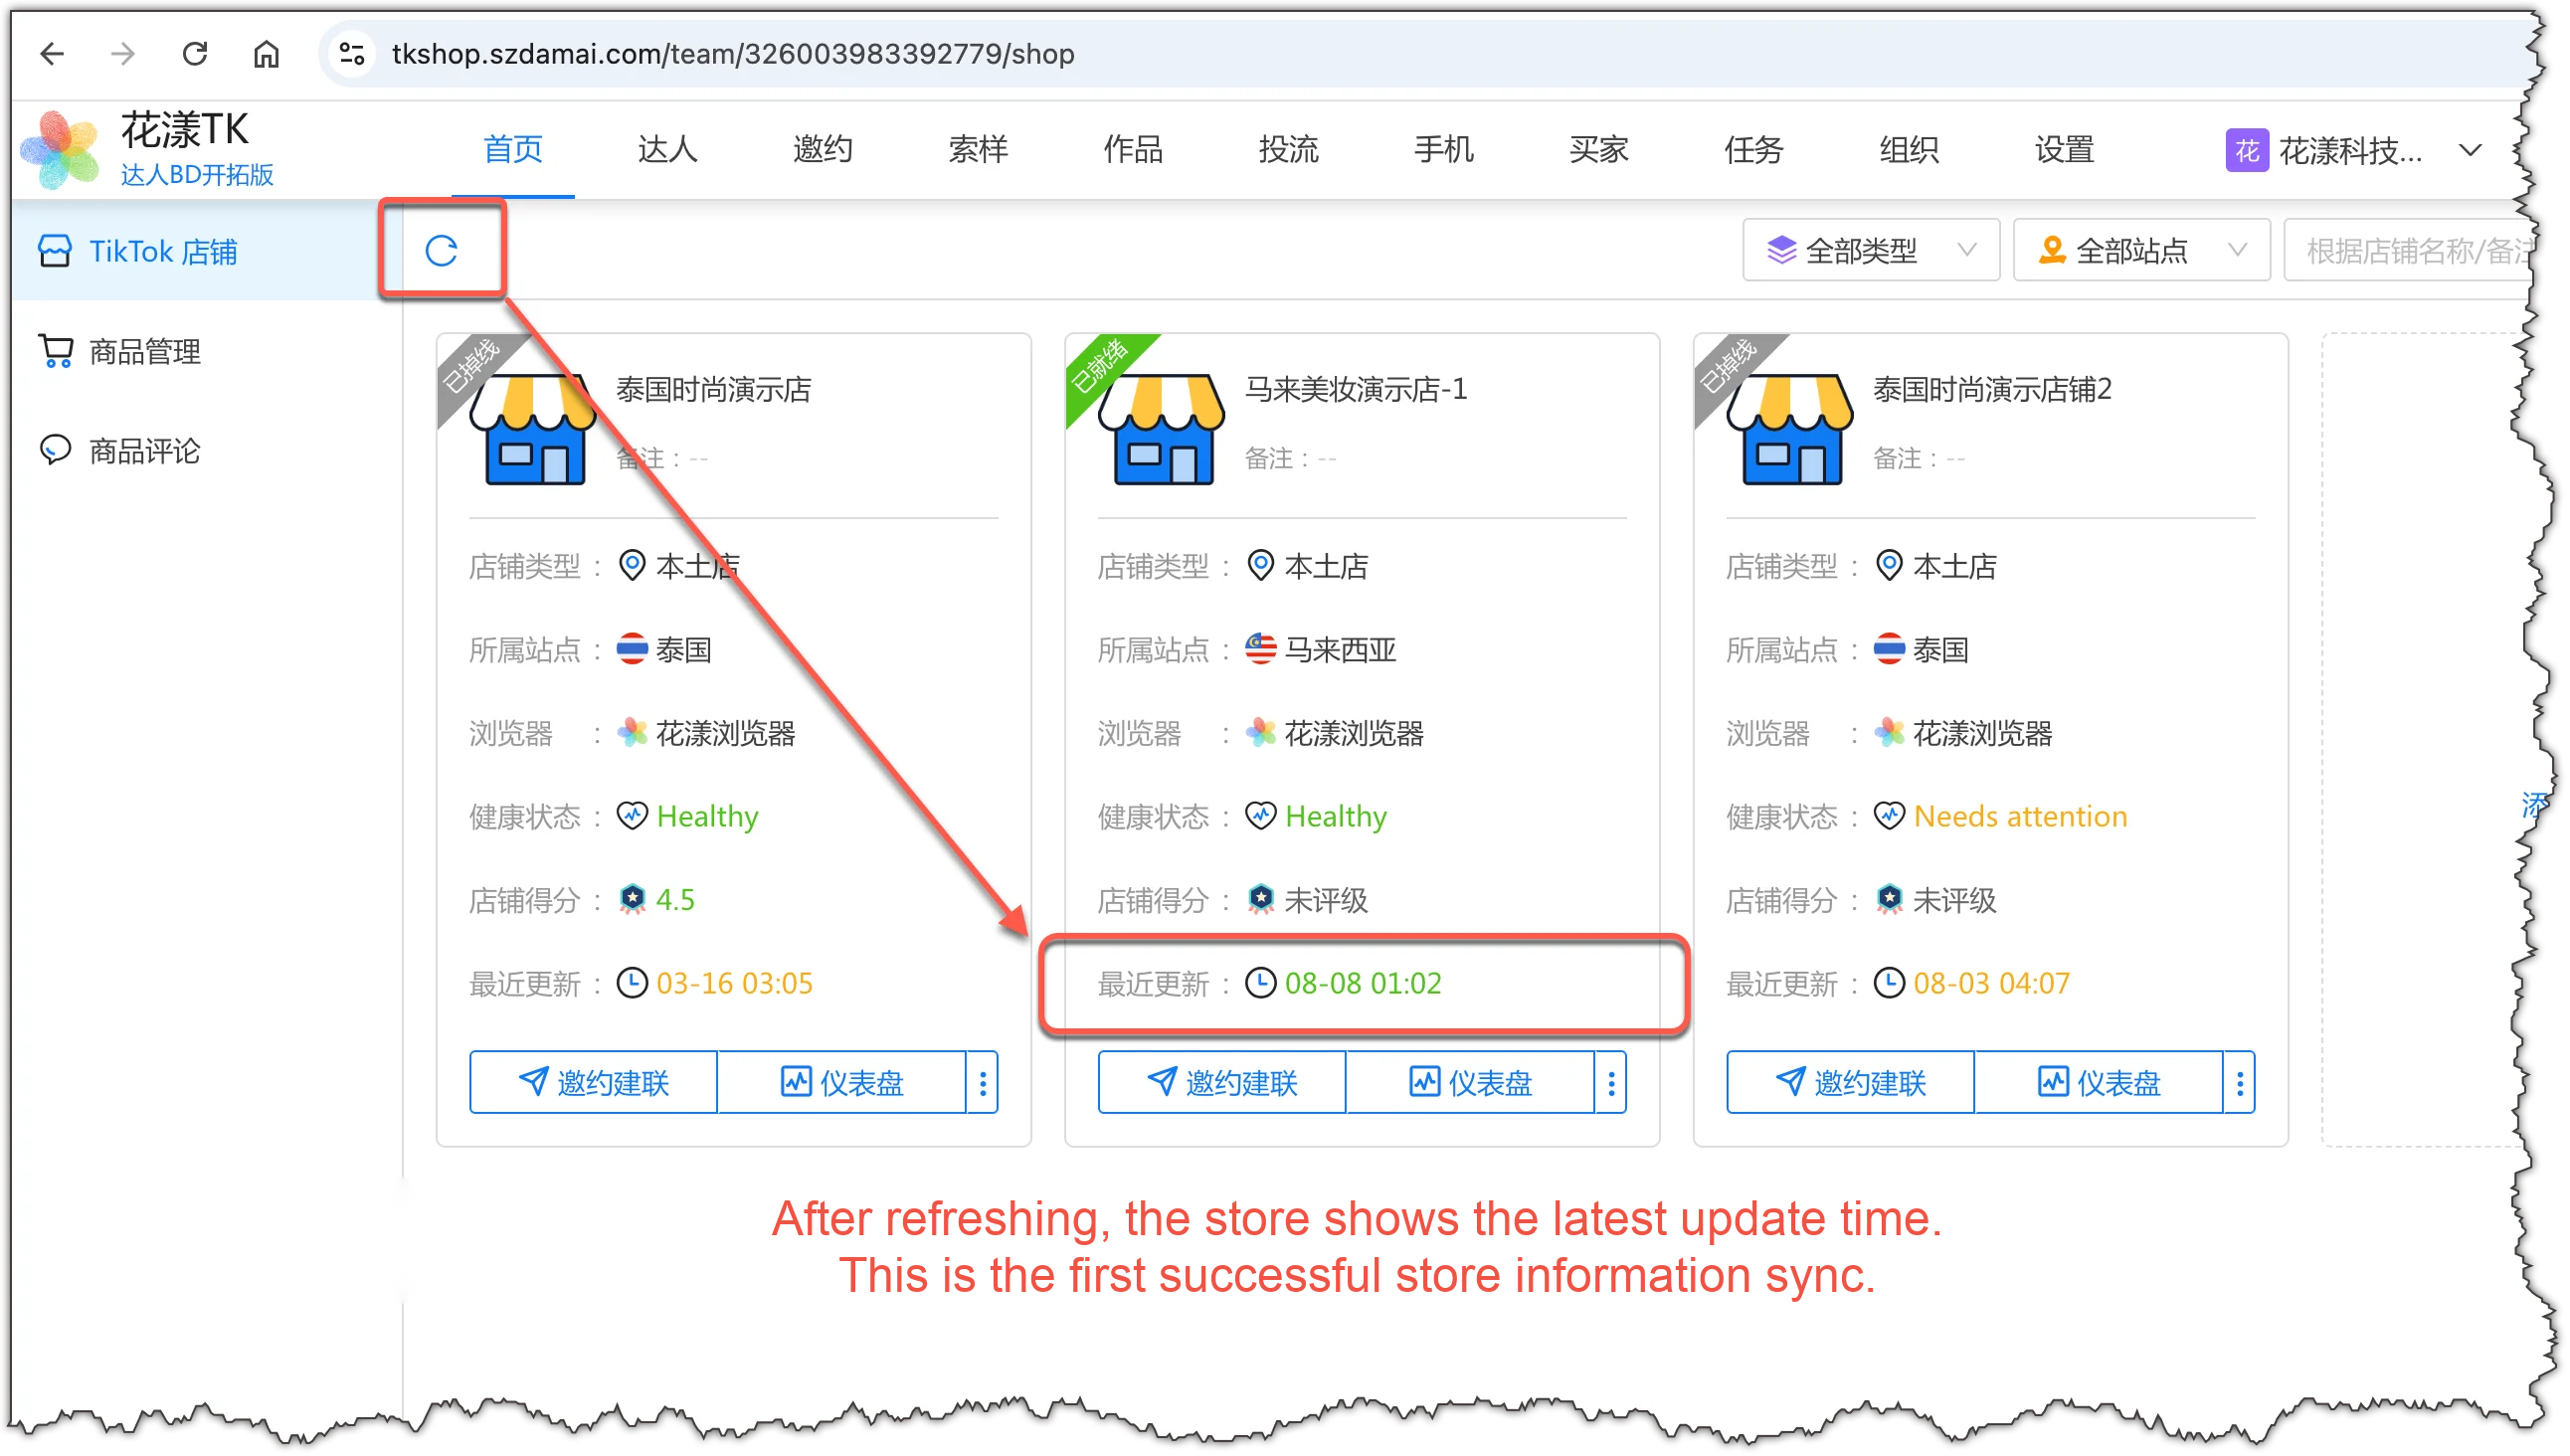
When the sync is done, return to the HuaYoung TK portal (tkshop.szdamai.com) and click “Refresh”. The store card’s “Last updated” field now shows the sync completion time, meaning the sync succeeded and the store is ready.Store readyAt this point you’re ready to run Creator outreach, store messaging, store-data analytics, and any other operations.
4.
Invite team members
If you need other colleagues to join your team to operate the store, follow the steps below to invite them.
Step 1: Send a member invitation
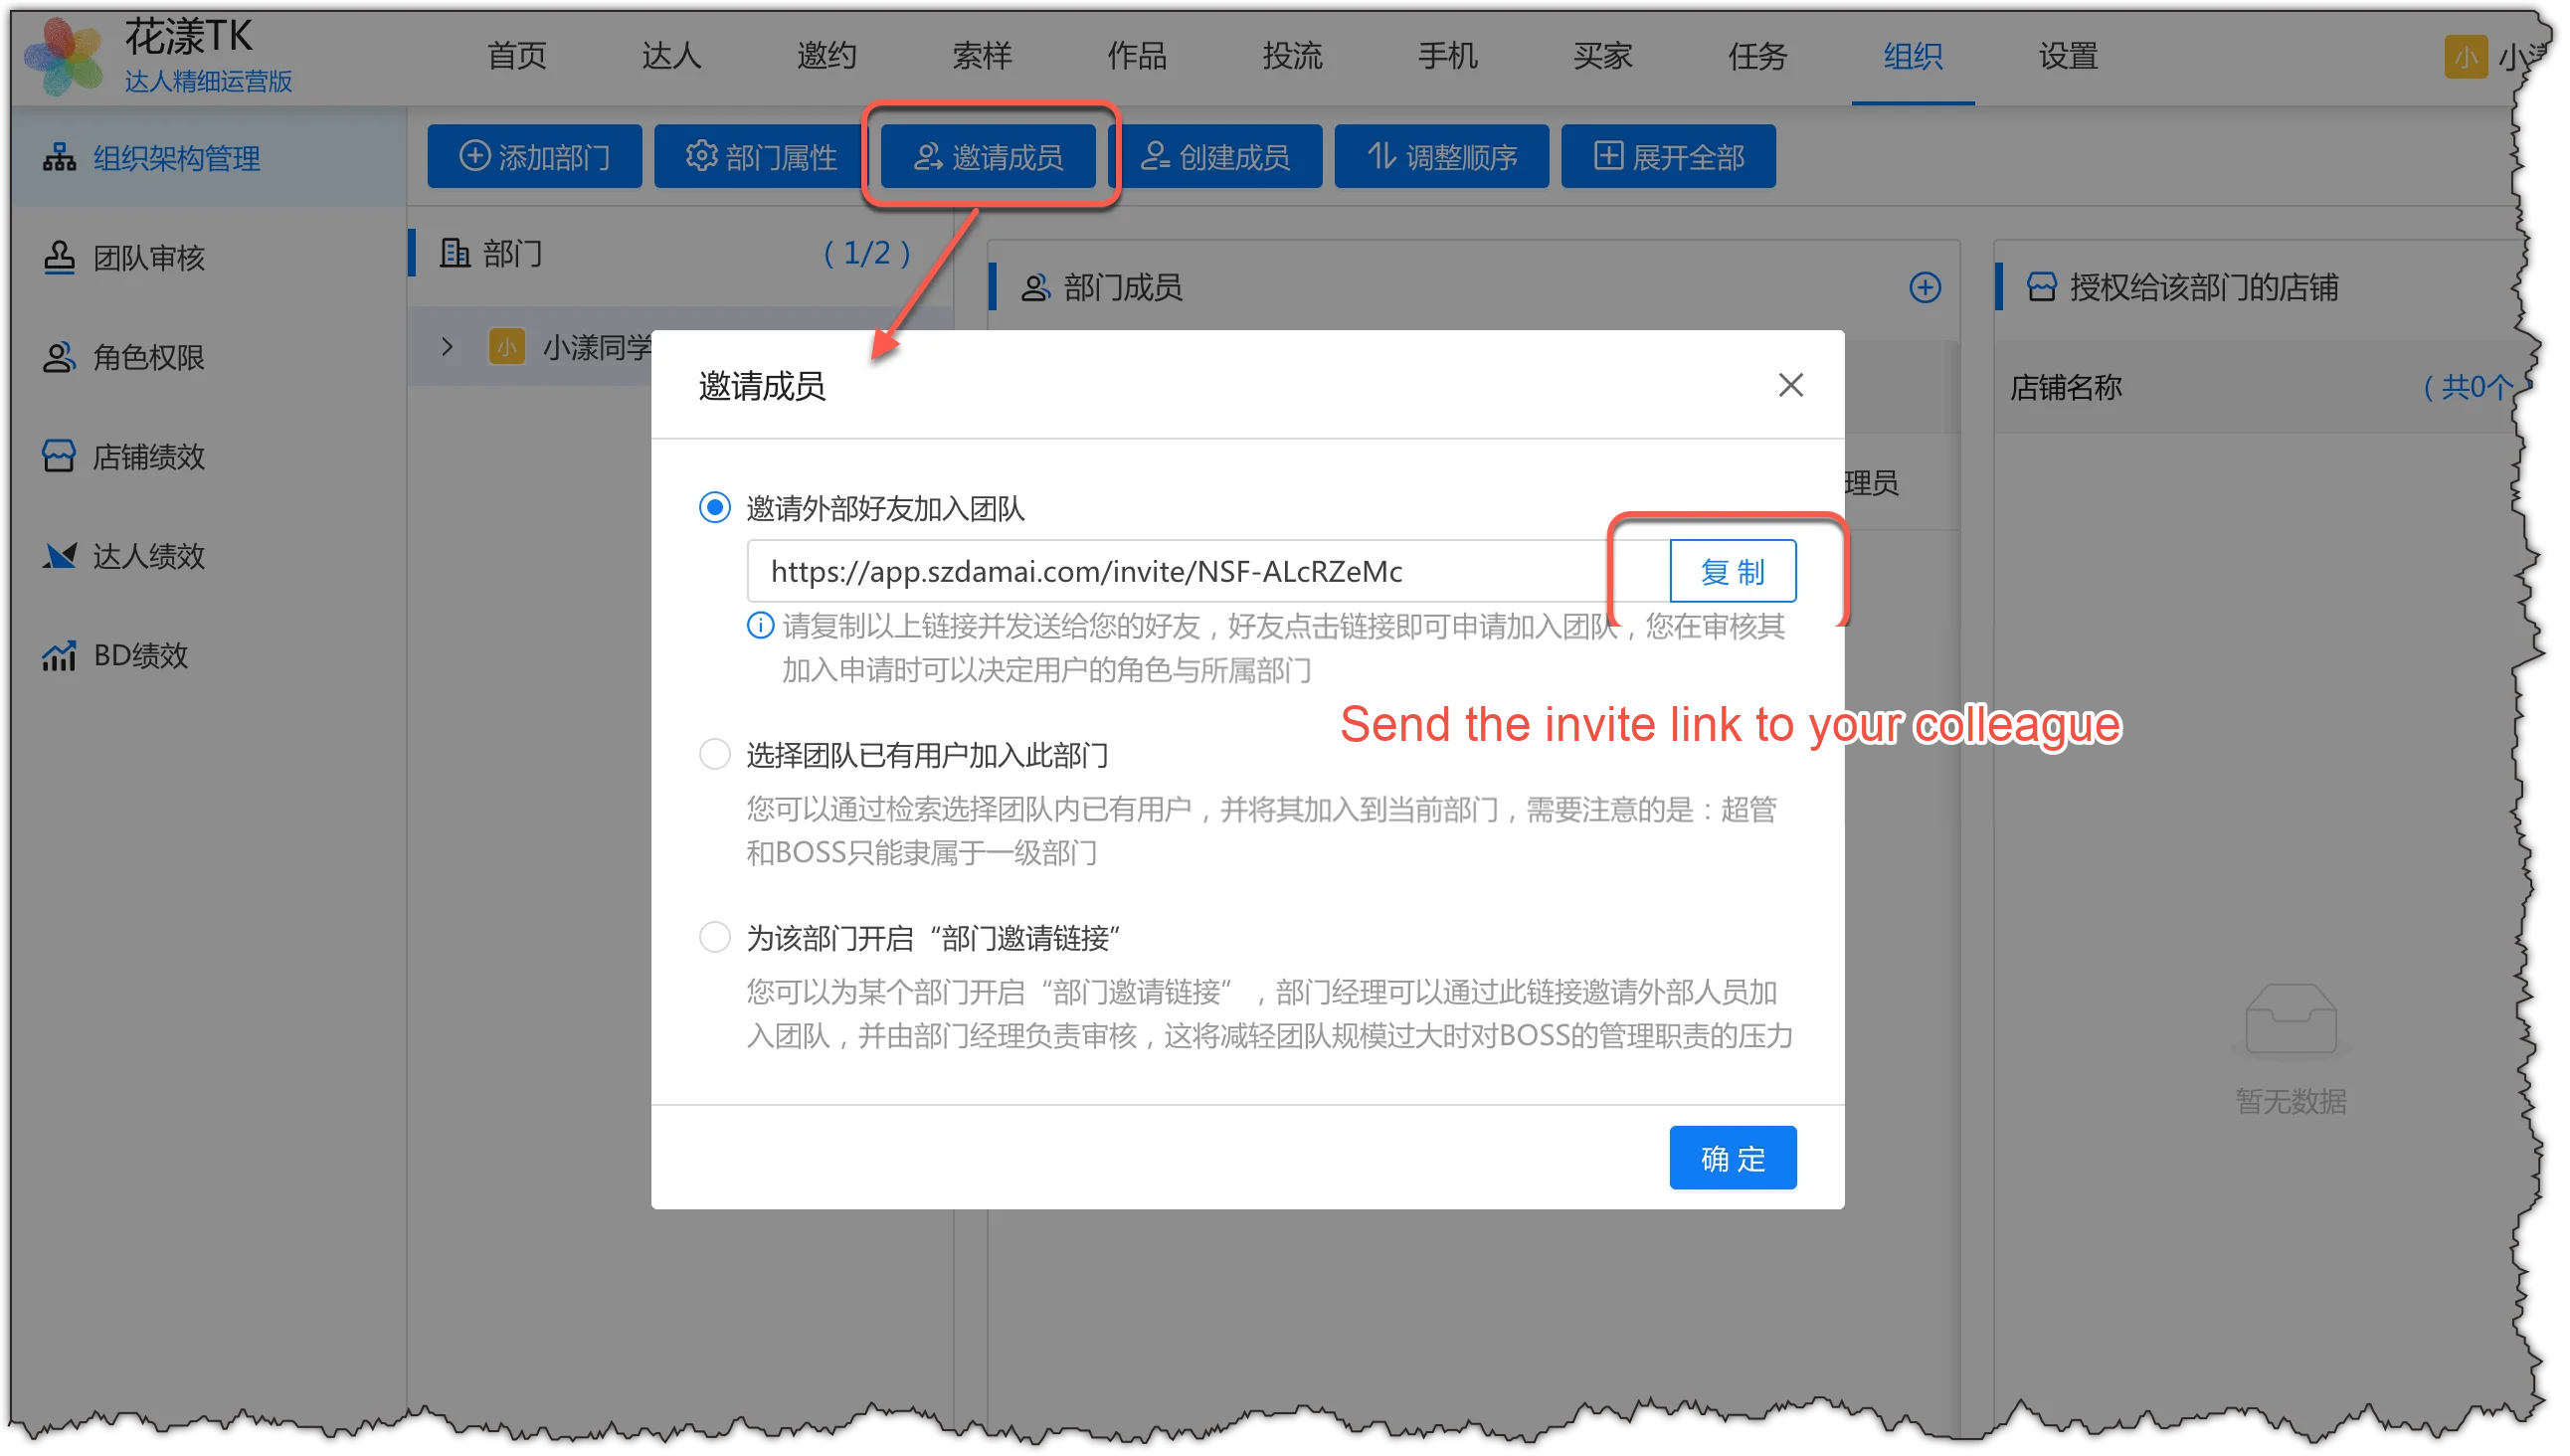
Open the HuaYoung TK portal: go to “Organization” → “Organization management”. Click “Invite member” in the action area. In the dialog, click “Copy”. Send the link to your colleague via Lark, WeChat, DingTalk, or any other IM tool.Send the invite link to your colleague
Step 2: Accept the invitation and join the team
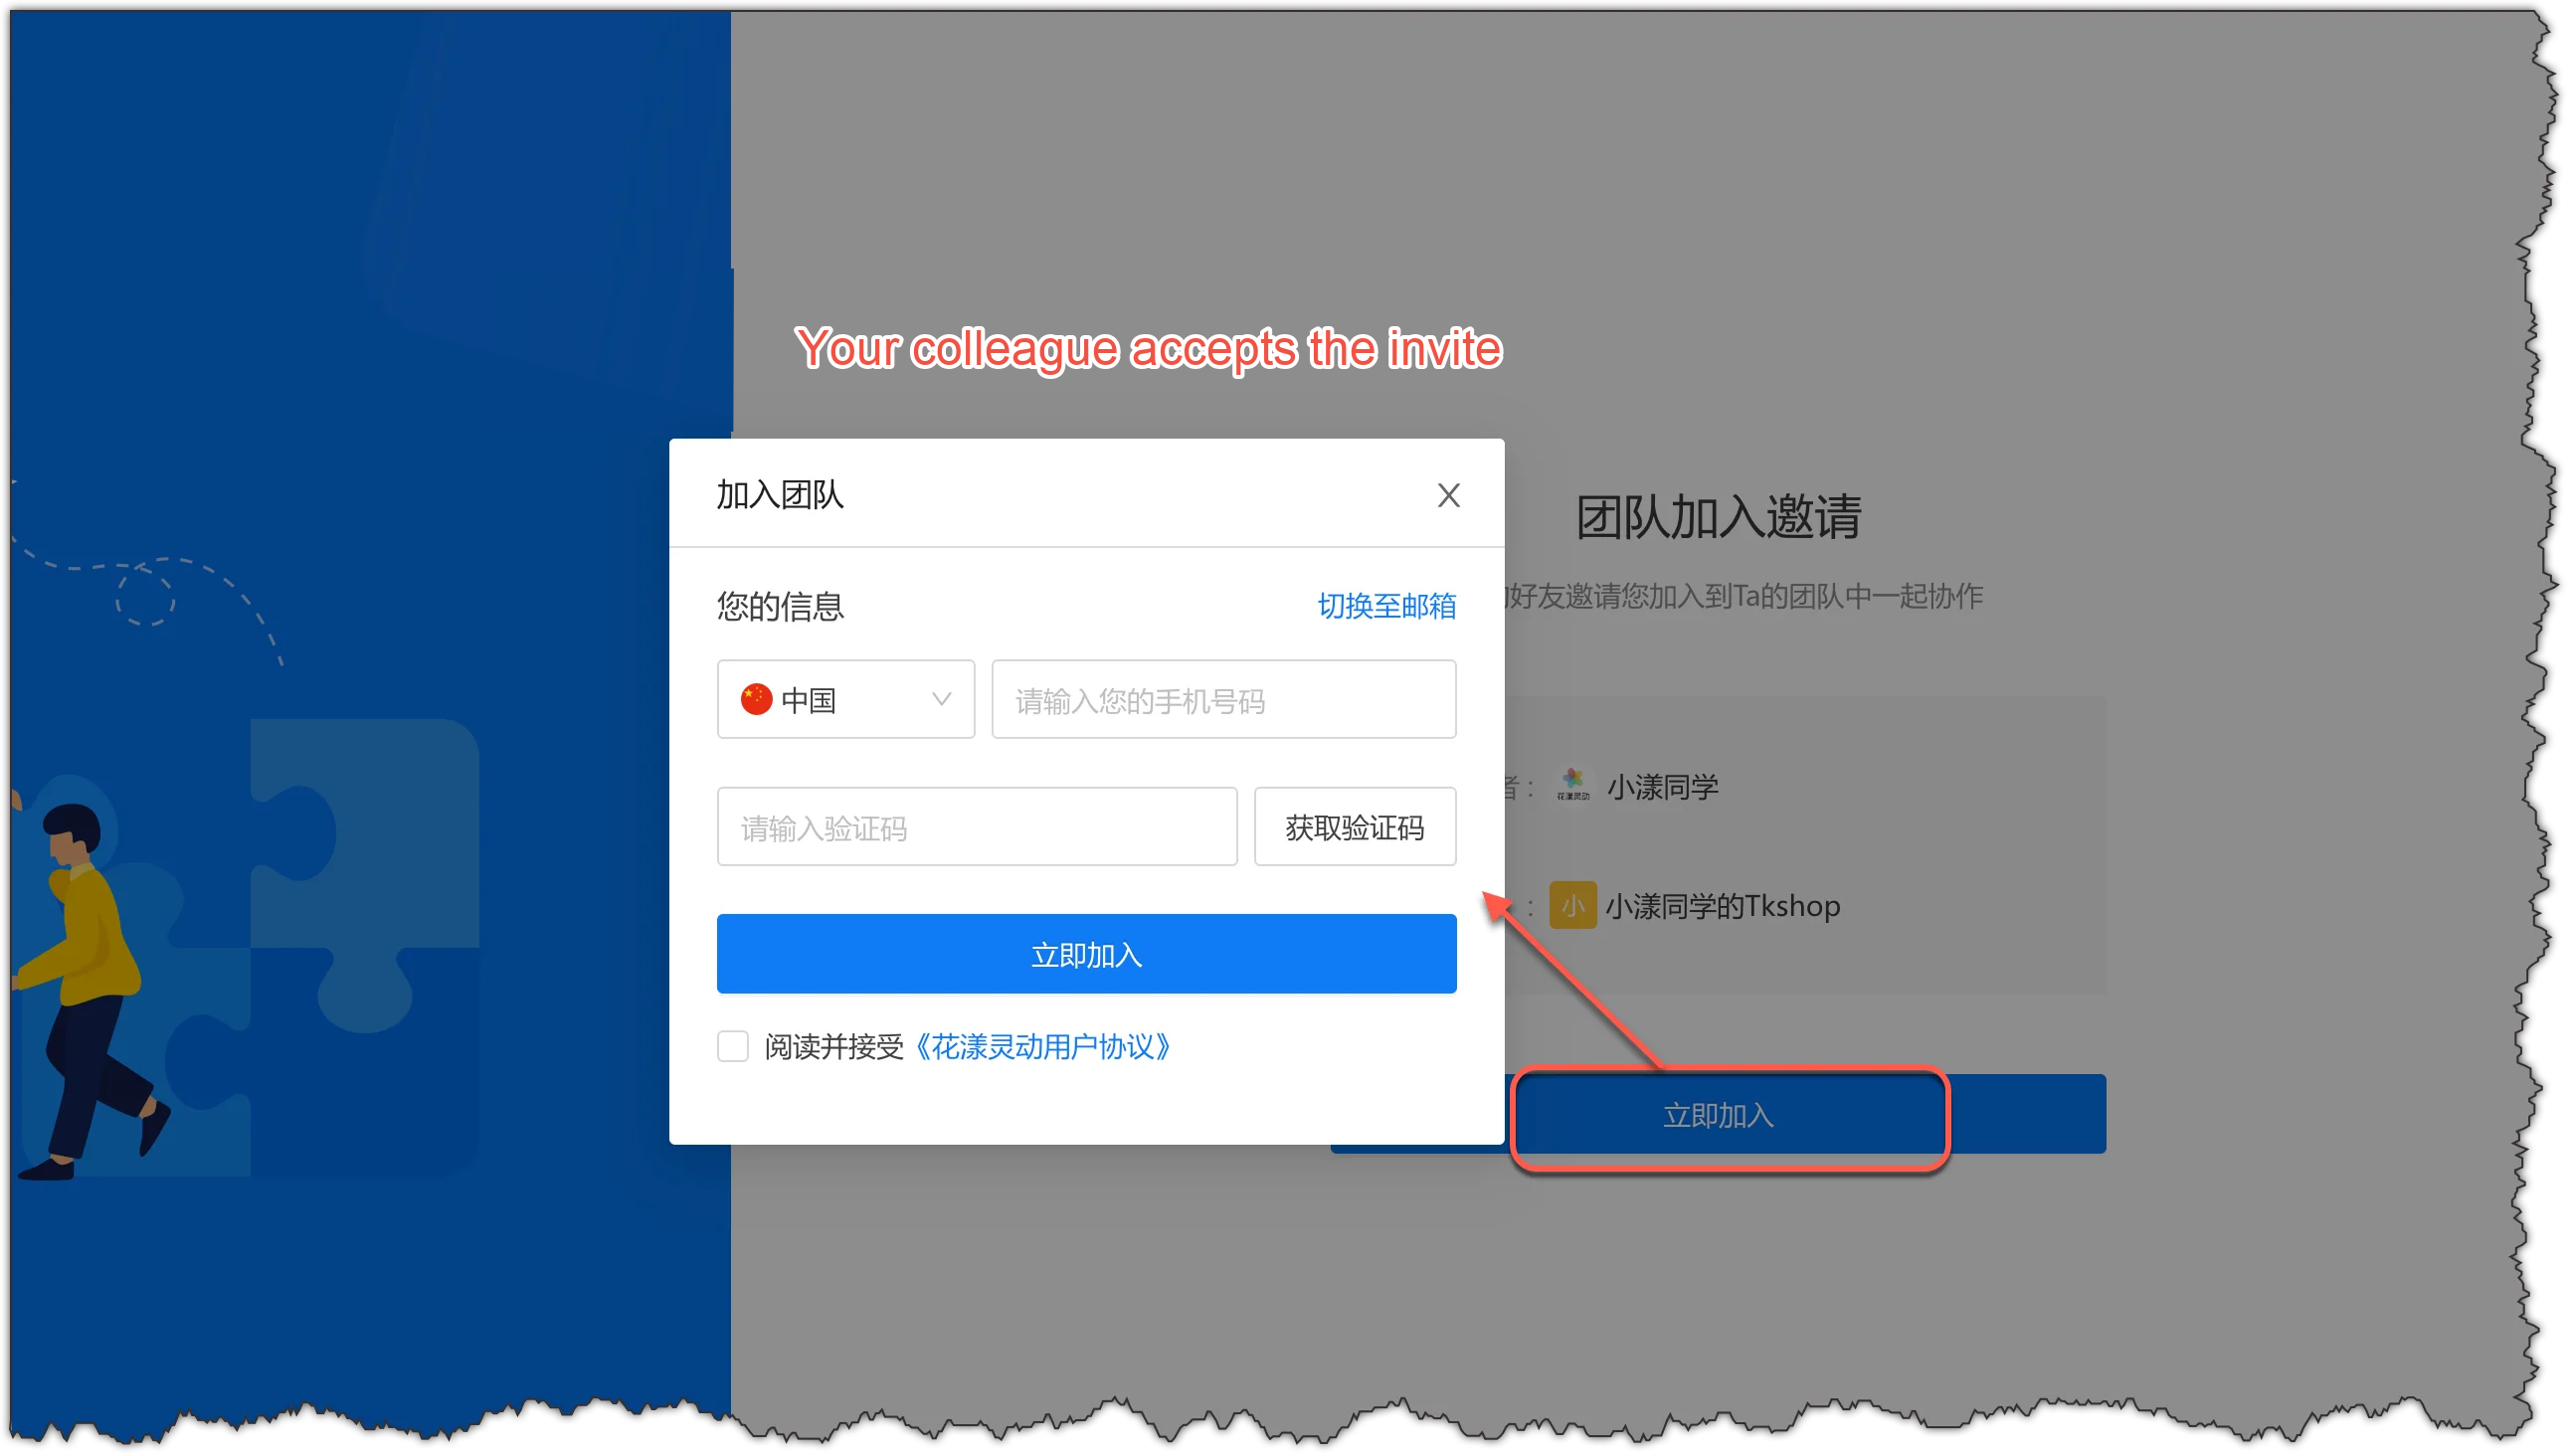
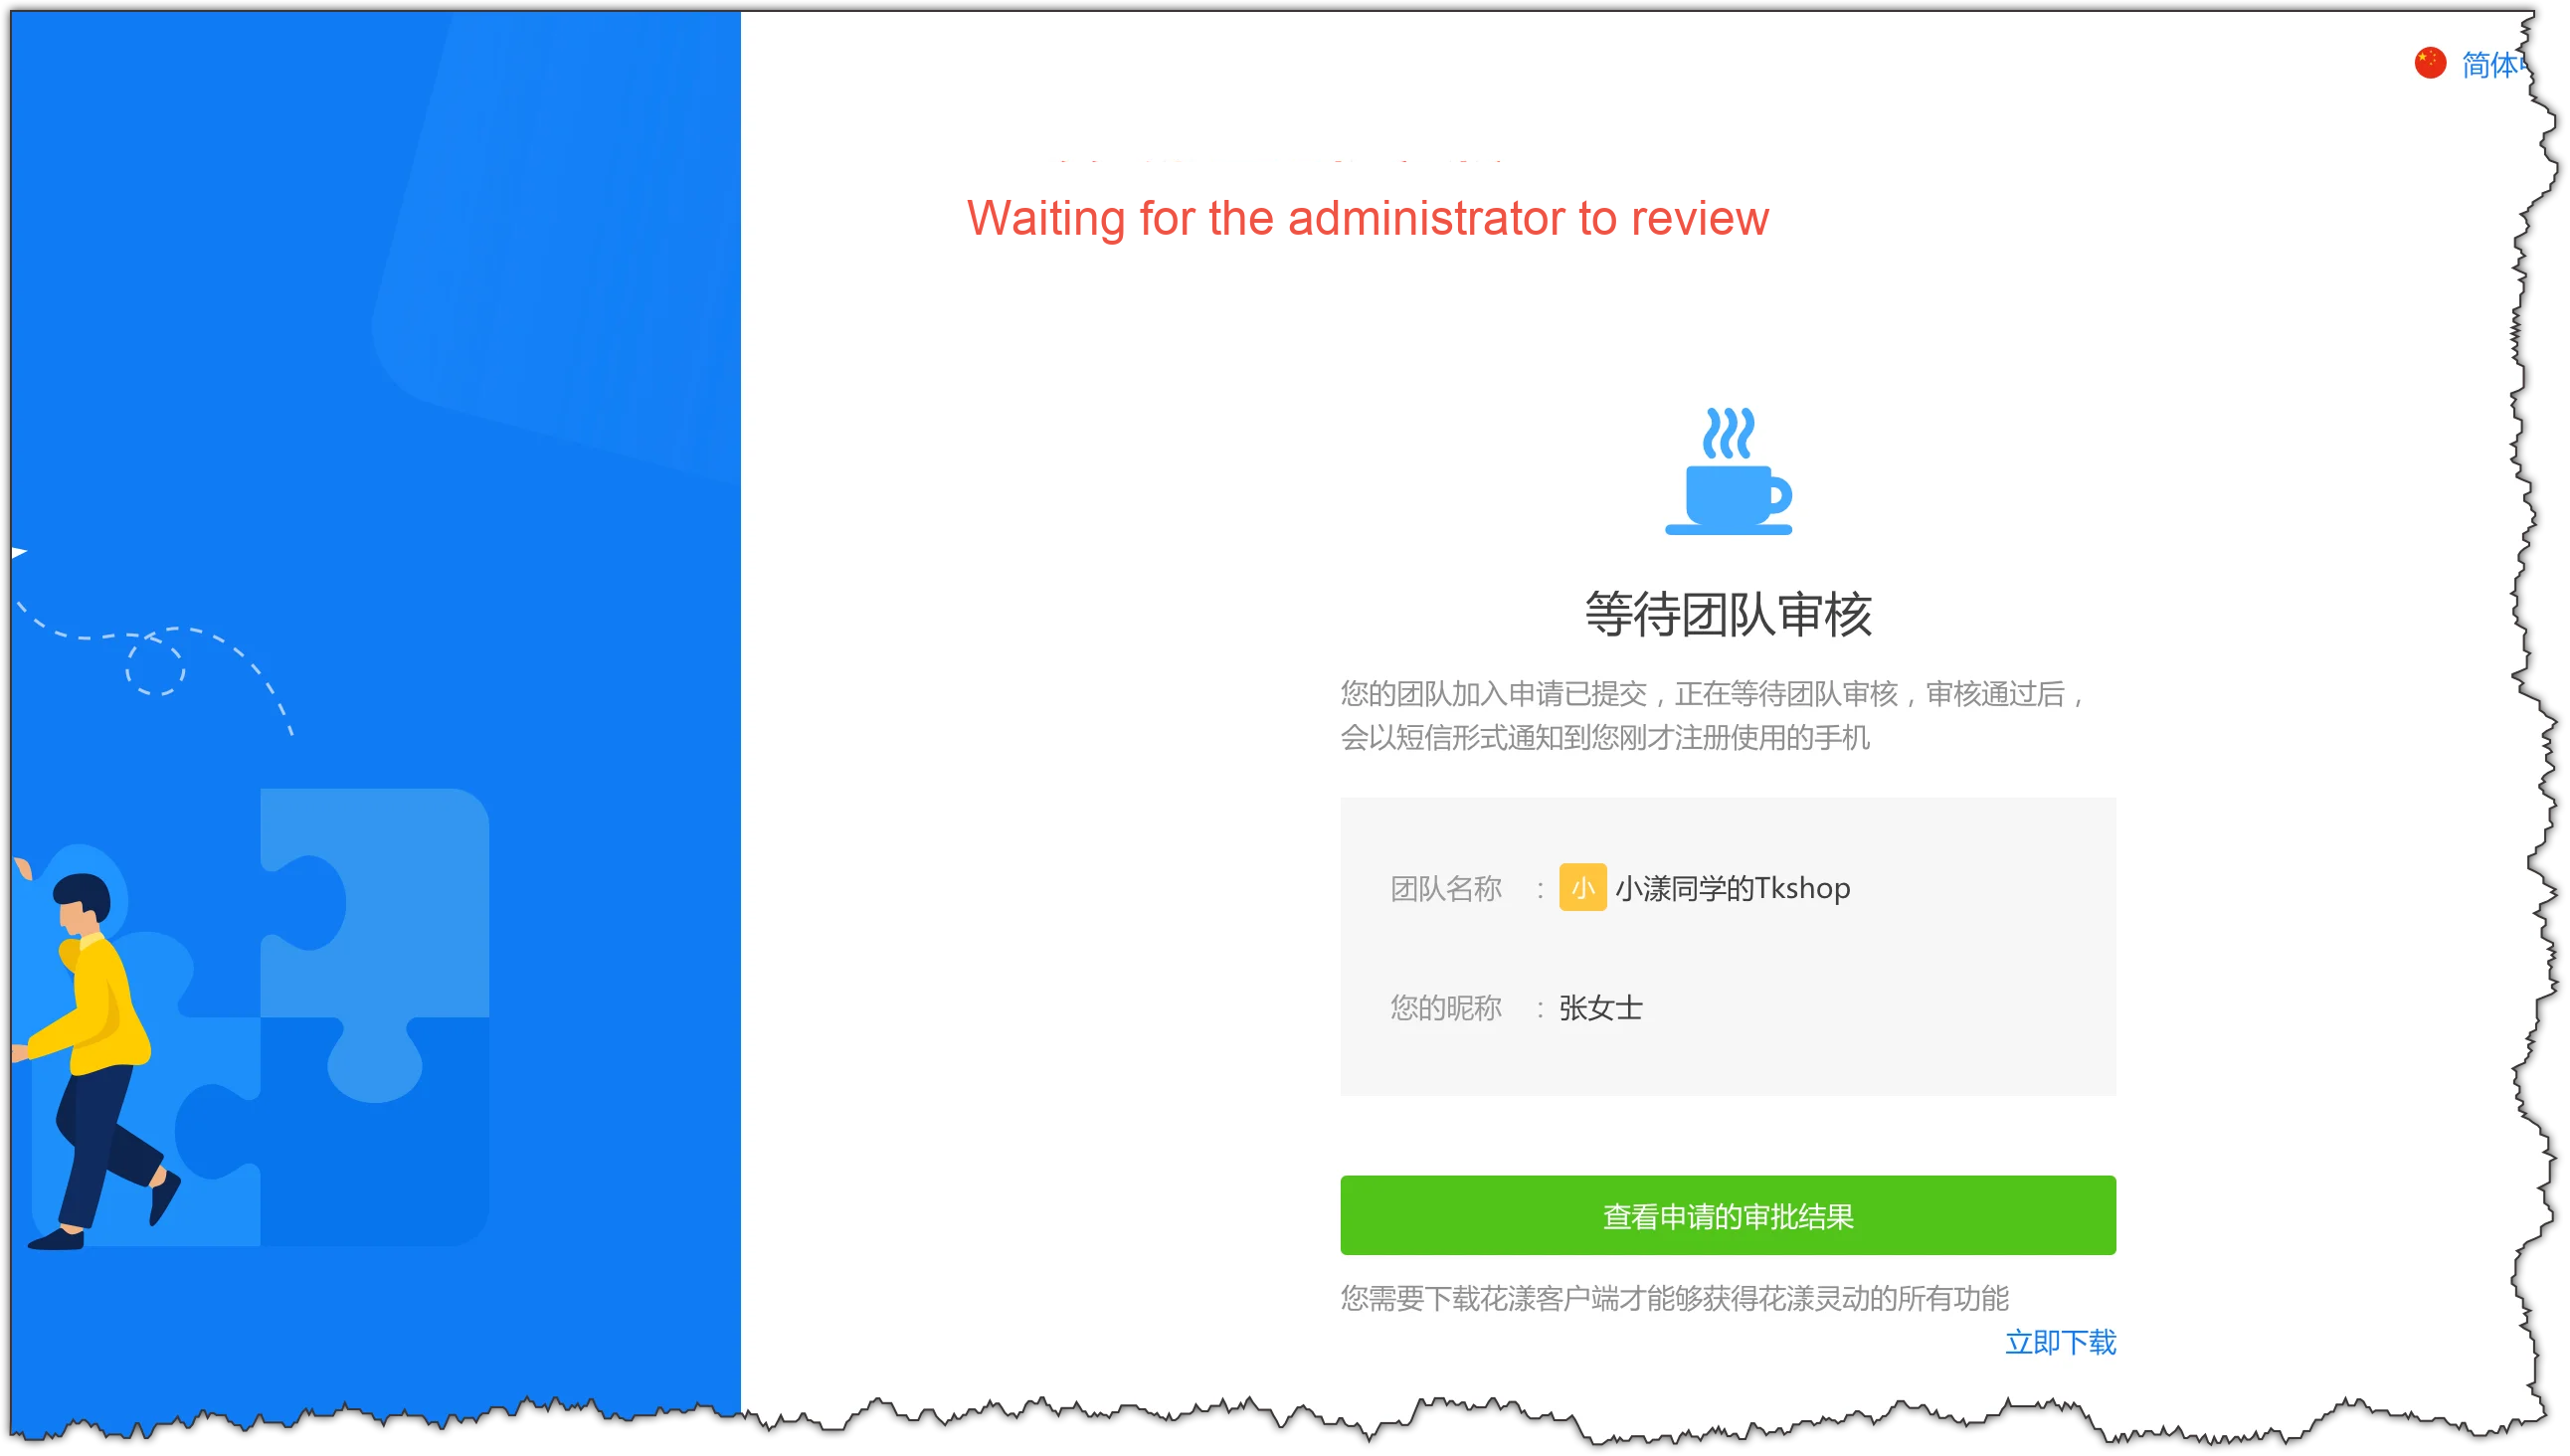
Your colleague clicks the invite link, follows the prompts to enter their account info, and clicks “Join now”. They then wait for the administrator’s review.Your colleague accepts the inviteWaiting for the administrator to review
Step 3: Administrator review
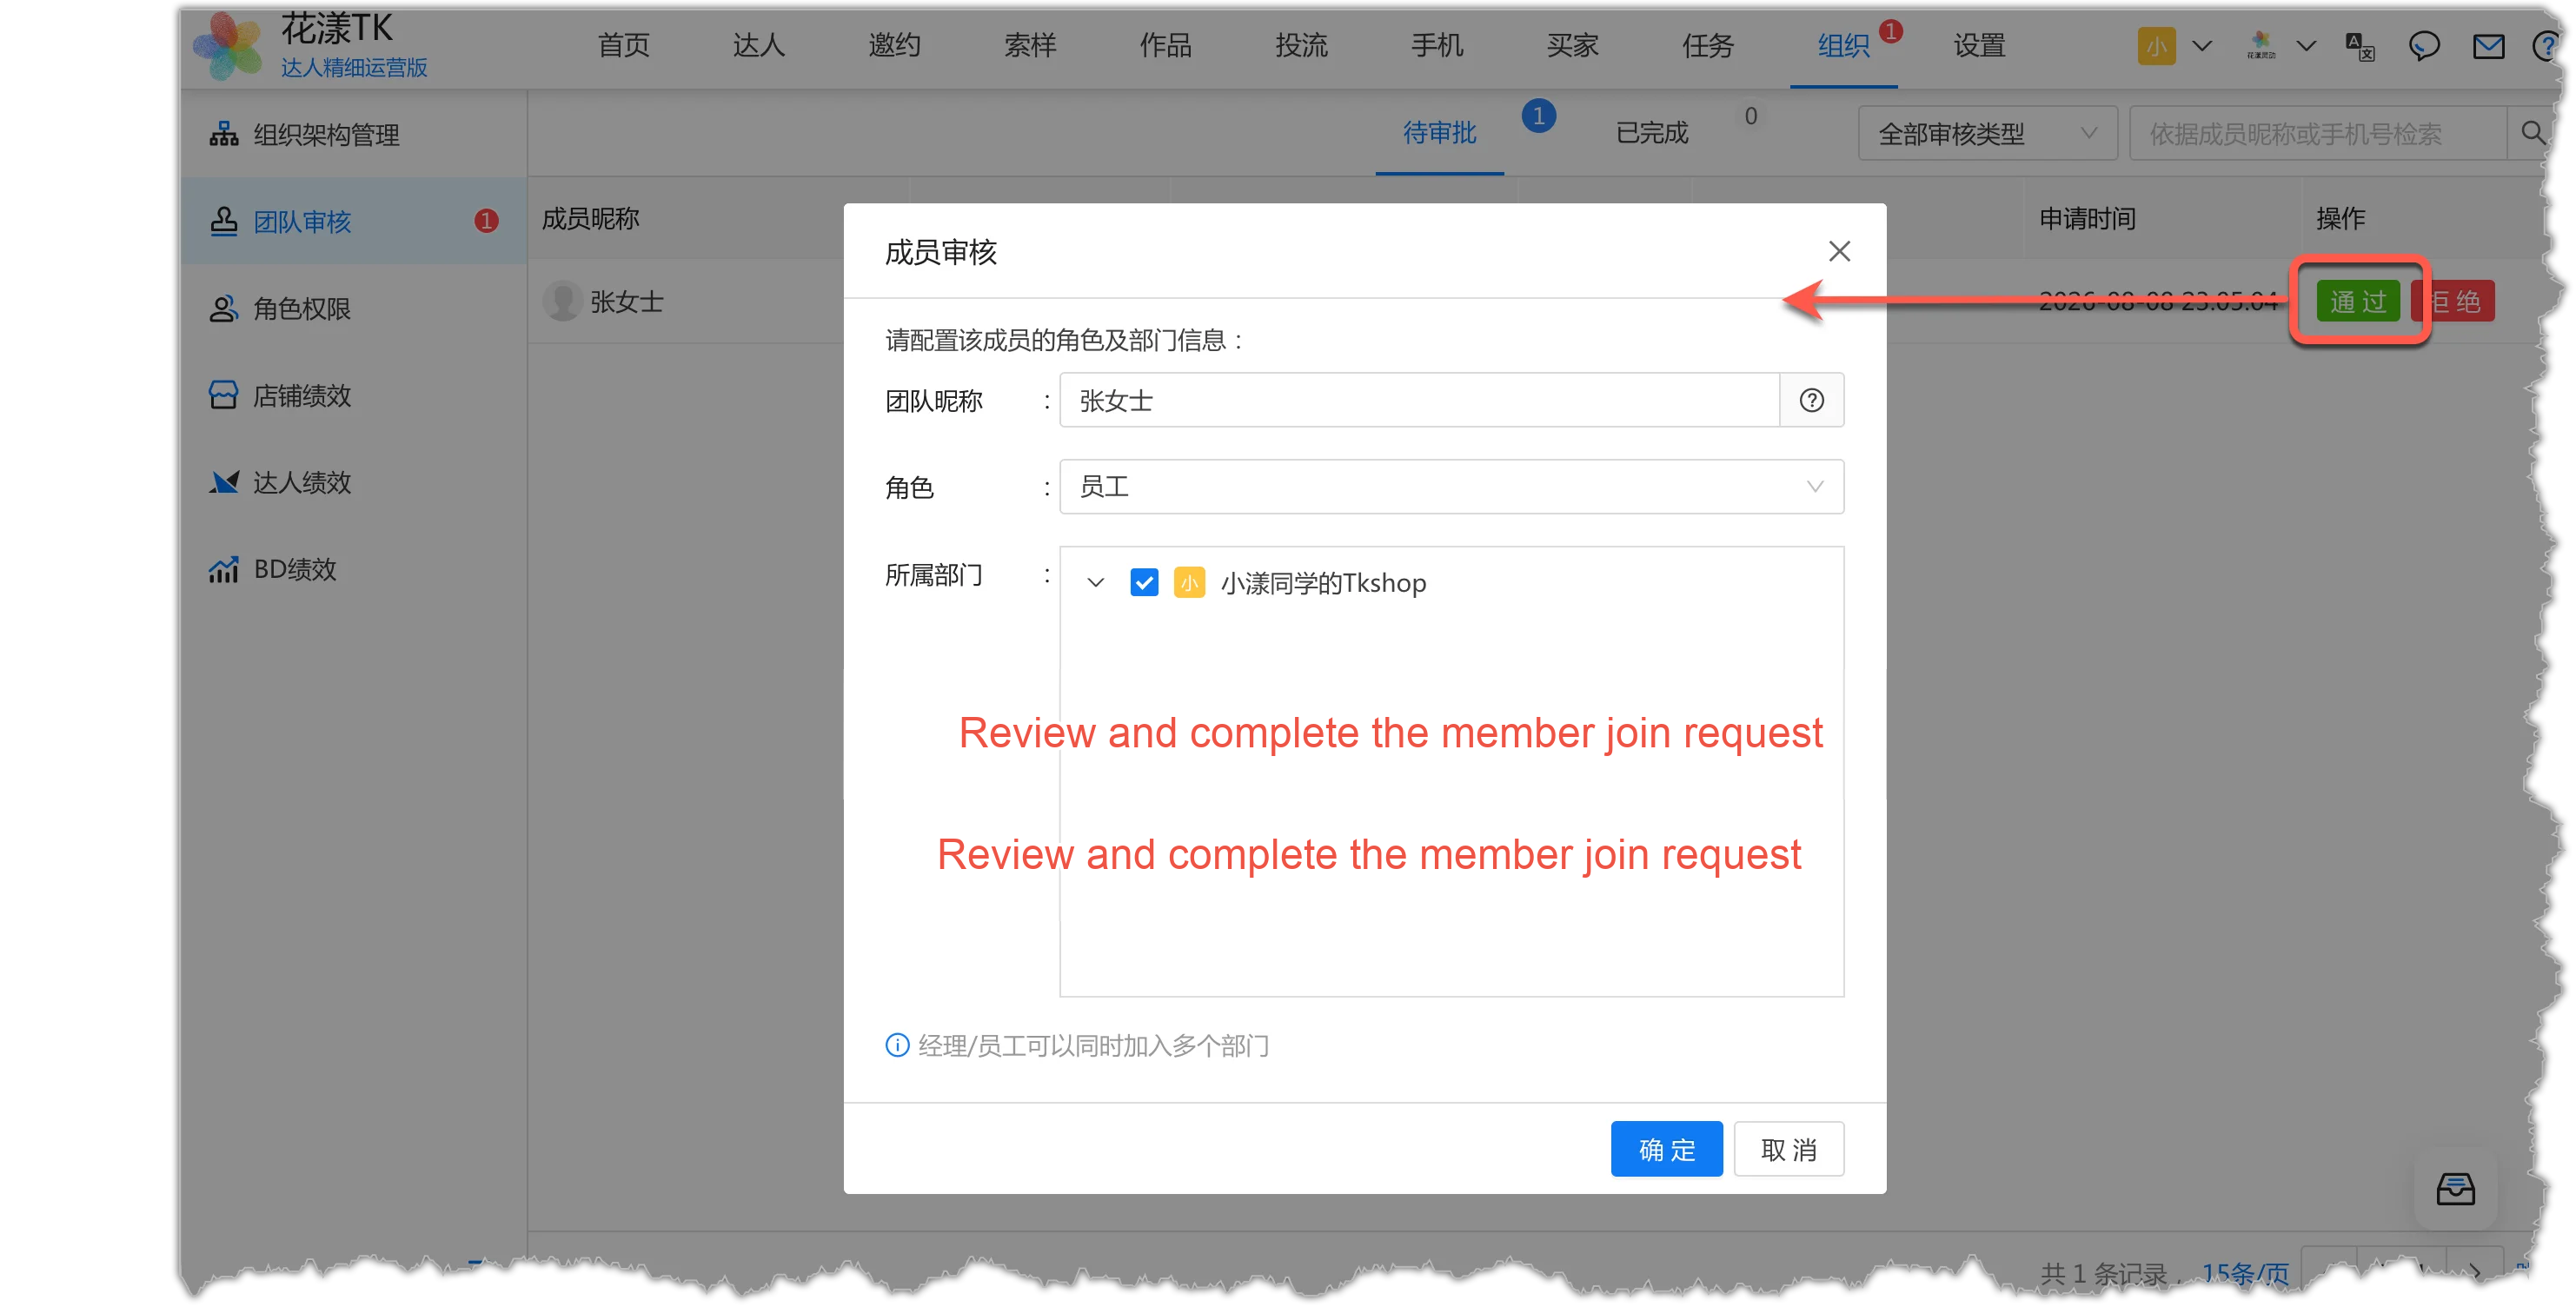
After the member submits a join request, the administrator sees it in the HuaYoung TK portal under “Organization – Team review – Pending”. Click “Approve”. Pick the colleague’s role and click “OK” to add them to the team.Review and complete the member join request
Step 4: Enable employee permissions
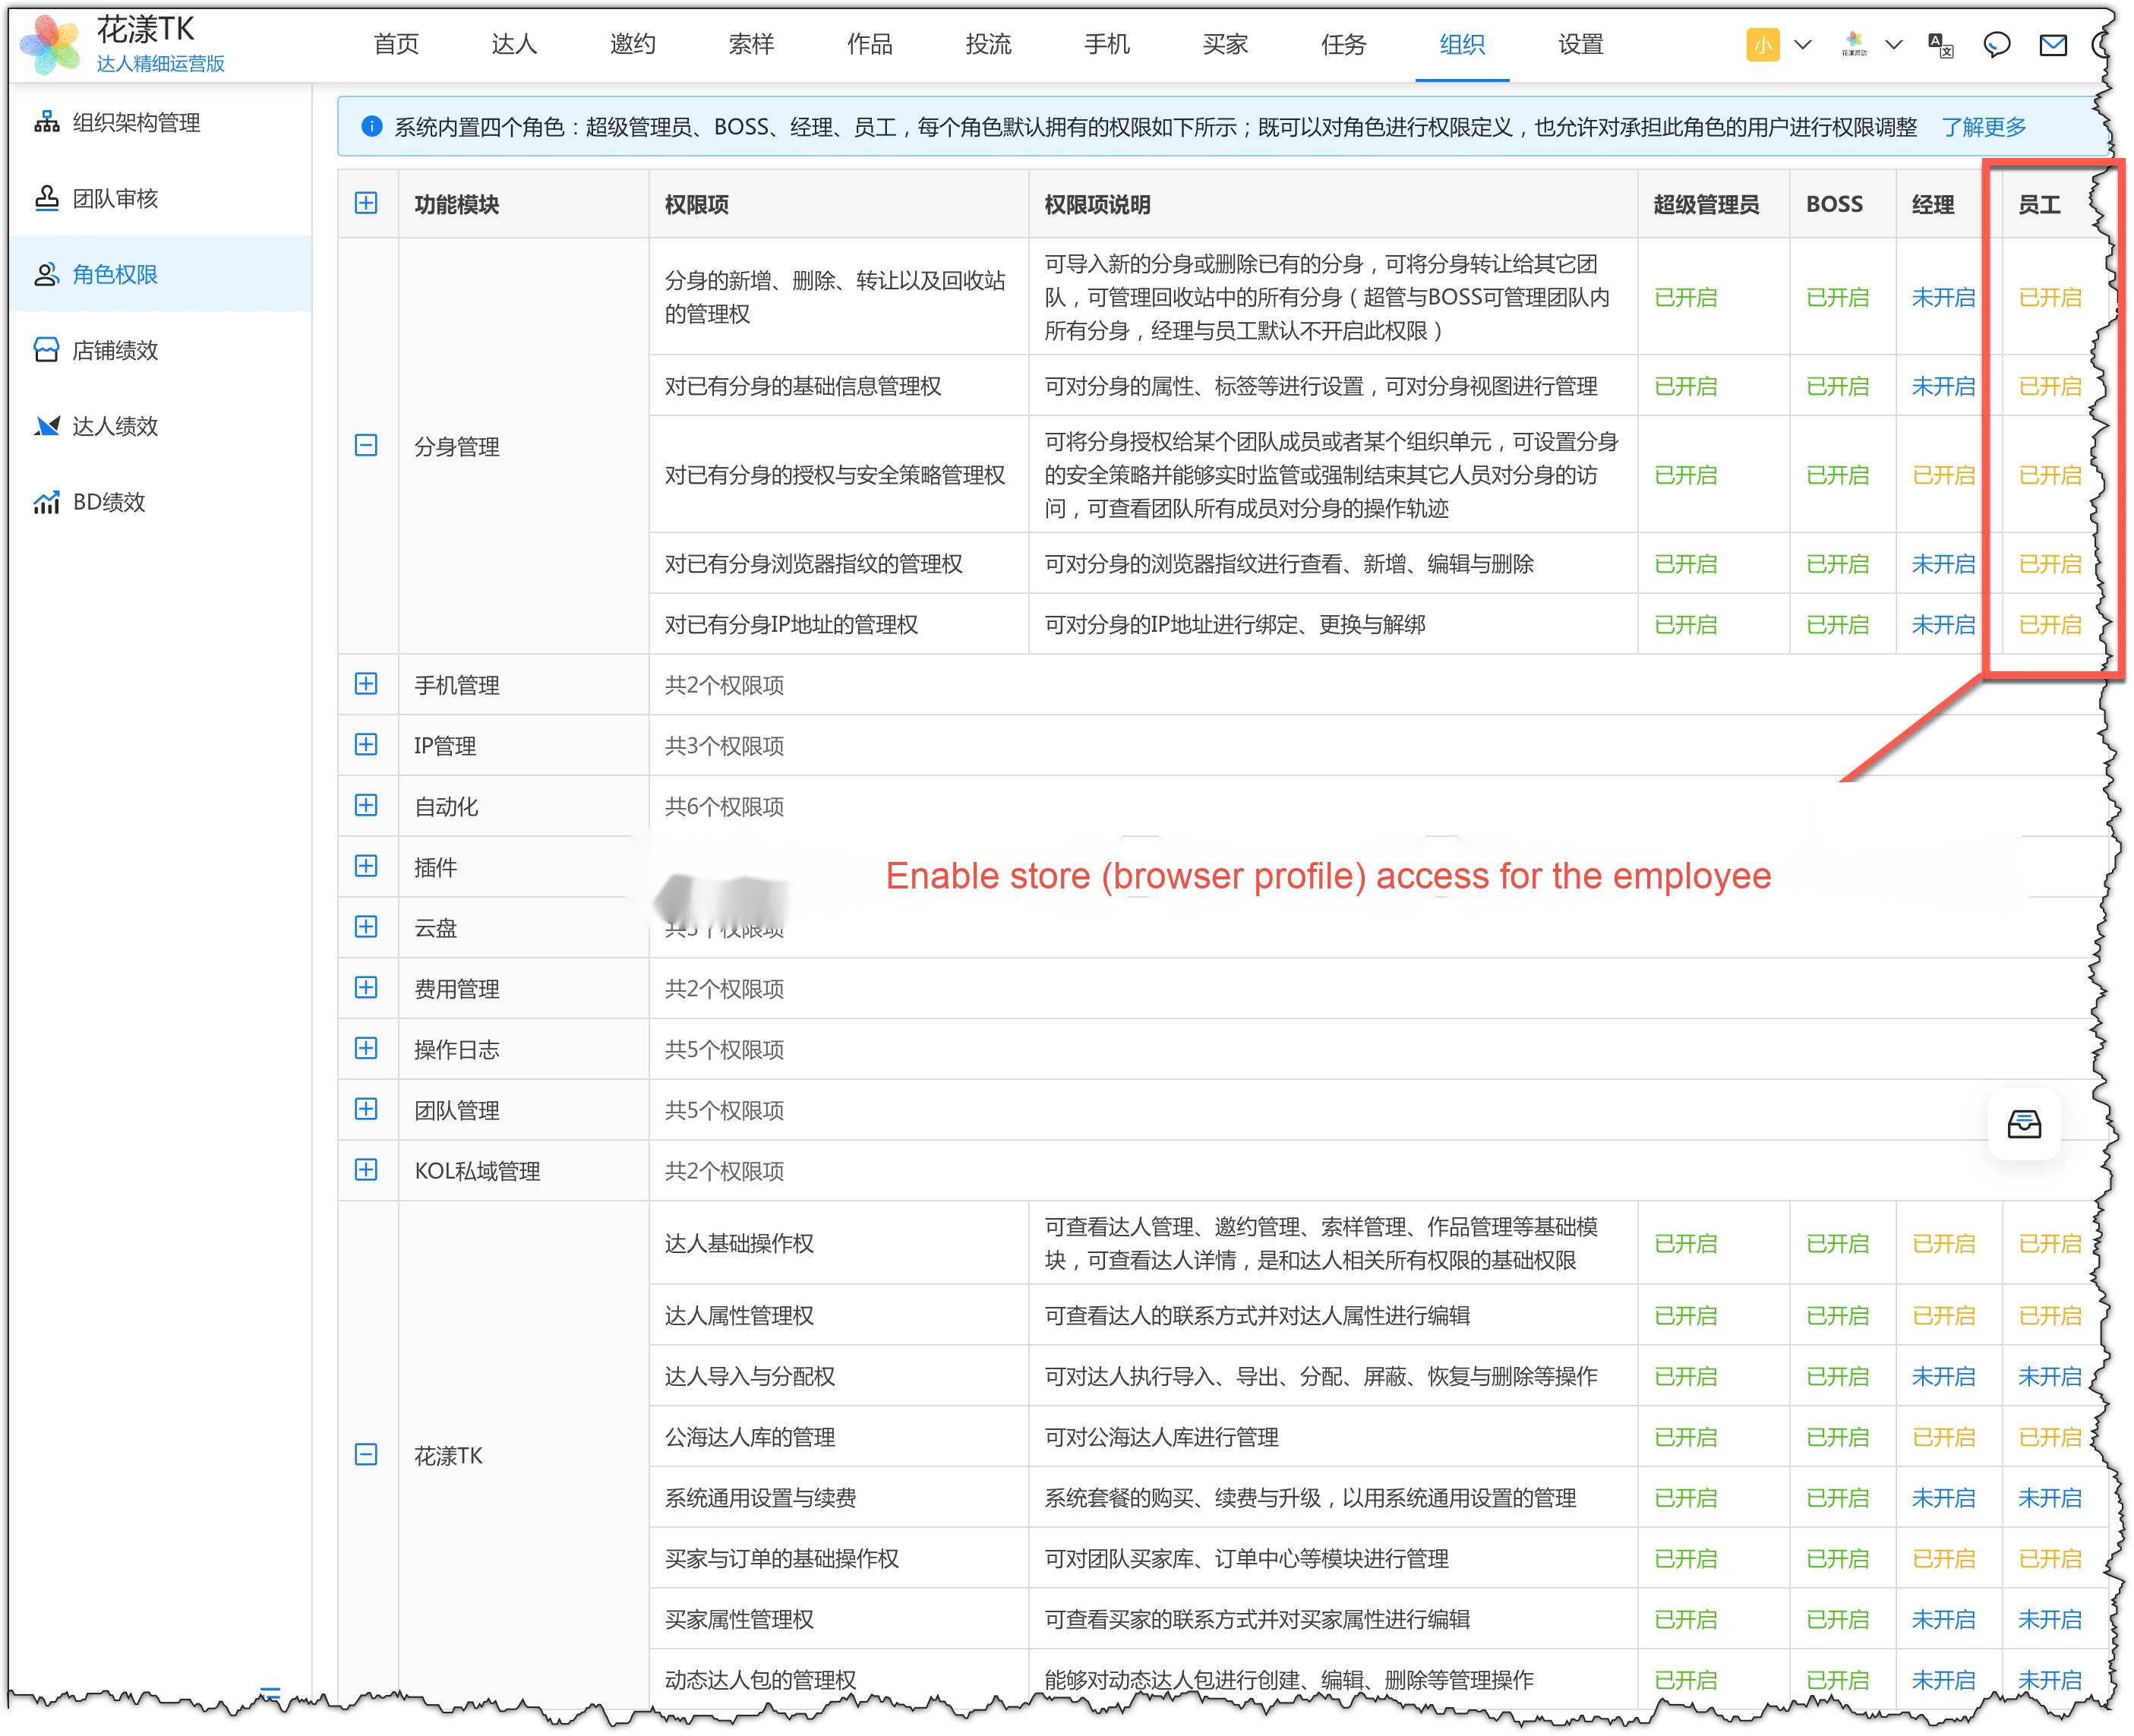
After joining, the colleague defaults to the “Employee” role, which usually needs permissions granted before they can access stores. Go to “Organization – Roles & permissions” and, as shown below, enable browser-profile access for the employee (the Manager role needs the same permissions).Enable store (browser profile) access for the employeeIf the employee also needs to import Creators, manage the order center, or manage dynamic Creator packs, enable those permissions in the “HuaYoung TK” module.
Step 5: Assign stores to an employee
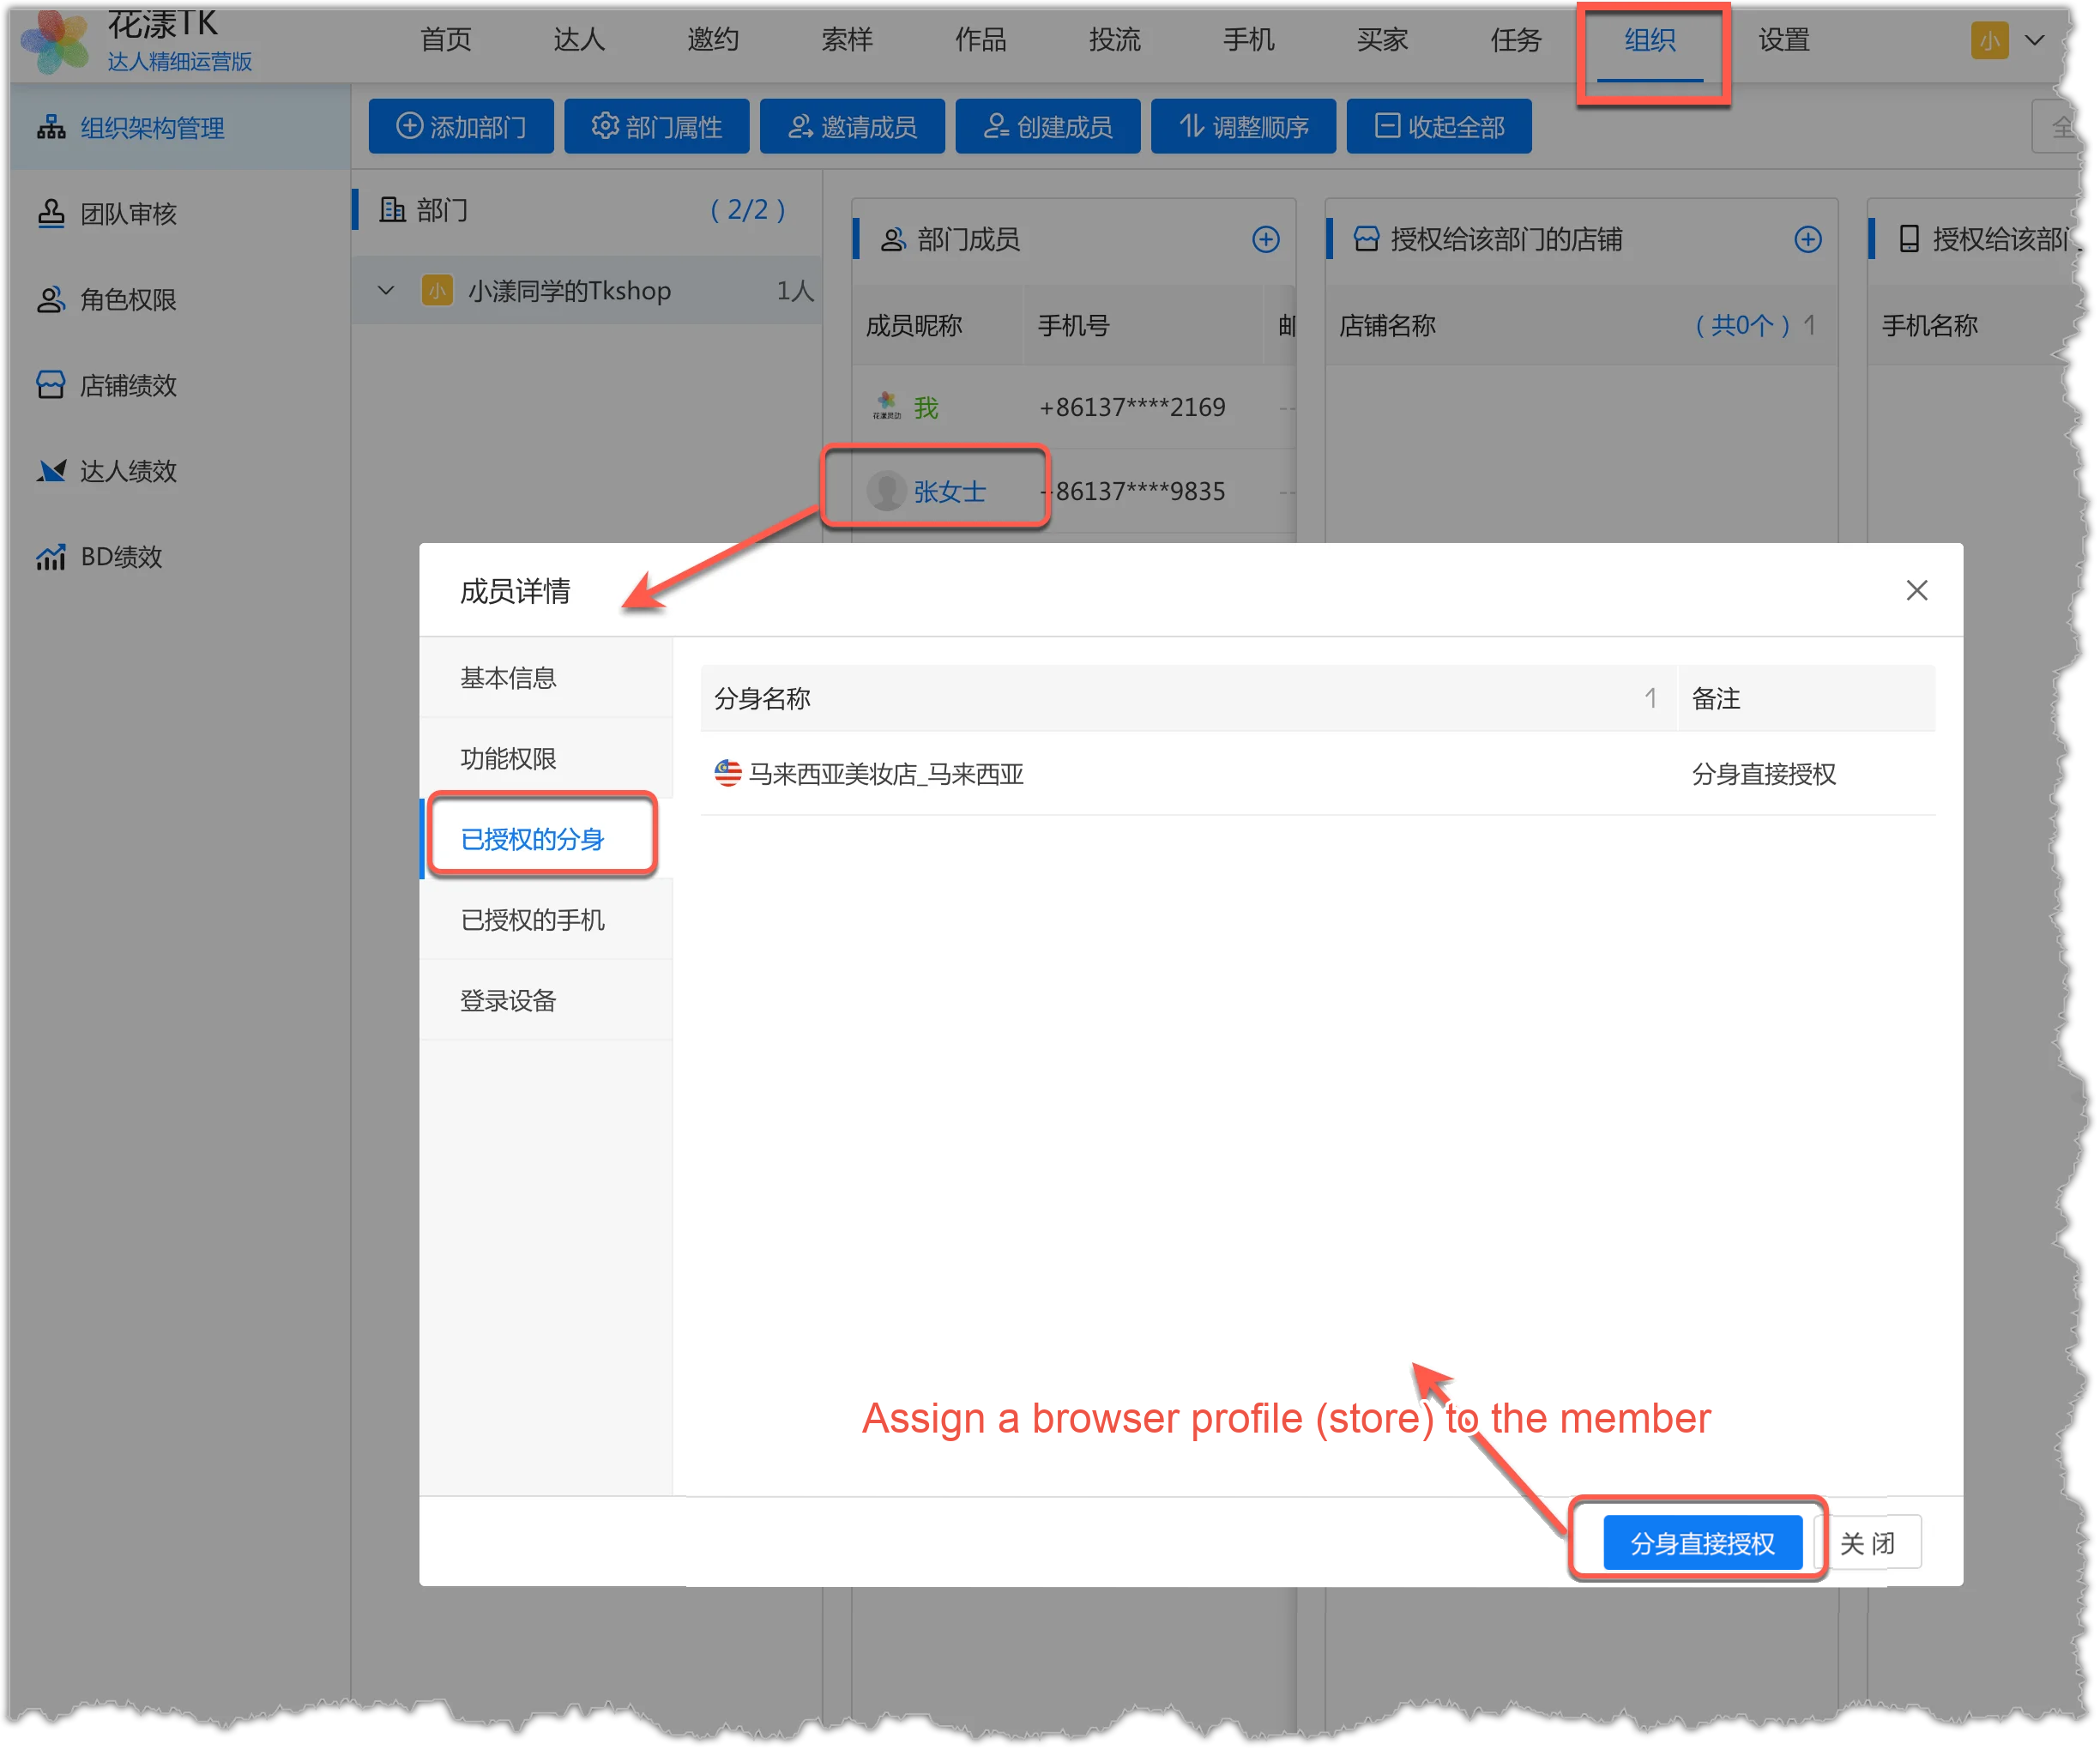
Once permissions are granted, you can assign the previously imported stores to the employee. In “Organization – Organization management”, click the member to view their details. On the “Authorized browser profiles” tab, click “Authorize browser profile directly” to assign the store.Assign a browser profile (store) to the memberAfter this, the new team member can start running the store.
5.
Enable BD features
If your team needs to assign Creators to BDs for follow-up, enable BD features in HuaYoung Creators. This chapter explains how to enable both Creator–BD collaboration scenarios.
5.1
Creator and BD collaboration scenarios
In HuaYoung TK, Creator–BD collaboration and performance management come in two scenarios:
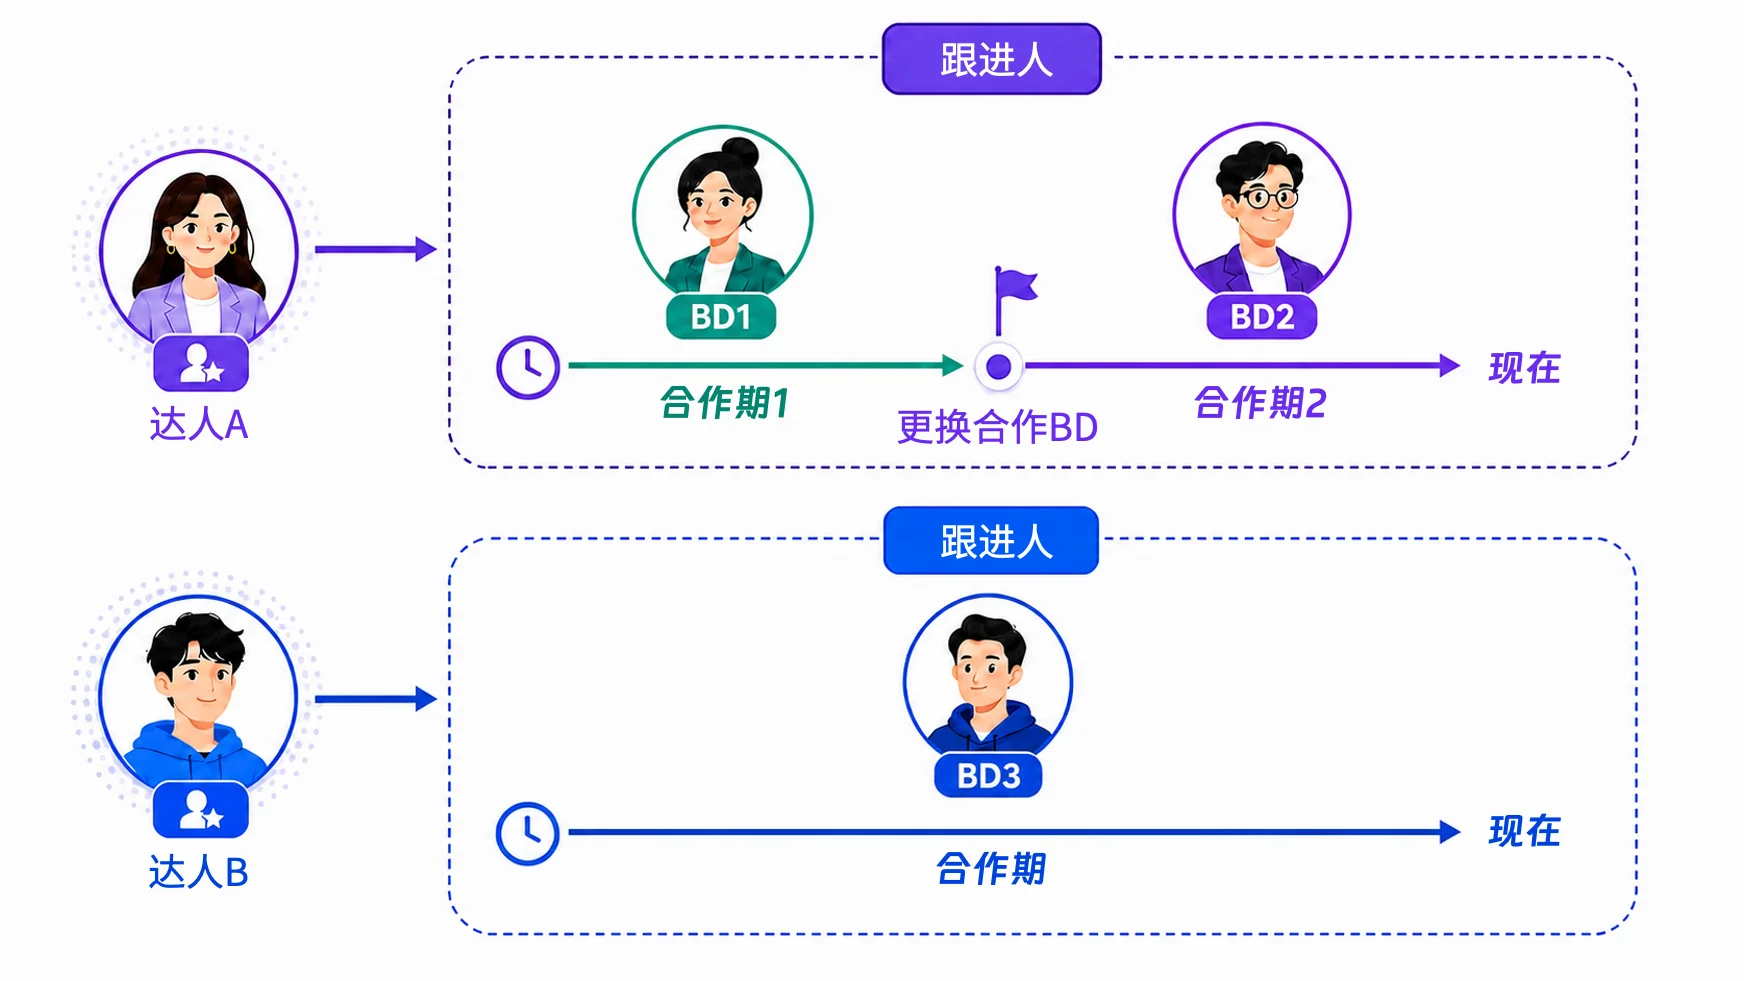
Scenario 1: One Creator can be assigned to only one BD at a time (Owner model) This is the simpler model: each Creator is assigned to one BD, and HuaYoung records the current BD in the Creator’s “Owner” field.Scenario 1: One Creator assigned to one BD at a time (Owner model) 1) When Creator A is assigned to BD Zhang San, all revenue generated by Creator A from the assigned start date until the end (or unassignment) belongs to BD Zhang San. This is exclusive—across all stores and products, Creator A’s revenue during this period belongs to BD Zhang San. 2) When Creator A is reassigned to BD Li Si, the new start date onward, Creator A’s revenue belongs to BD Li Si; the previous period’s revenue still belongs to BD Zhang San. This Owner-based model in HuaYoung Creators suits small teams with simple Creator–BD relationships.
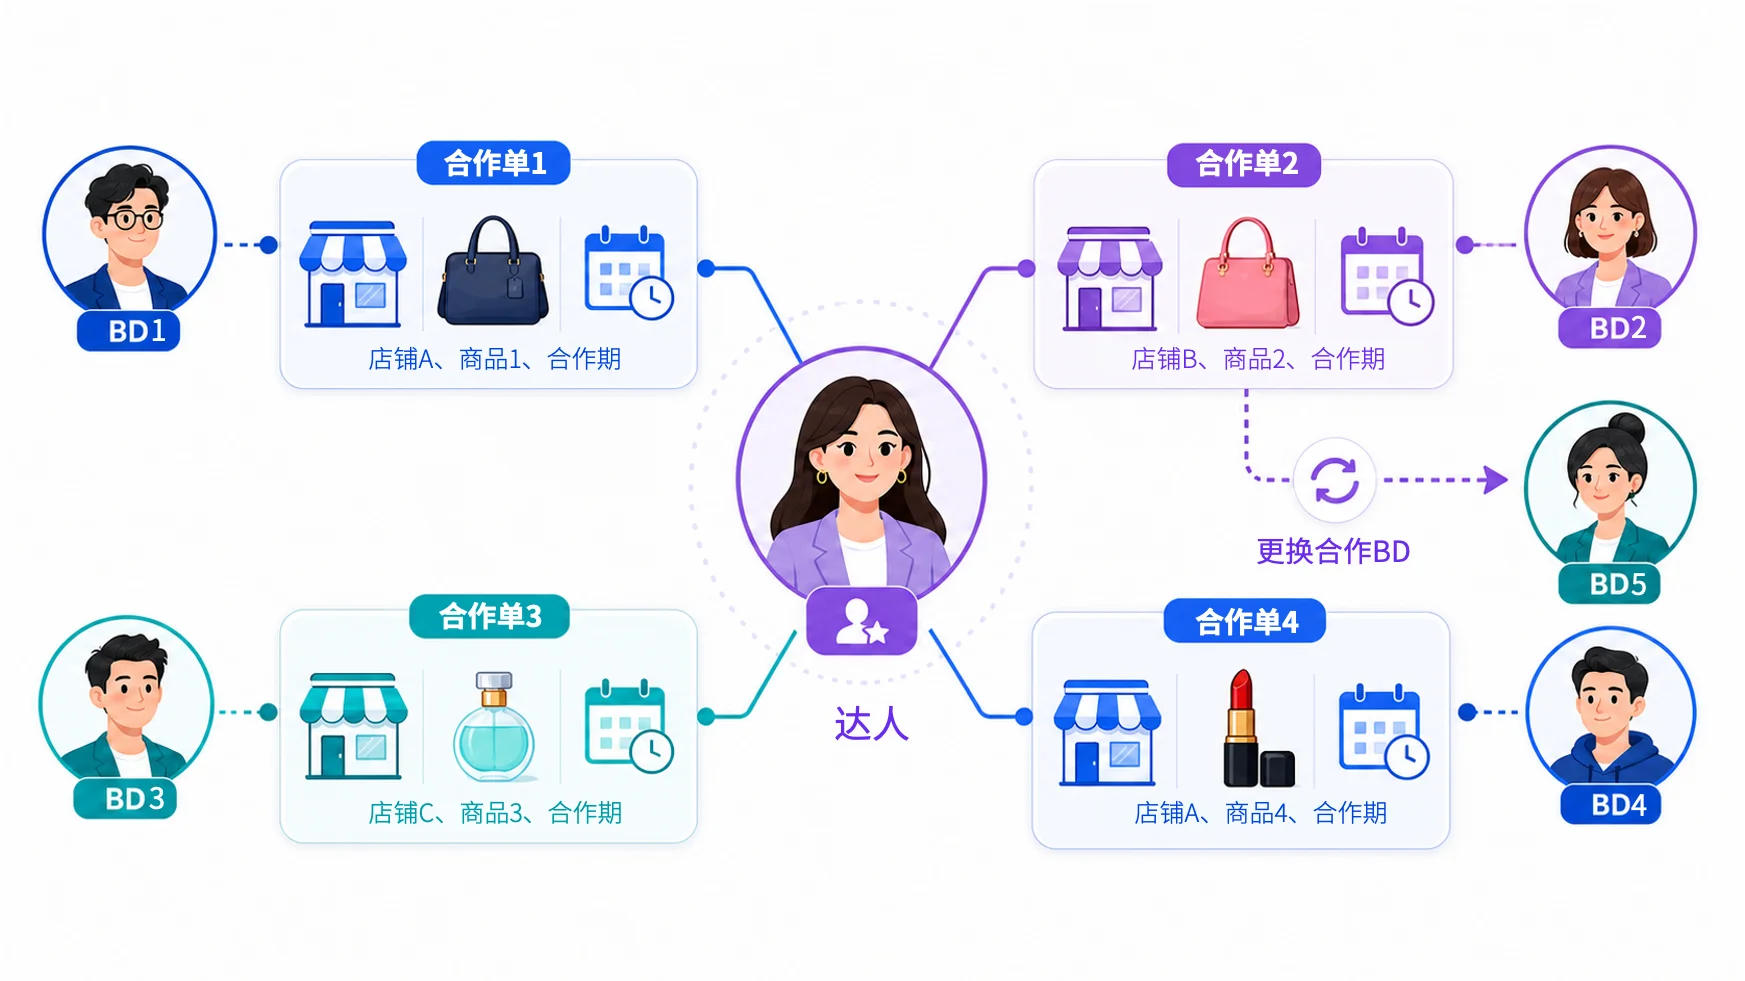
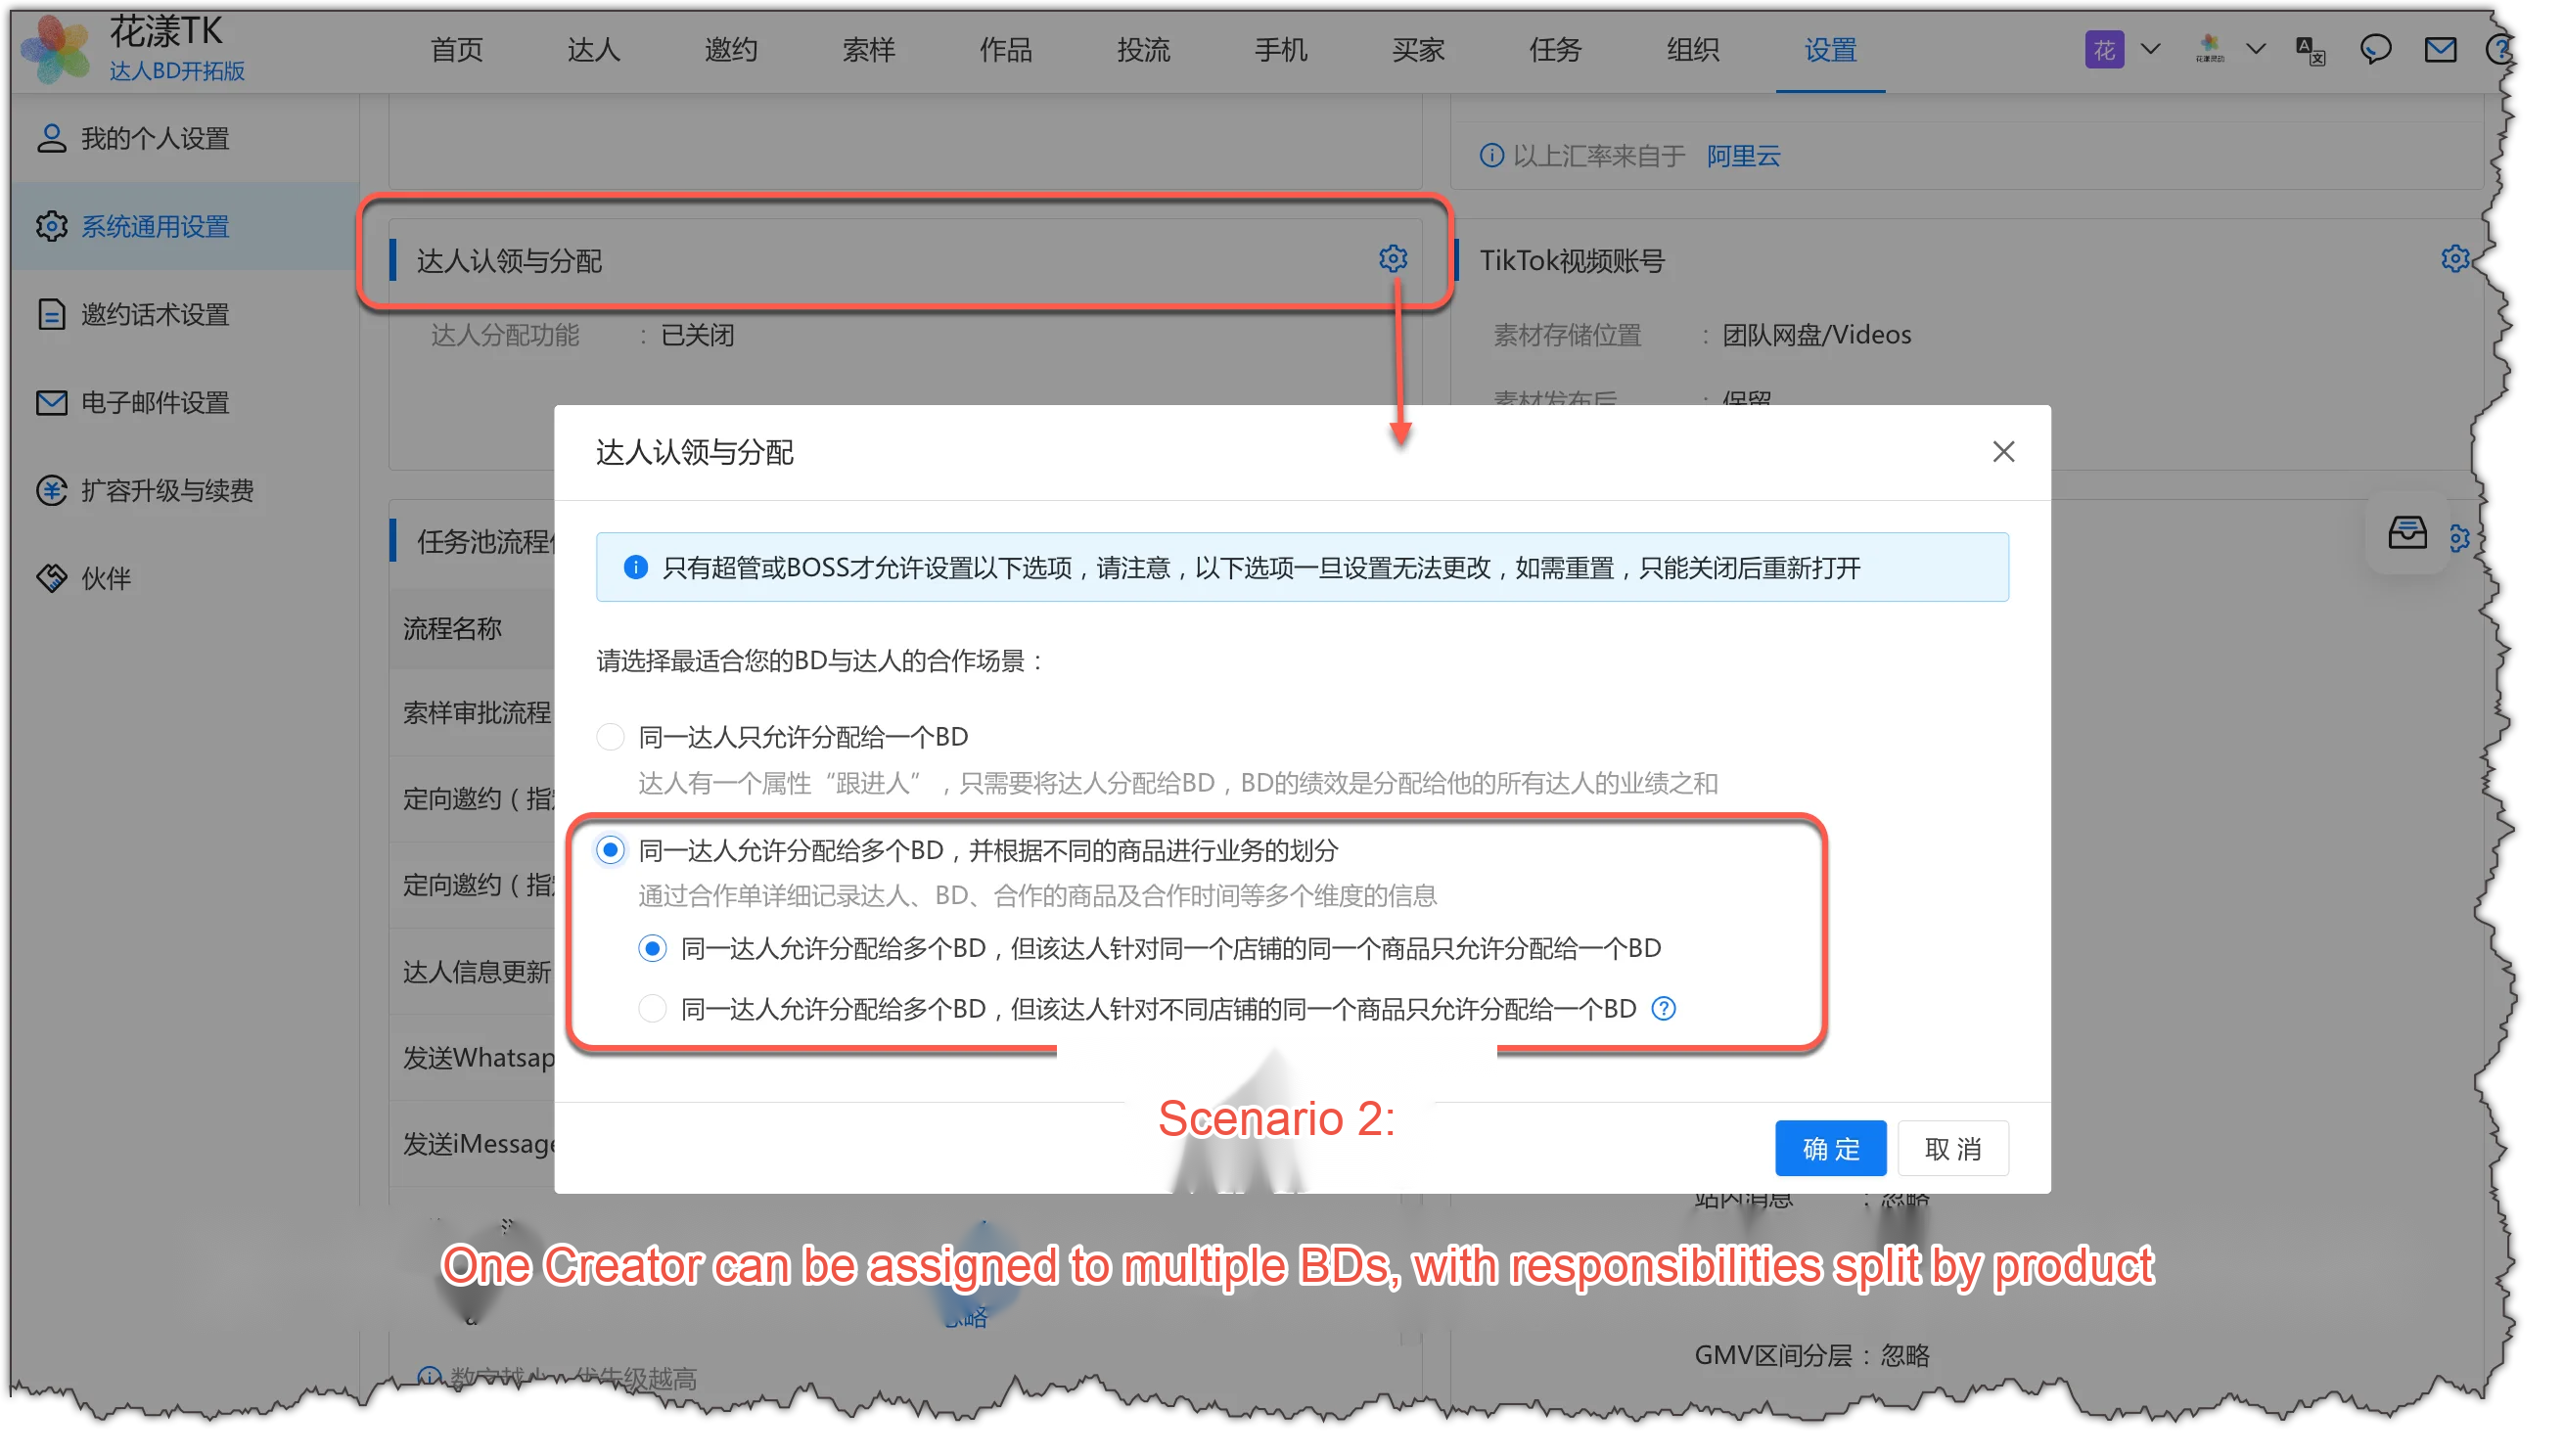
Scenario 2: One Creator can be assigned to multiple BDs, split by product (collaboration-order model) For larger merchants with many stores, products, Creators, and BDs, a Creator often needs to be assigned to several BDs who each handle different products. For example:Scenario 2: One Creator assigned to multiple BDs (collaboration-order model) 1) Creator A’s “Men’s bags” business is handled by BD Zhang San, while Creator A’s “Women’s bags” business is handled by BD Li Si. 2) Creator B’s “Perfume” business in store 1 is handled by BD Wang Wu, while Creator B’s “Lipstick” business in store 2 is handled by BD Zhao Liu. 3) Creator C’s “Men’s clothing” and “Women’s clothing” business was originally handled by BD Sun Qi. After a business adjustment, Creator C’s “Women’s clothing” business moves to BD Zhou Ba, while “Men’s clothing” stays with BD Sun Qi. 4) And other complex cases. It’s clear that a single “Owner” field on the Creator can’t precisely describe or record these complex collaboration and performance-management scenarios. So for scenario 2, HuaYoung TK introduces the “collaboration order” concept: a collaboration order records the Creator, BD, store, product, and collaboration time in detail. This collaboration-order model in HuaYoung Creators suits large and mid-sized merchants with complex Creator–BD collaboration and performance management. For more on collaboration orders, see the docs: Creator–BD collaboration (collaboration orders)
5.2
Plan requirement
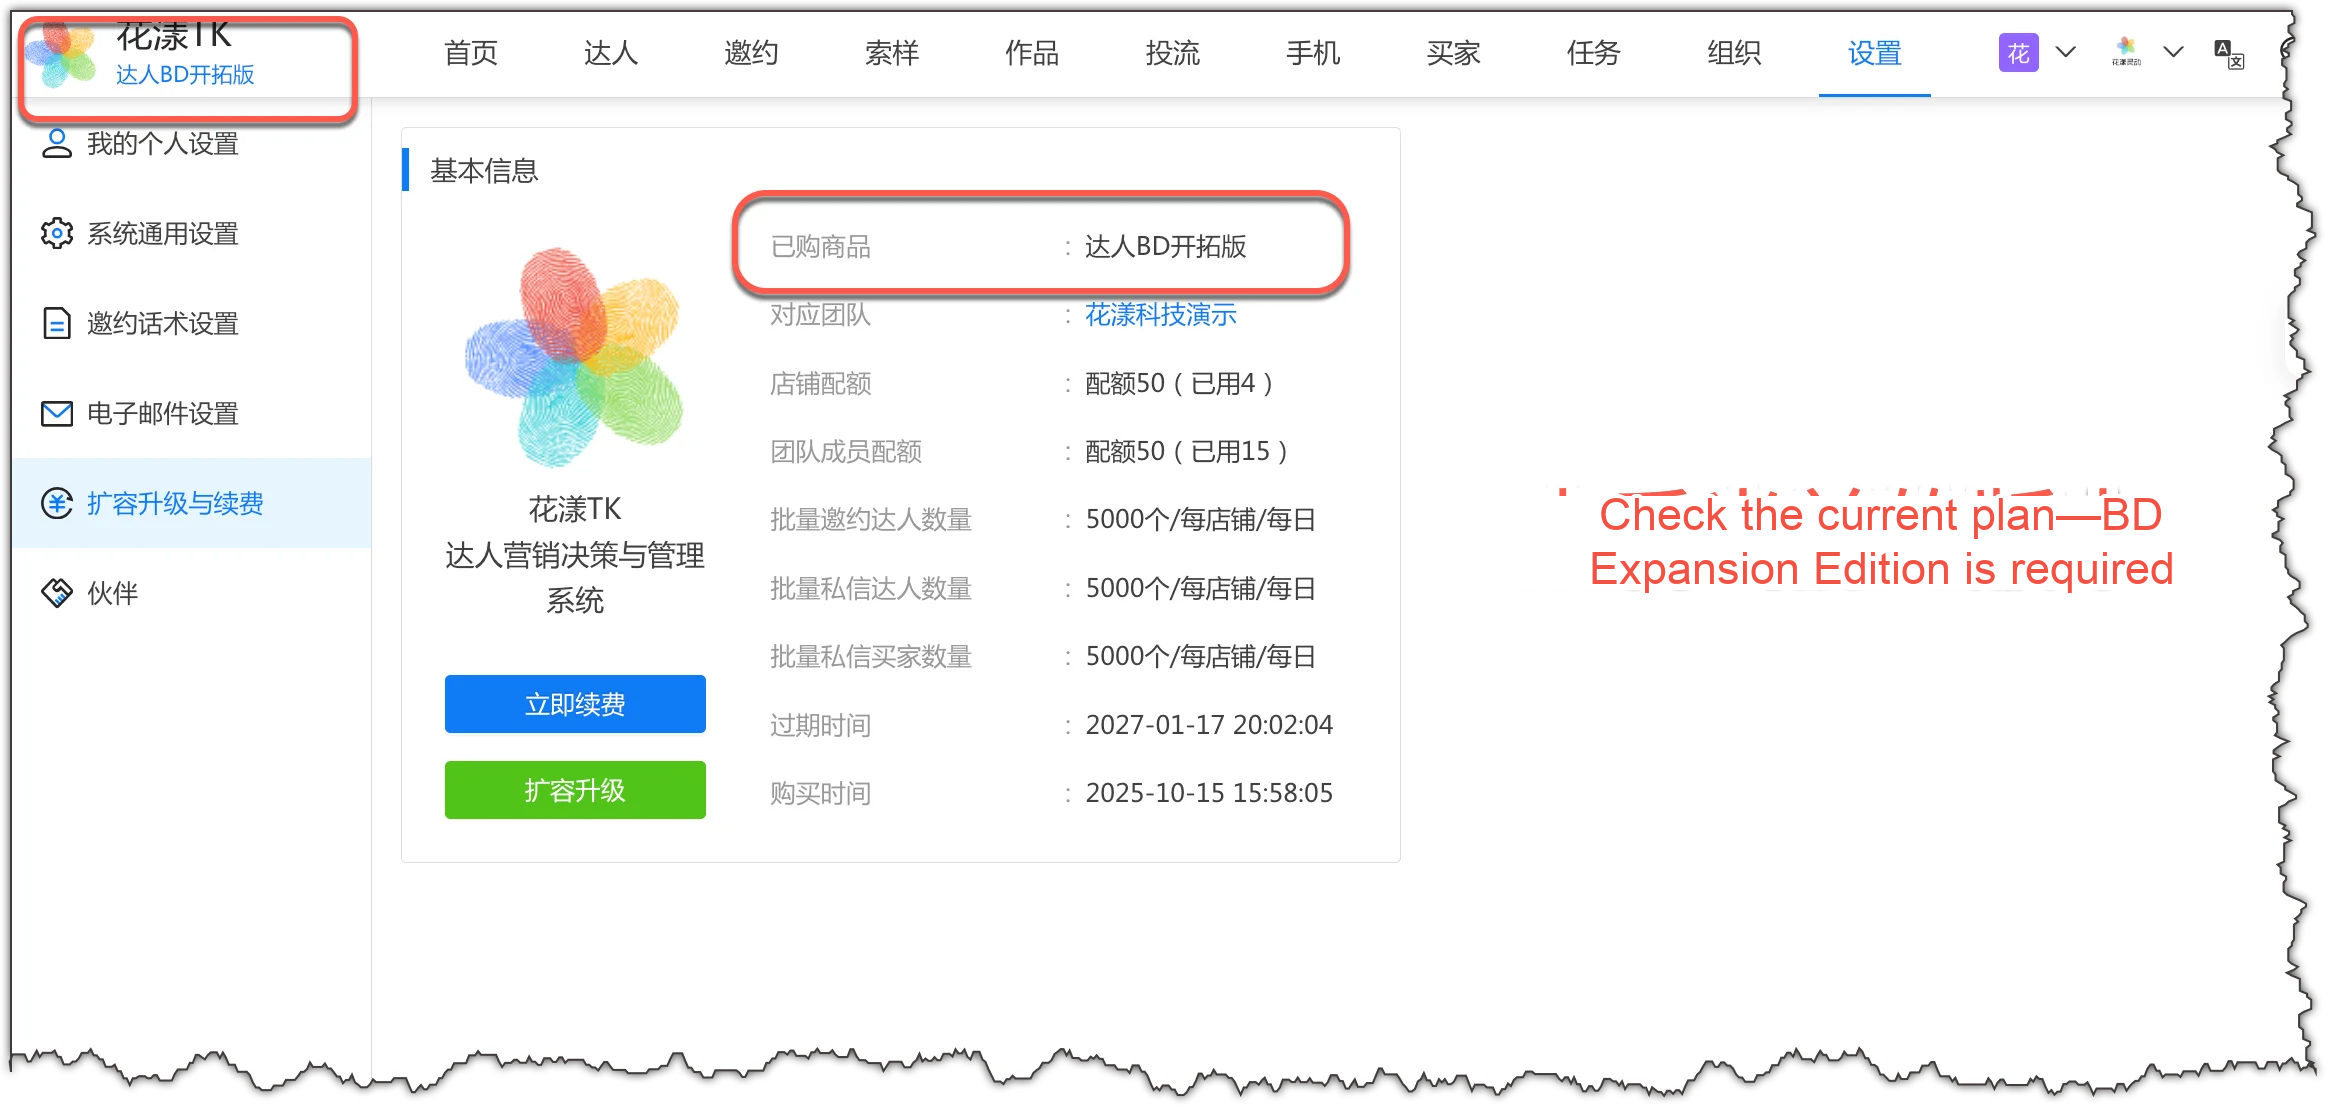
To get BD follow-up and performance management across the full Creator-marketing cycle, you must enable BD features in HuaYoung Creators. This requires the “BD Expansion Edition” plan. The current plan is shown in the top-left of the HuaYoung Creators app, or in “Settings – Plan & renewal – Purchased products”.Check the current plan—BD Expansion Edition is required
5.3
Enable BD features (scenario 1)
Scenario 1: A Creator can be assigned to only one BD at a time.
5.3.1 Enable BD features
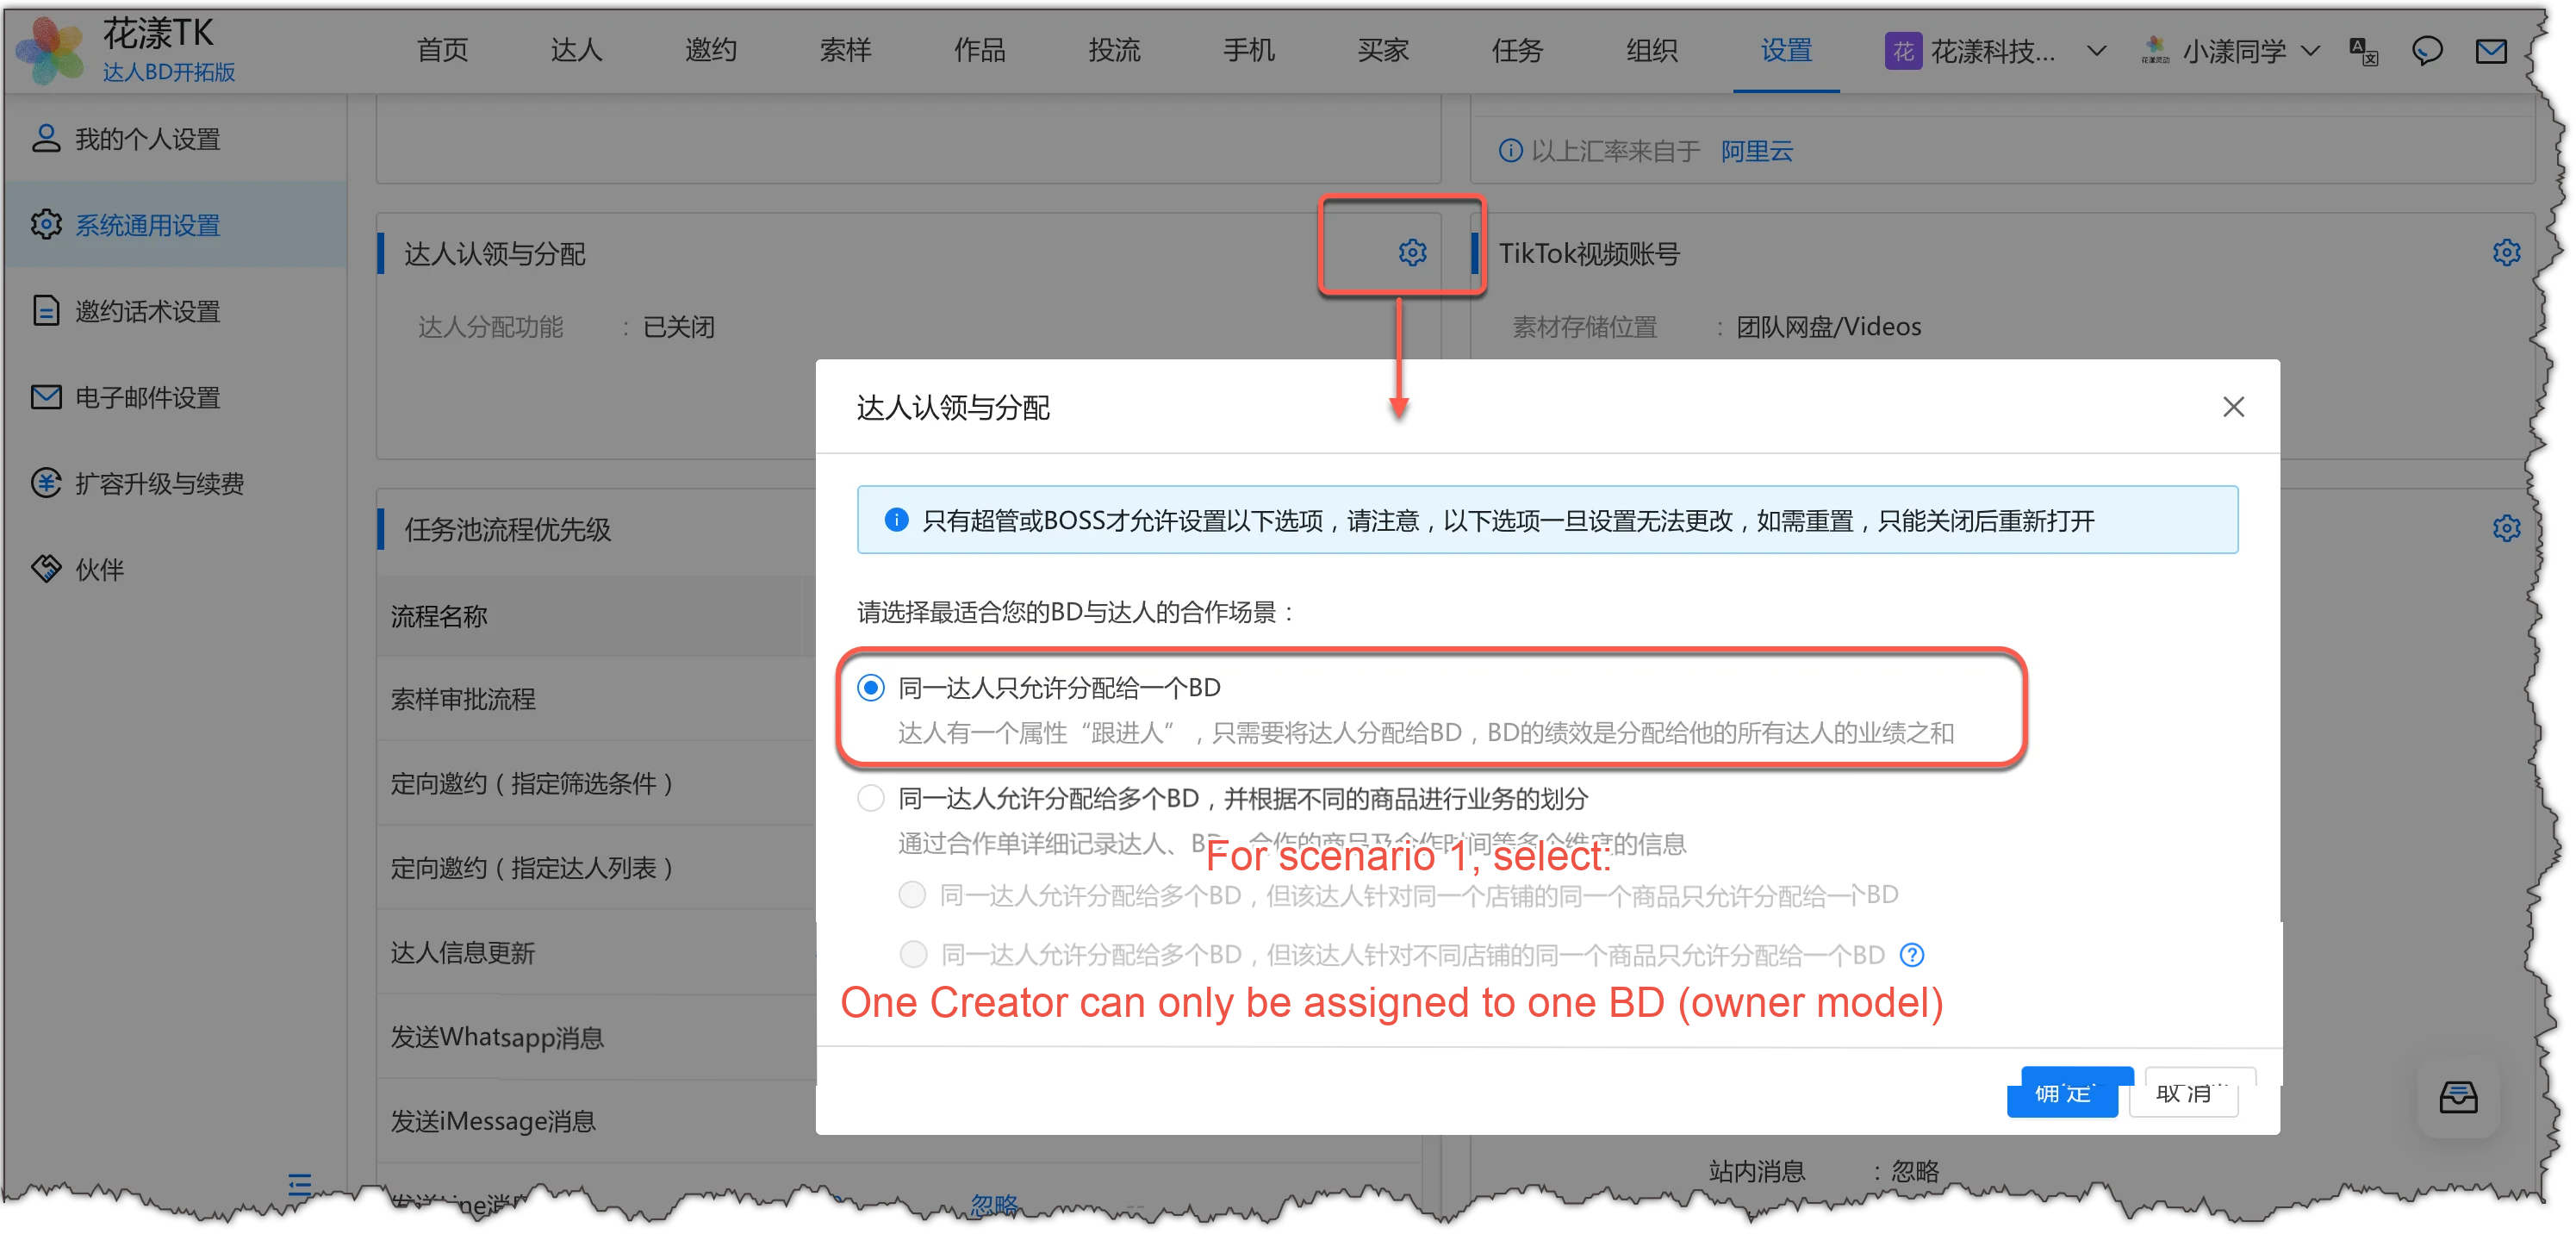
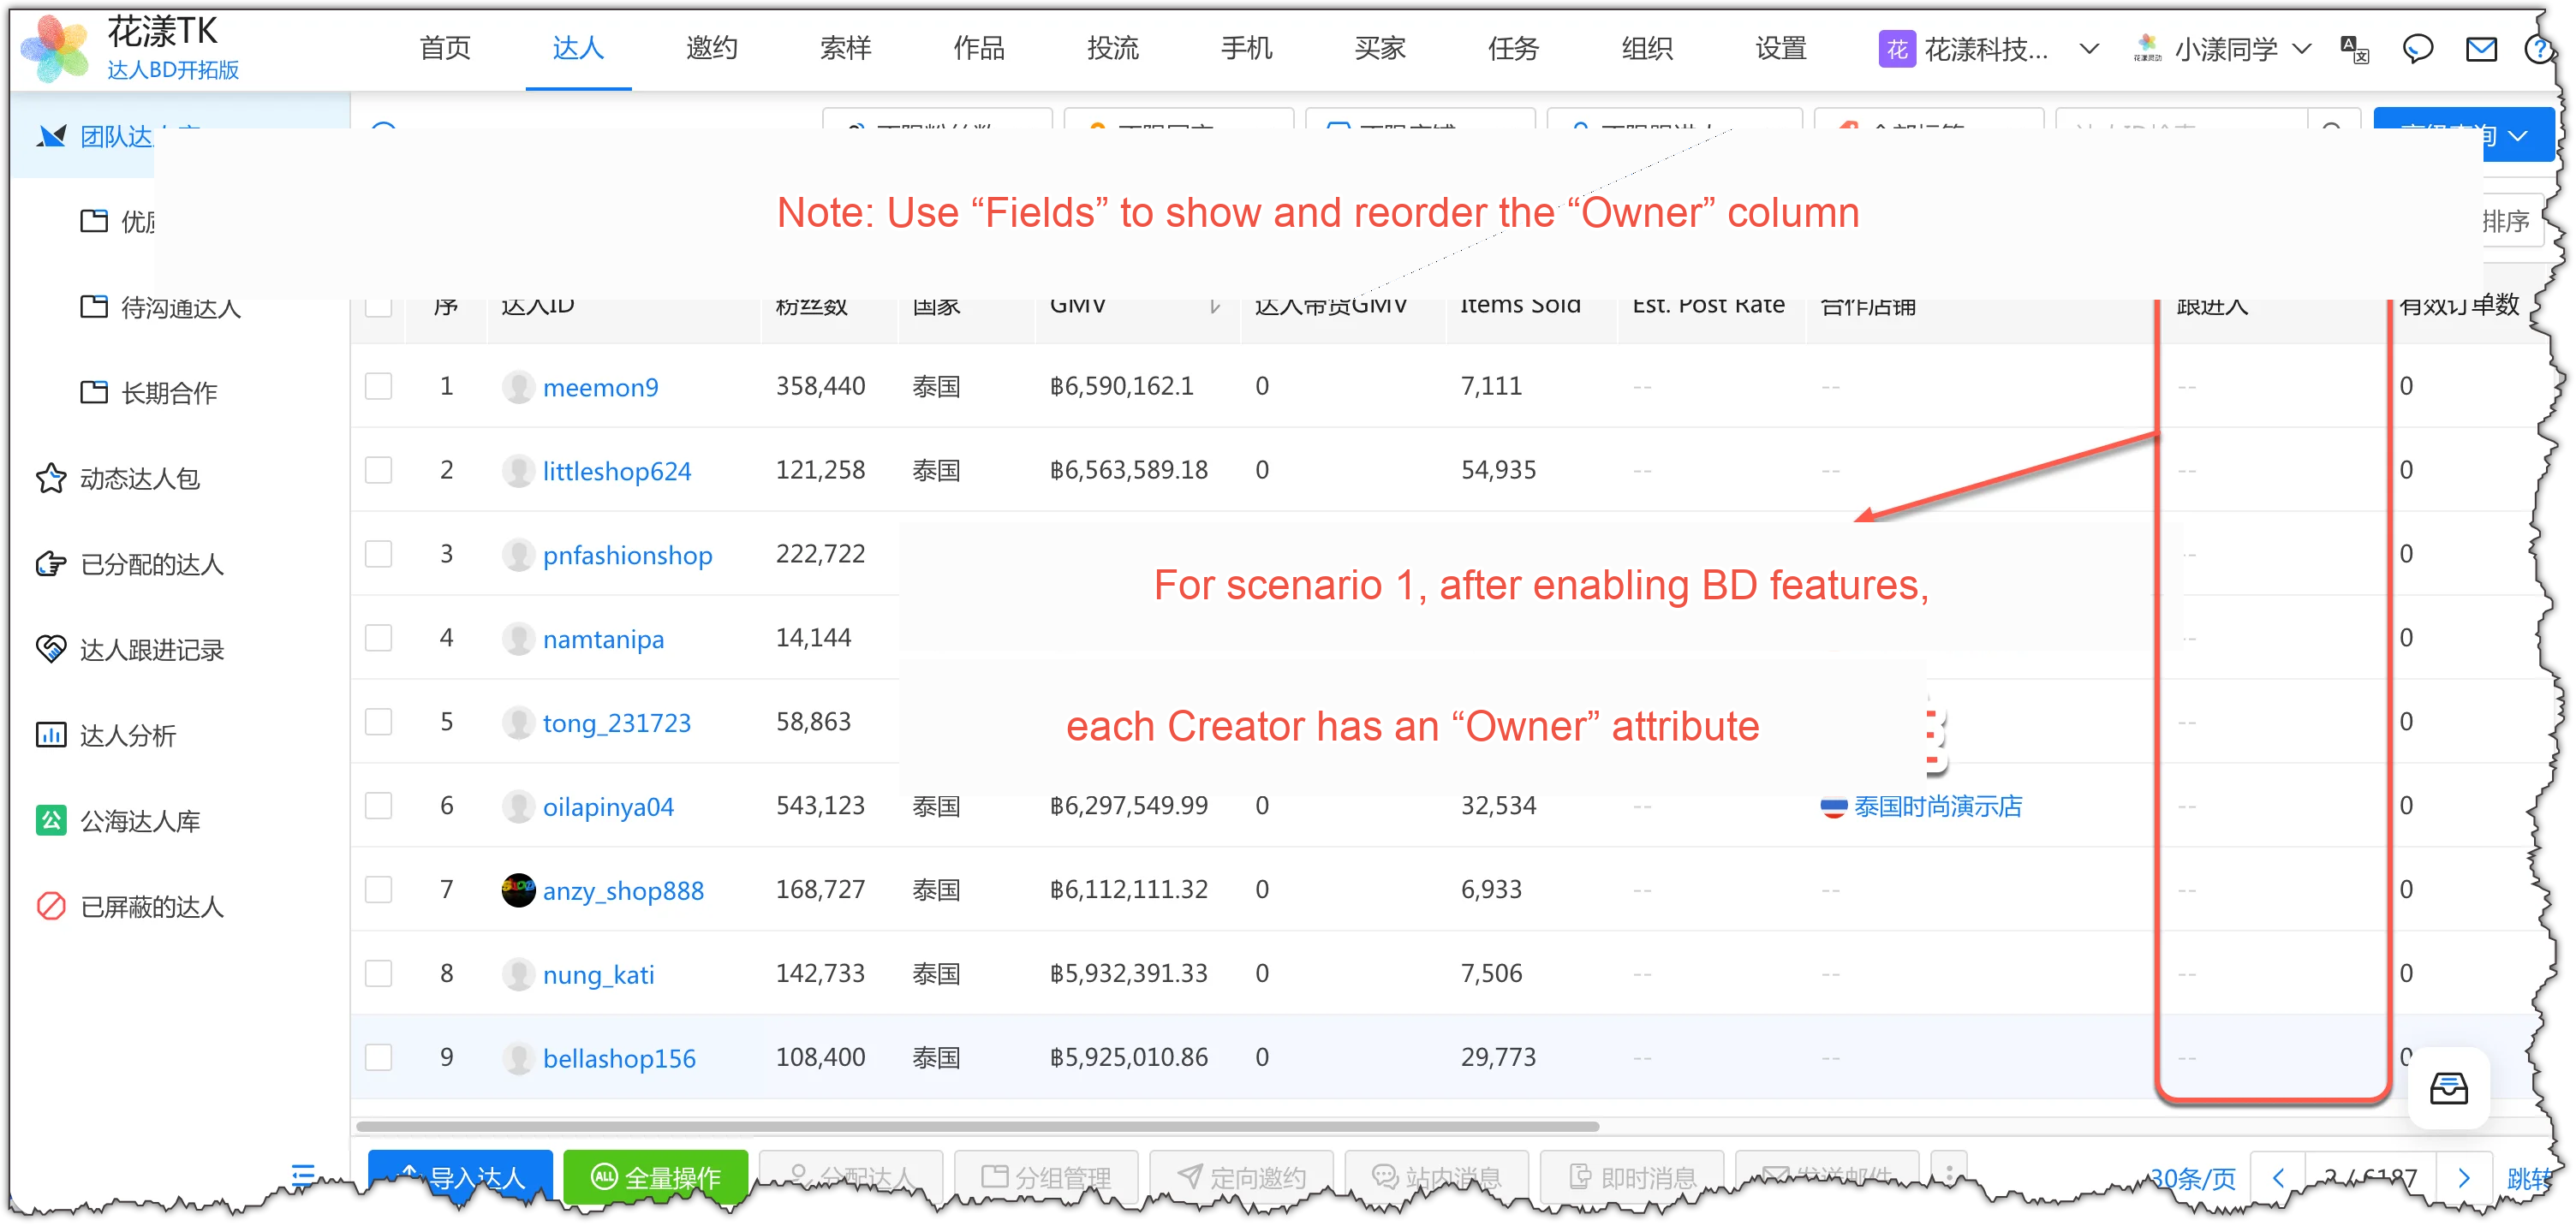
1) In "Settings – General settings – Creator claim & assignment", click "Settings", select "One Creator can only be assigned to one BD":Enable BD features for scenario 12) After enabling BD features, the Creator list in “Team Creators” shows the “Owner” field for each Creator:The Creator list shows the “Owner” fieldNote: If you can’t see this field, click the “Fields” button in the top-right to show the “Owner” column and reorder it.
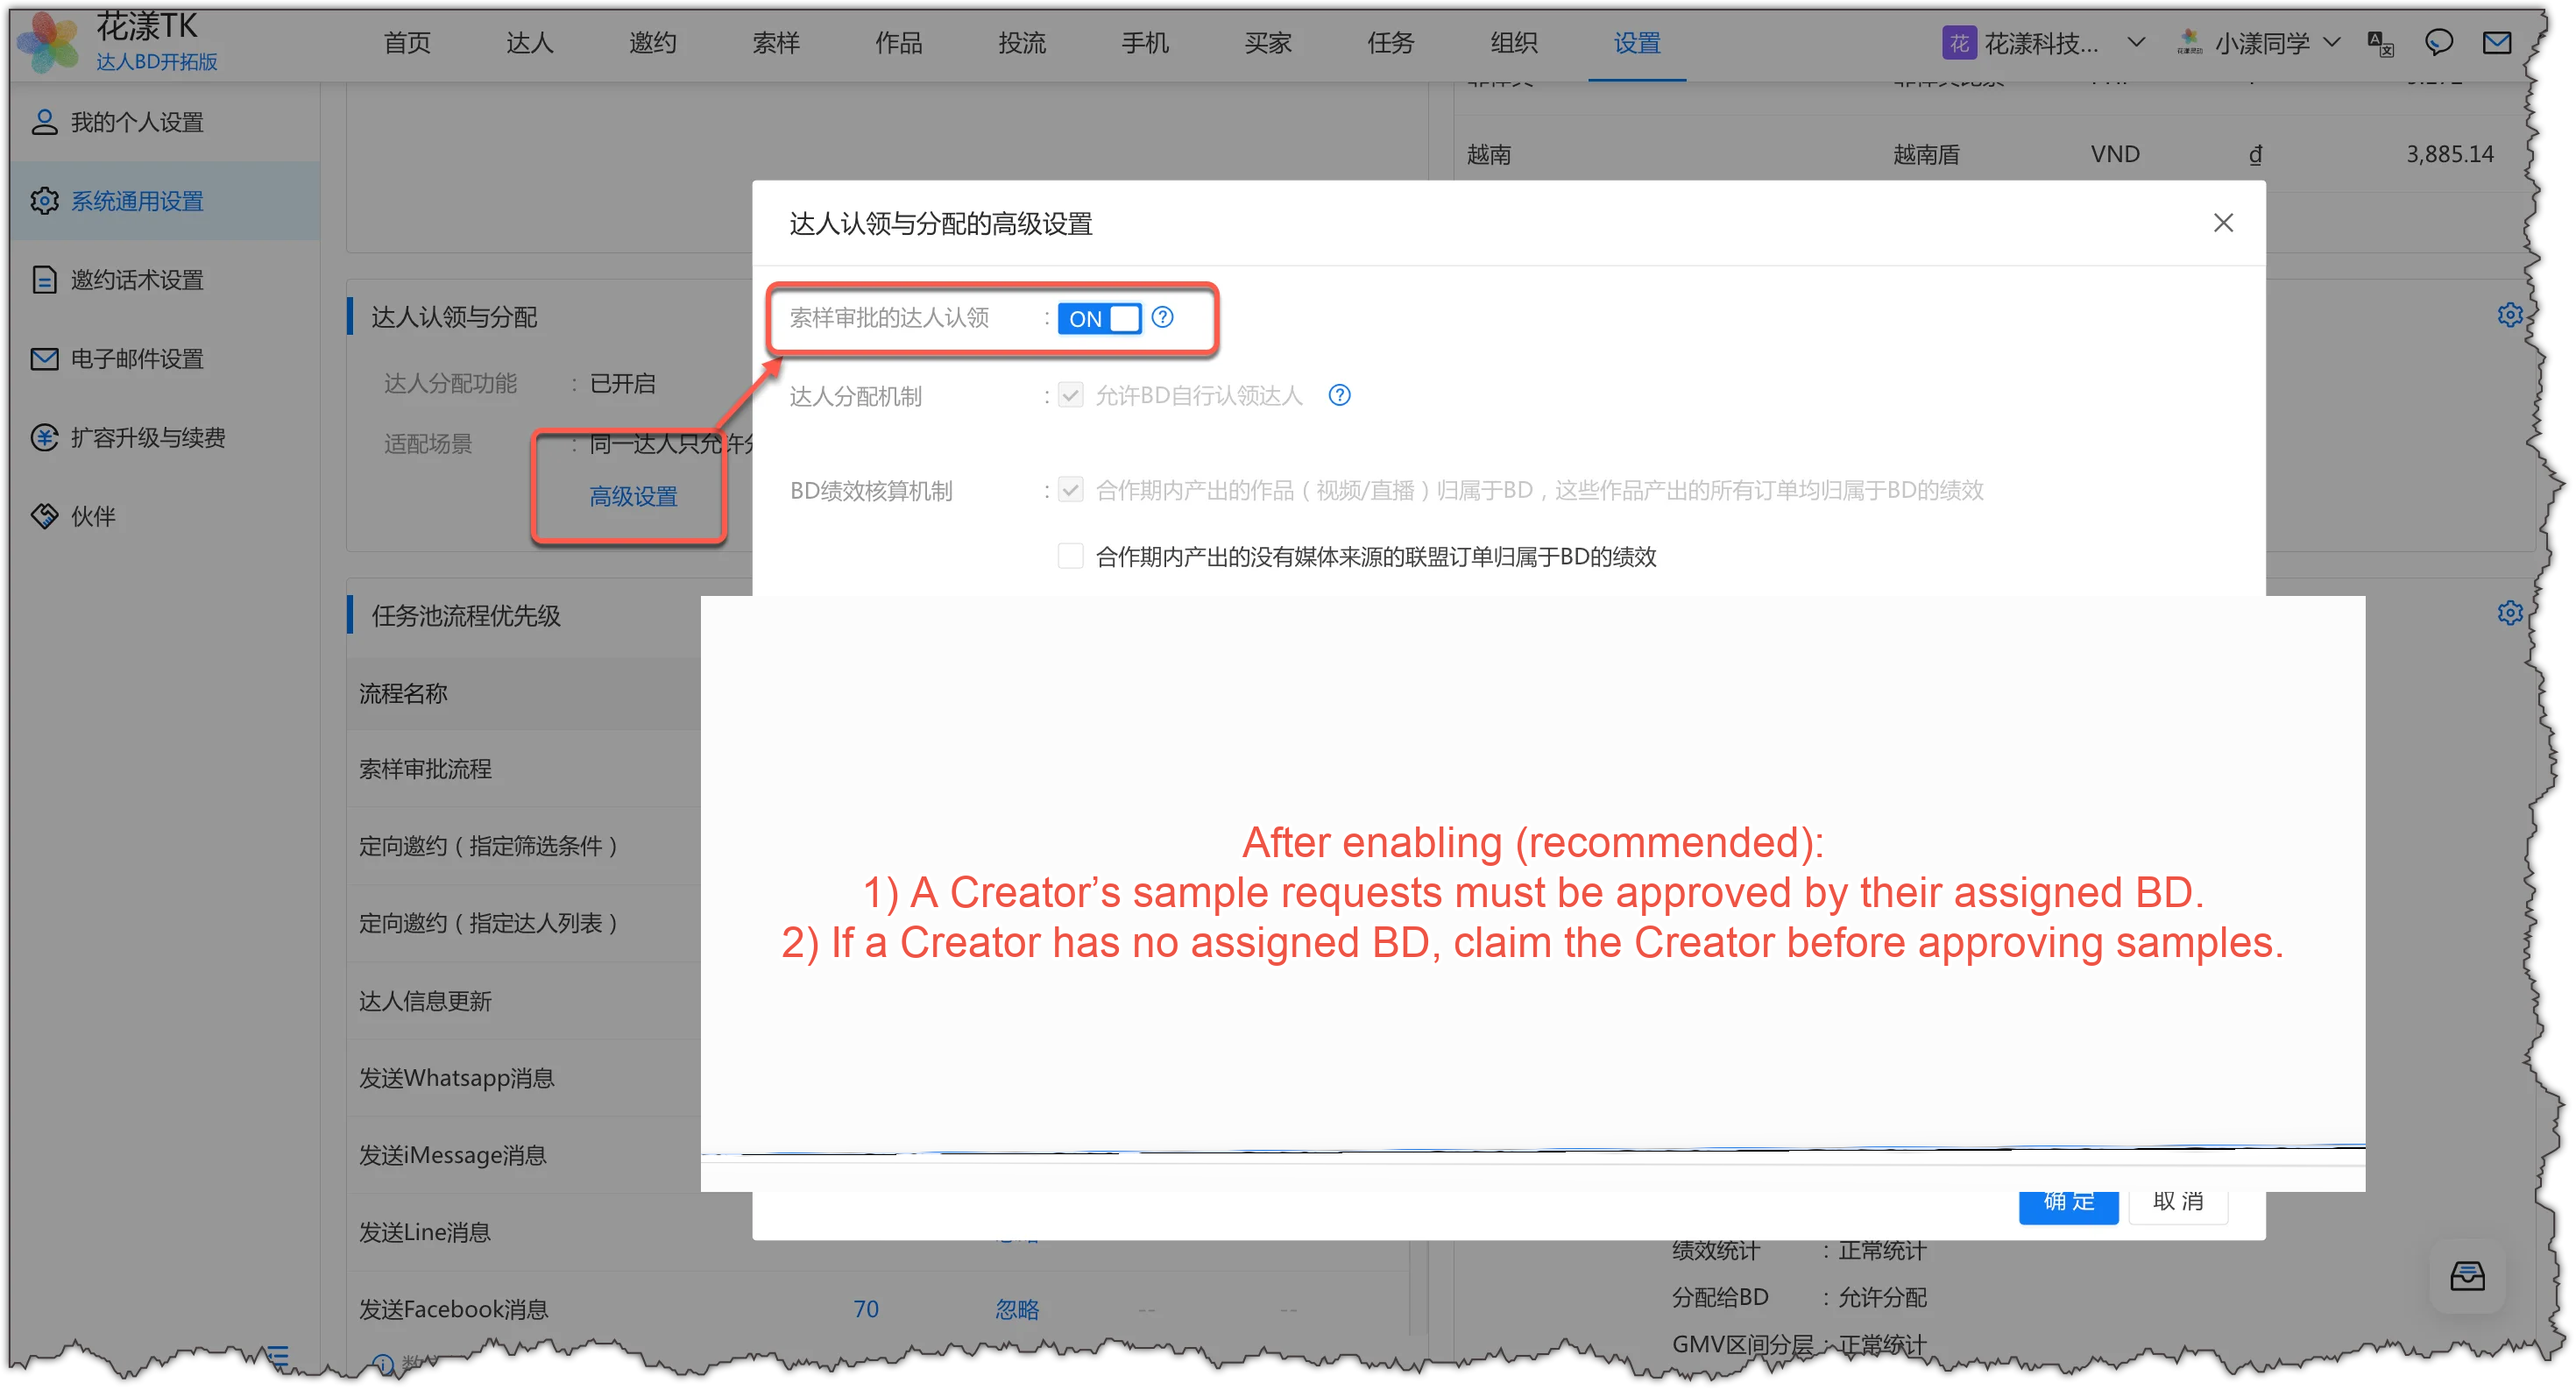
5.3.2 Advanced setting: creator ownership for sample-request approval (strongly recommended)
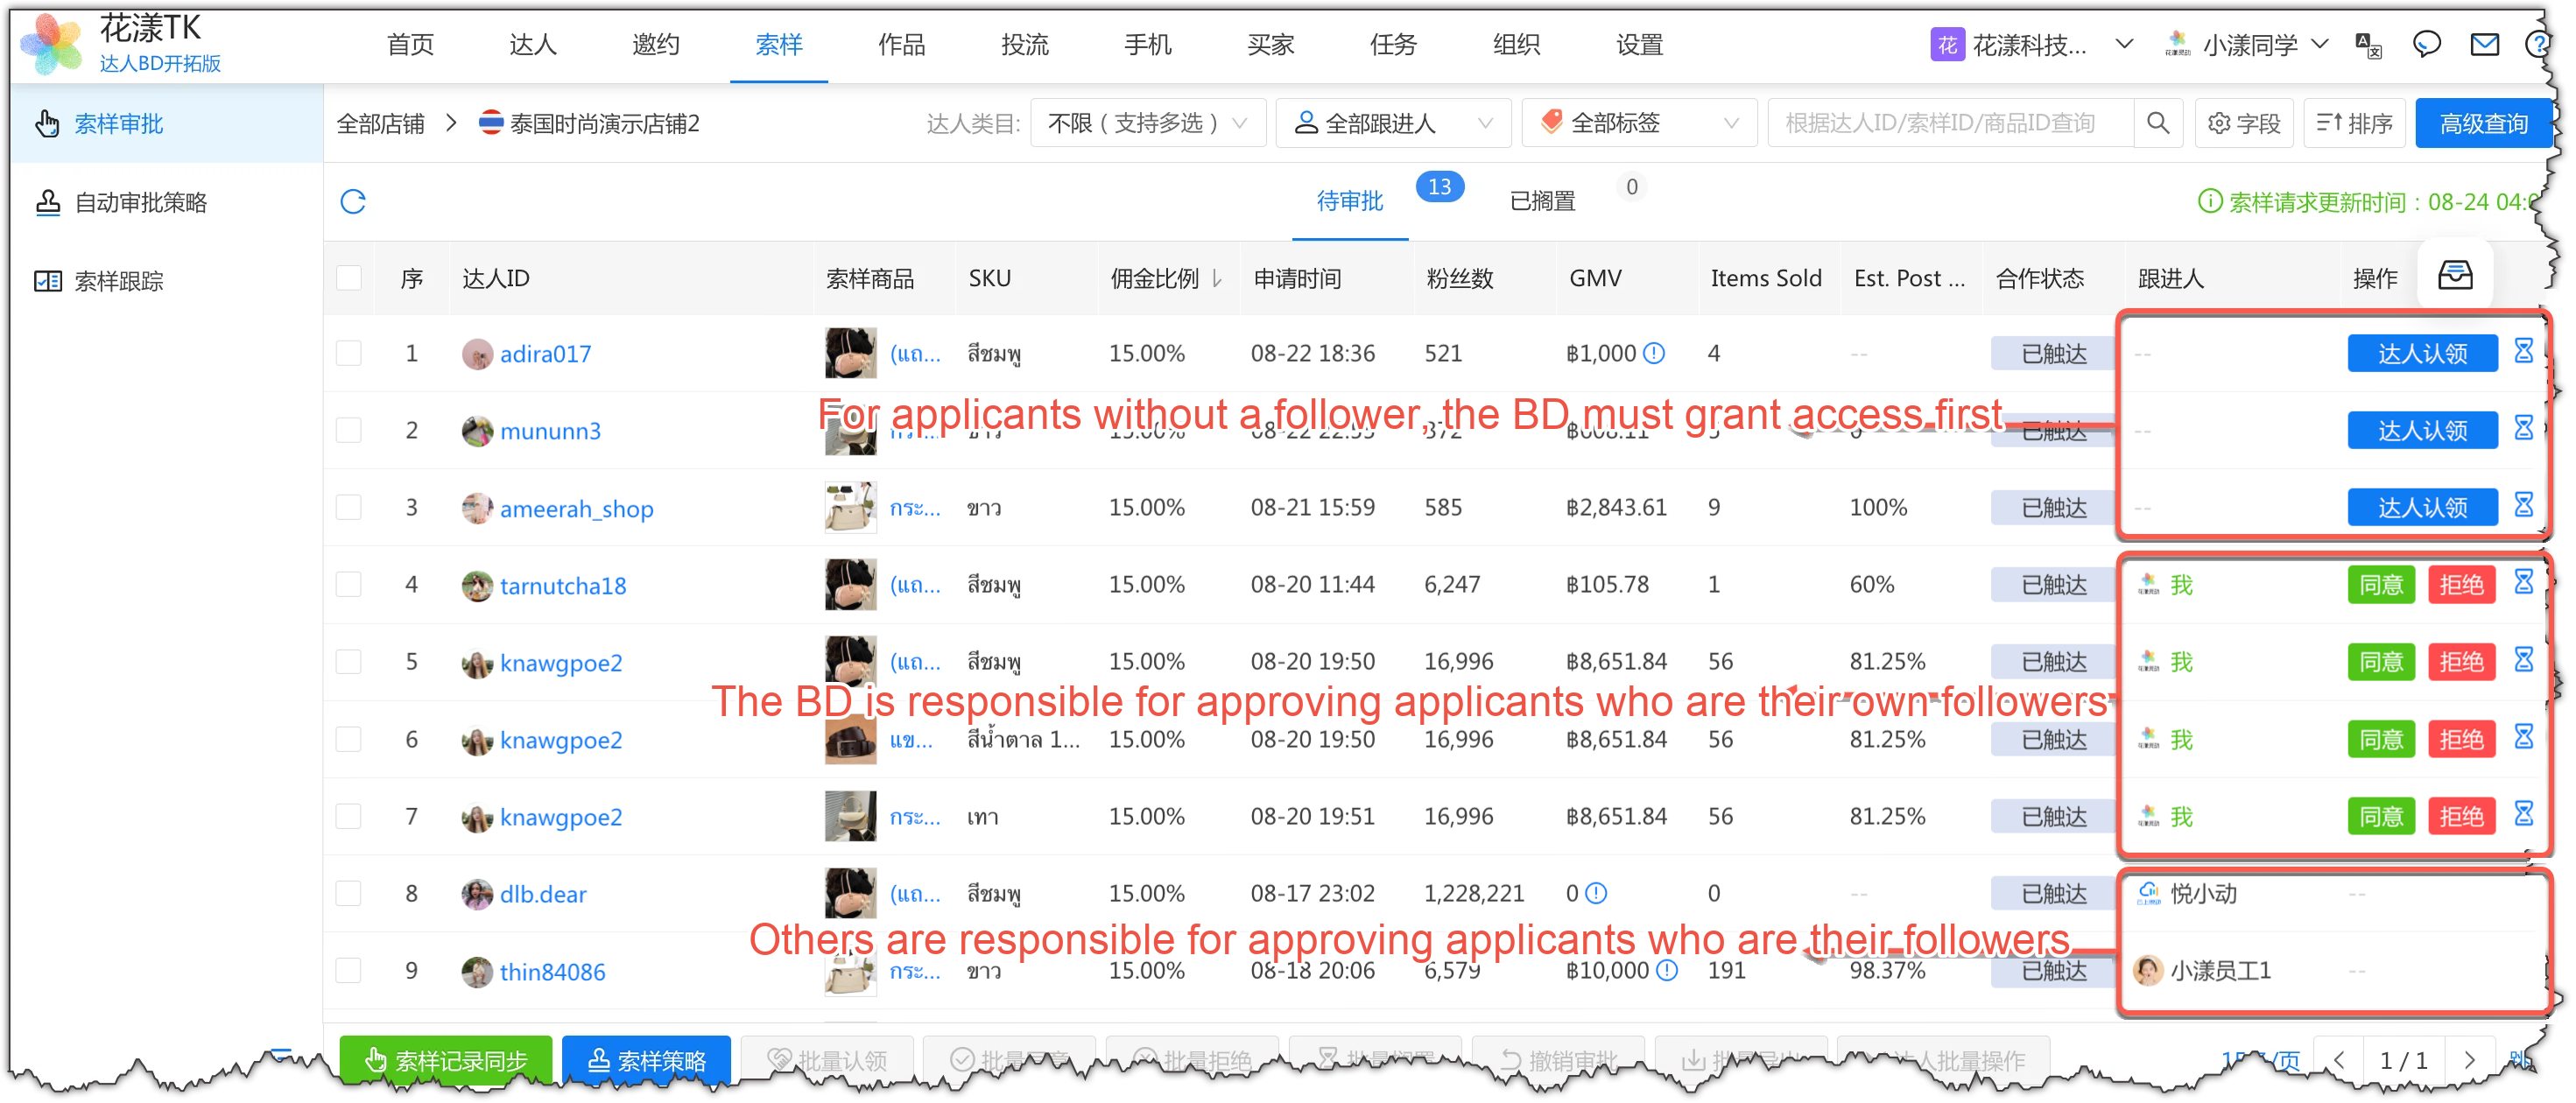
If you want a Creator’s sample requests to be approved only by their assigned BD, go to “Settings – General settings – Creator claim & assignment – Advanced”, and turn “Creator ownership for sample-request approval” ON.Enable “creator ownership for sample-request approval”After enabling, you achieve: 1) Only the Creator’s assigned BD can approve sample requests. 2) If a Creator has no assigned BD, the Creator must be claimed first before any sample can be approved.A Creator’s sample requests must be approved by their assigned BD
5.4
Enable BD features (scenario 2)
Scenario 2: A Creator can be assigned to multiple BDs, split by product.
5.4.1 Enable BD features
1) In "Settings – General settings – Creator claim & assignment", click "Settings", select "One Creator can be assigned to multiple BDs, split by product", and choose the sub-options below based on your situation: If a Creator's same store same product can only be assigned to one BD, choose the 1st. If a Creator's different stores same product can only be assigned to one BD, choose the 2nd.Enable BD features for scenario 2
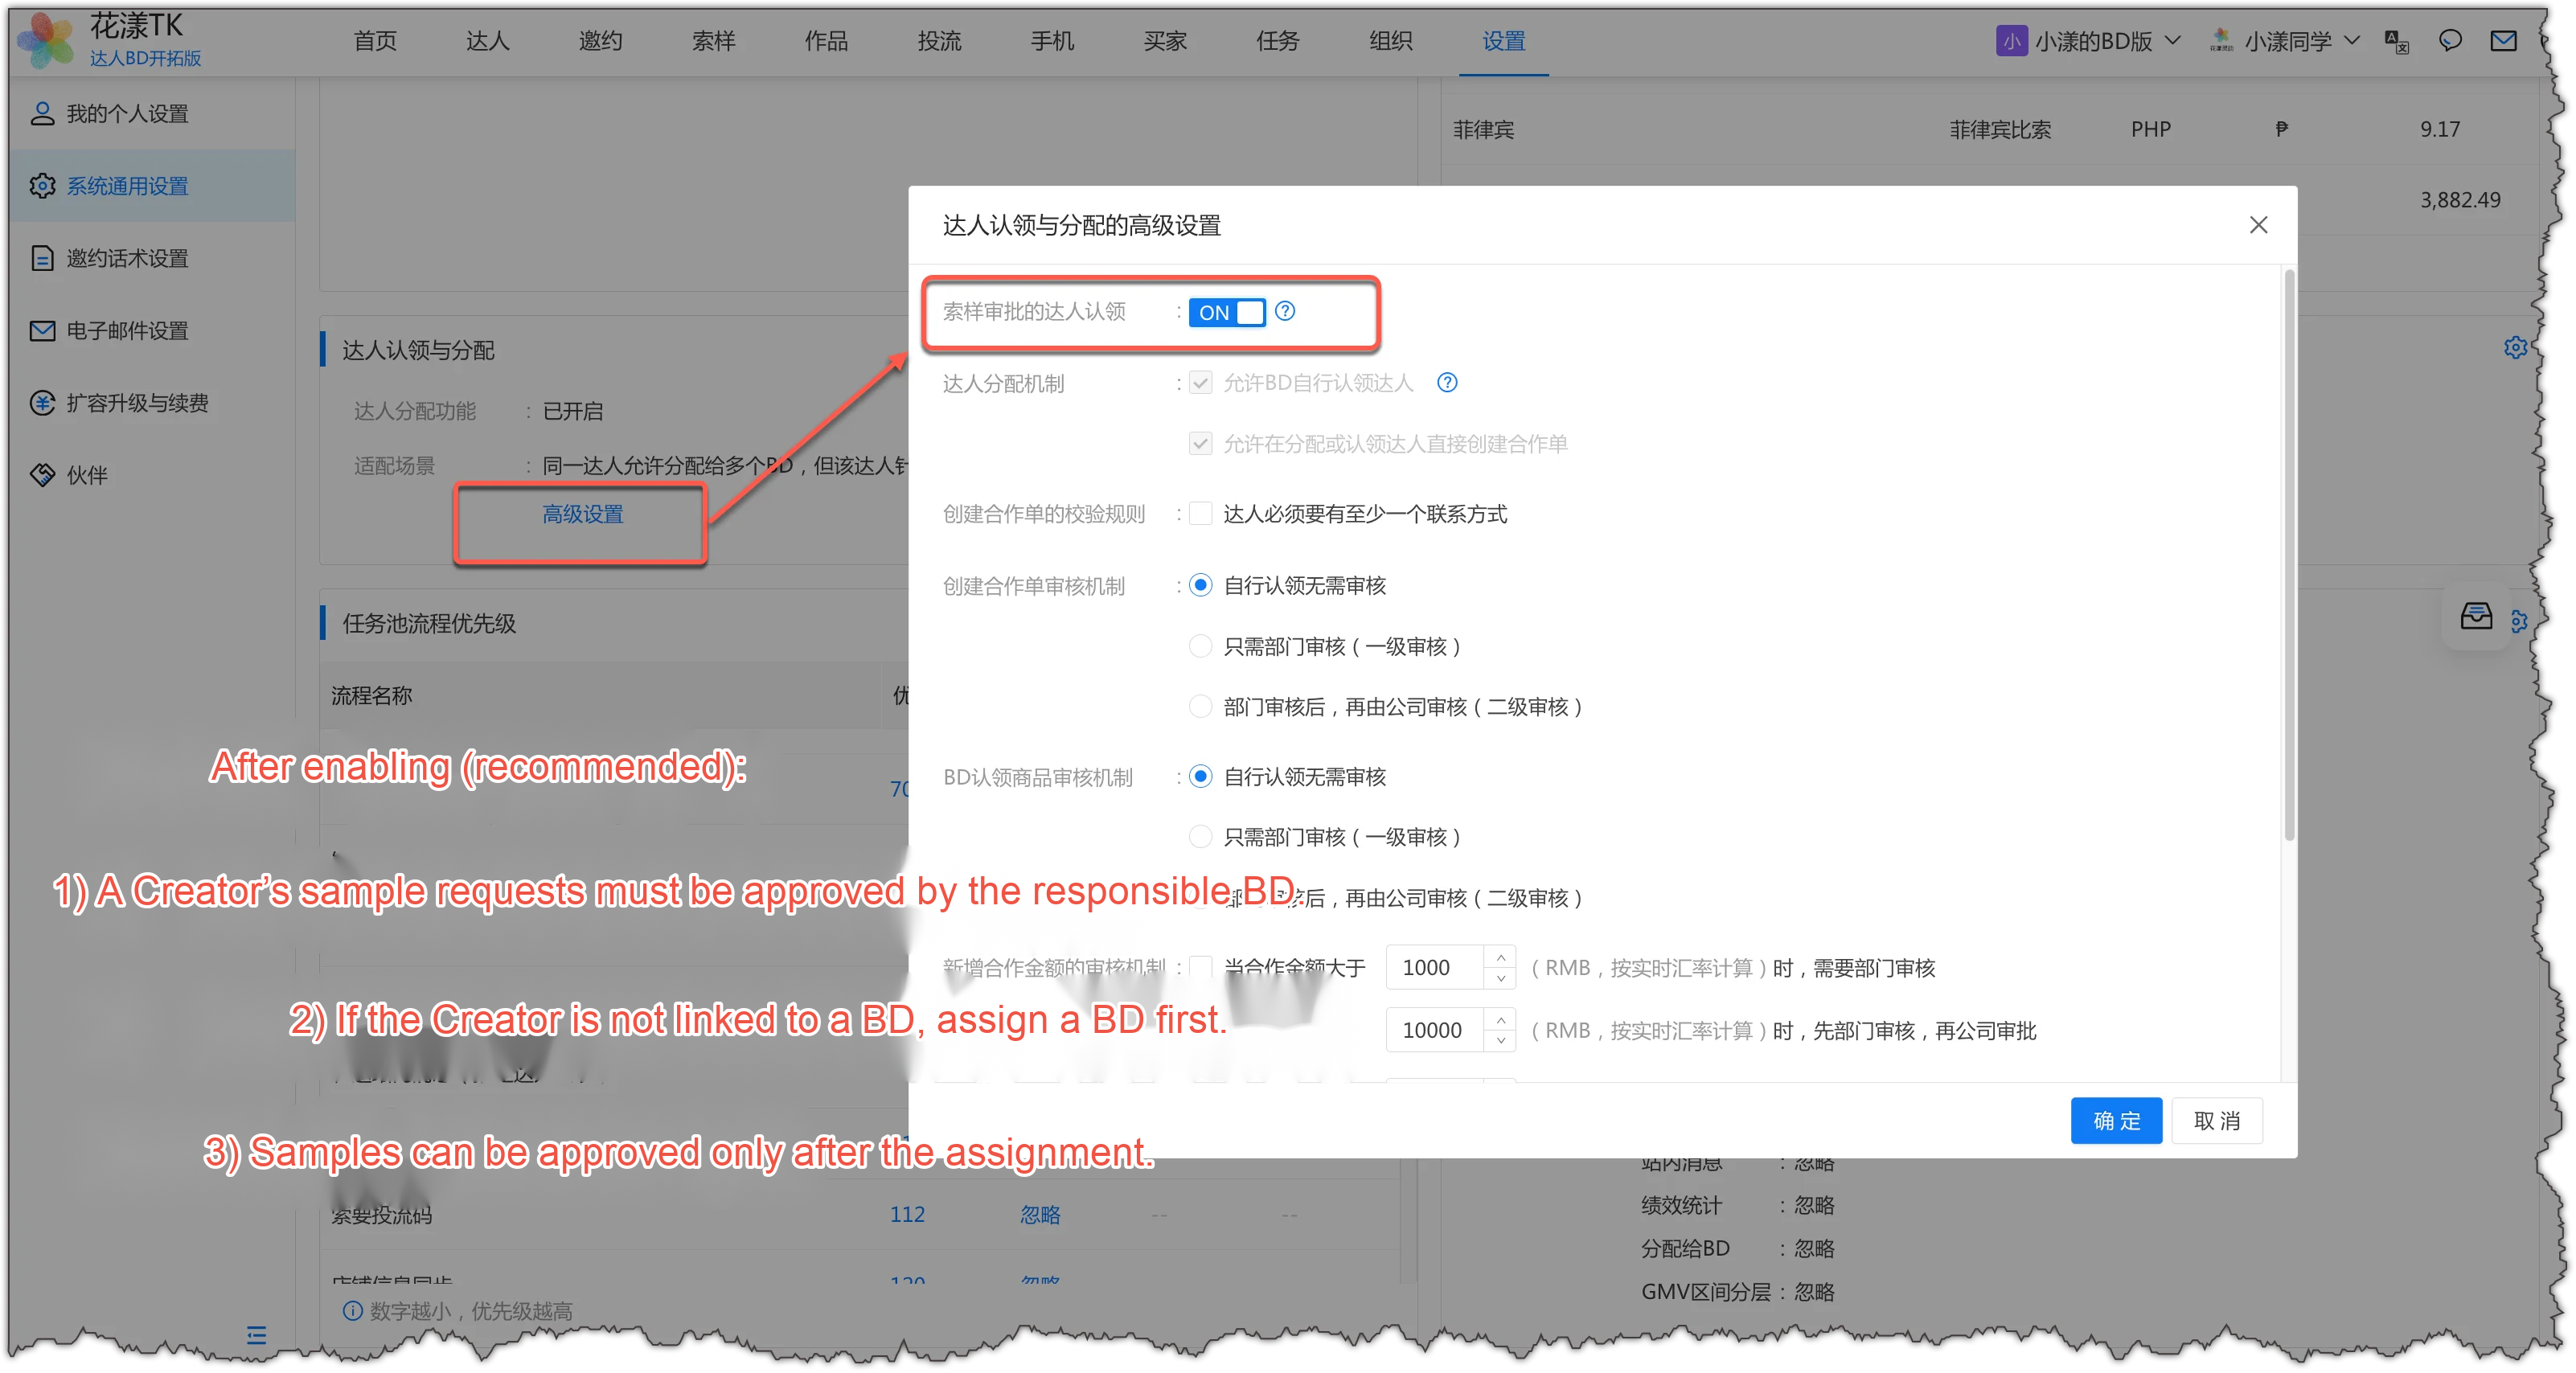
5.4.2 Advanced setting: creator ownership for sample-request approval (strongly recommended)
In “Settings – General settings – Creator claim & assignment – Advanced”, turn “Creator ownership for sample-request approval” ON.A Creator’s sample requests must be approved by the responsible BD (strongly recommended)
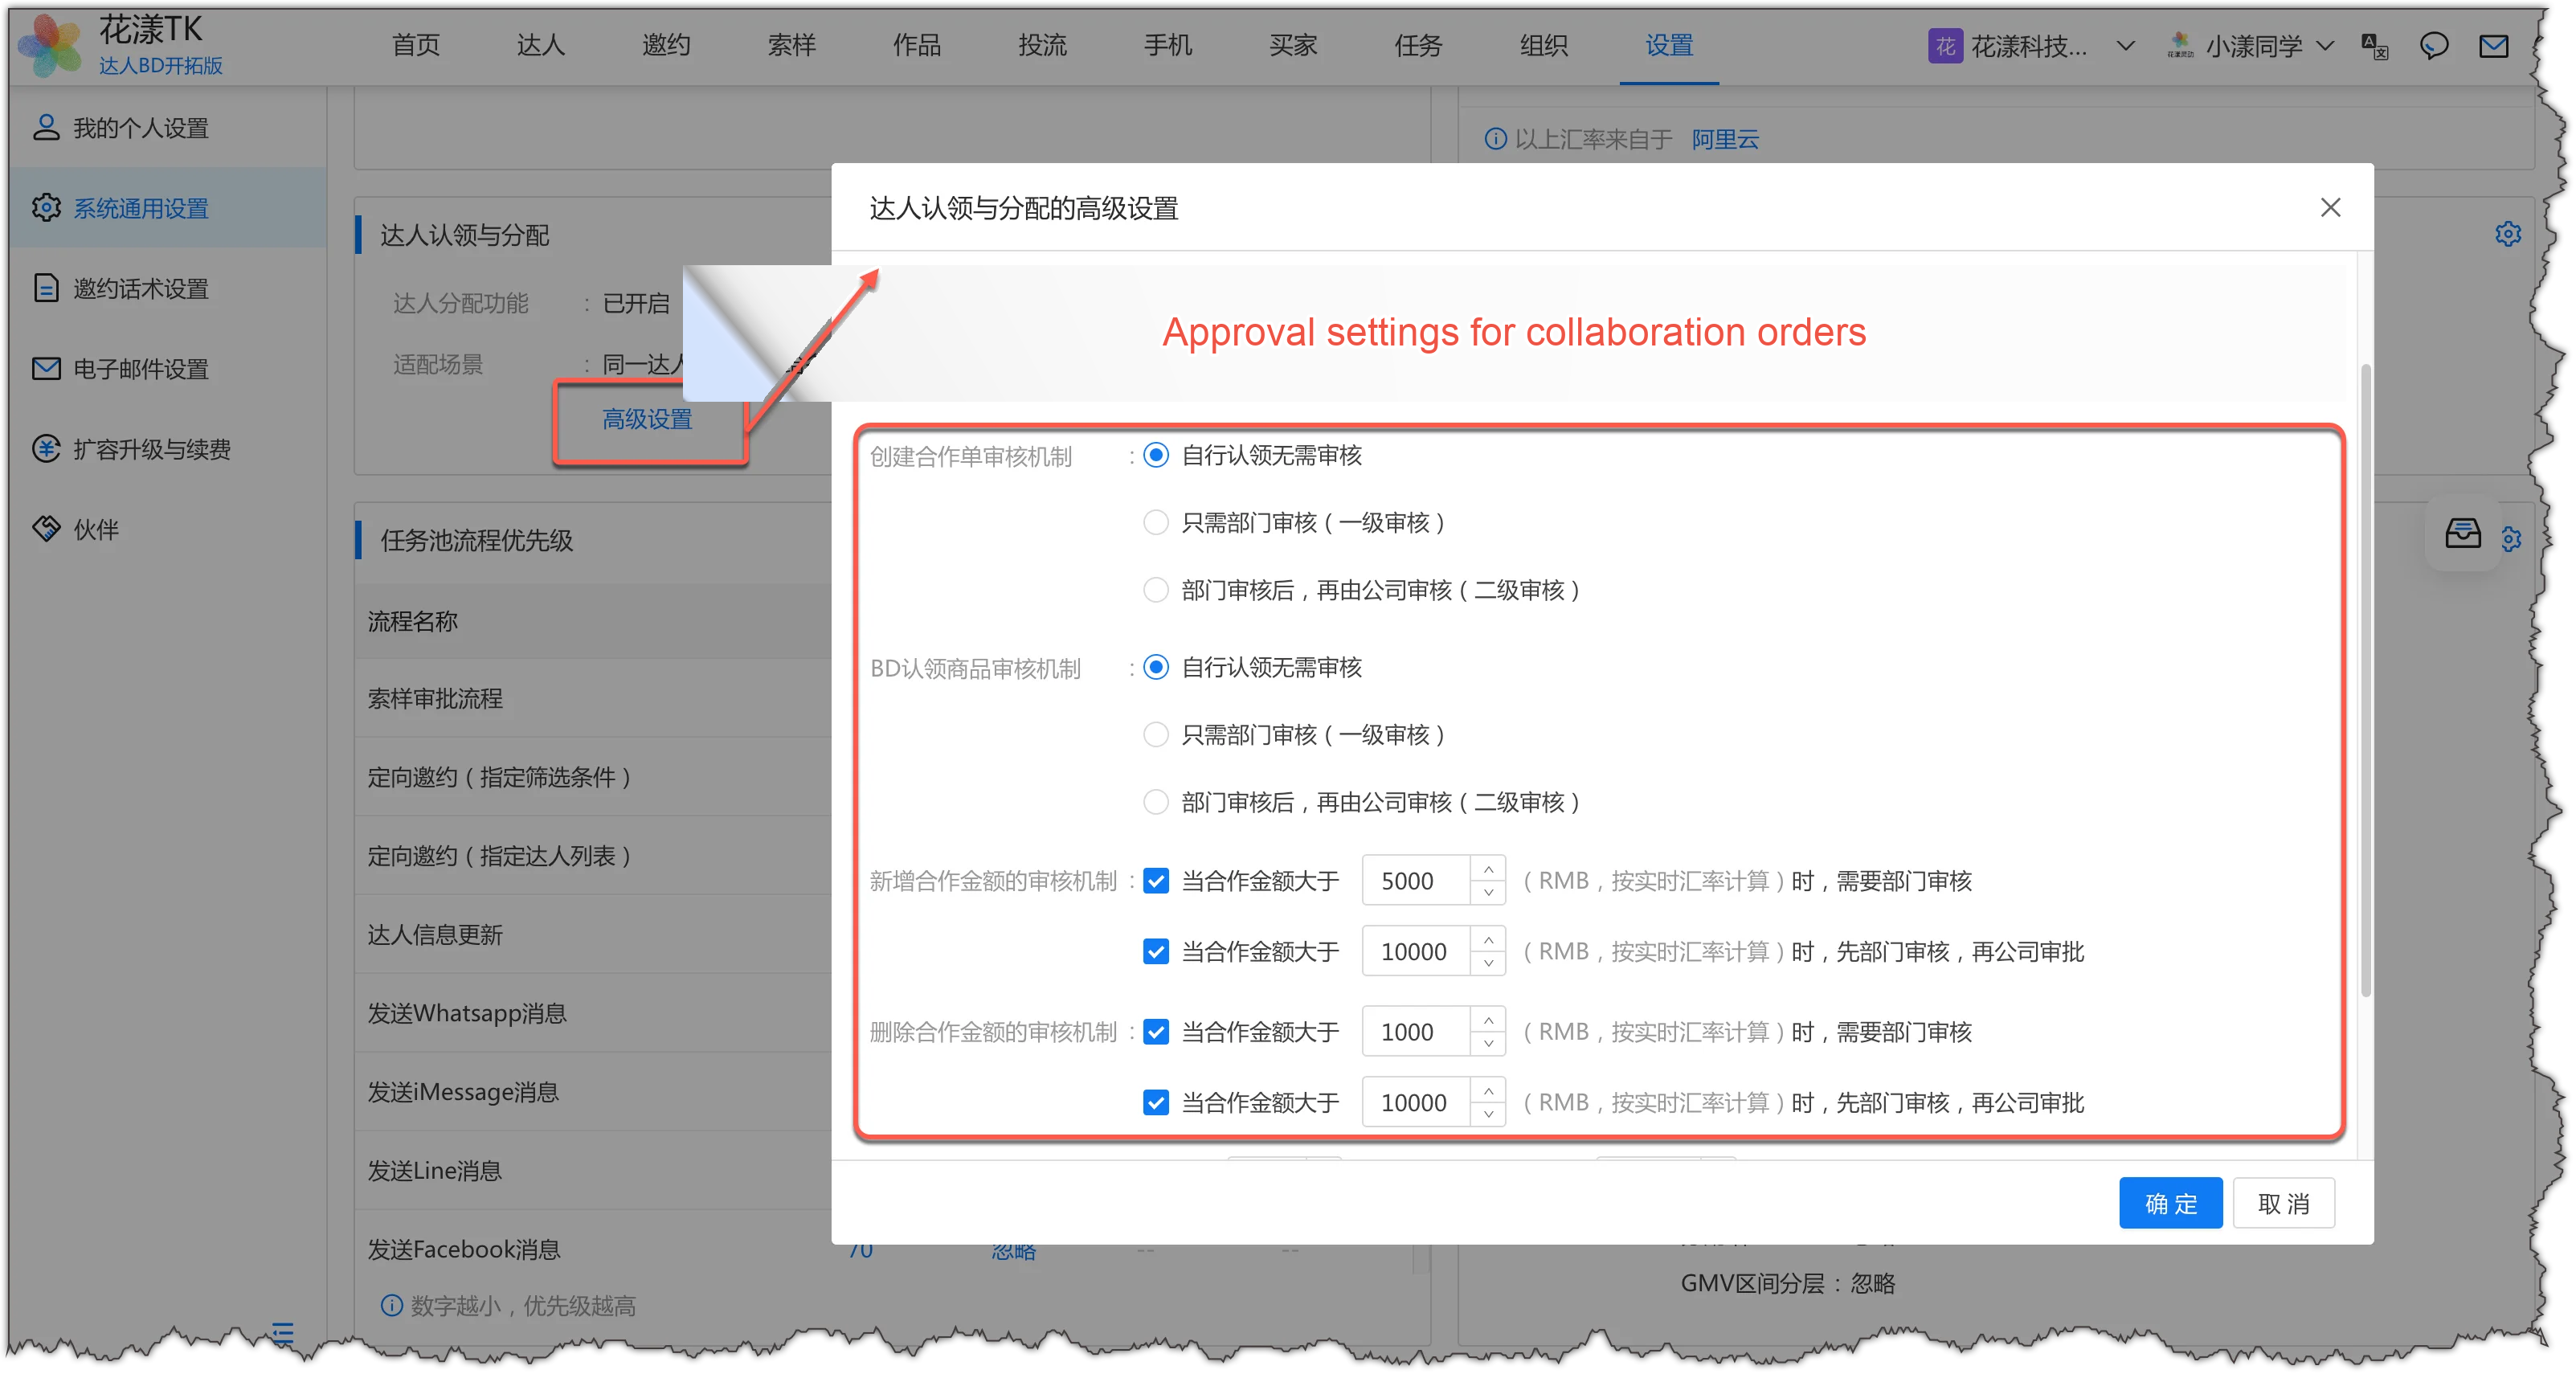
5.4.3 Advanced setting: workflow approvals
Workflow approvals can be triggered in four places: “when a collaboration order is created”, “when a BD claims a product in a collaboration order”, “when a new collaboration cost is added to a collaboration order”, and “when a collaboration cost is removed”. Approvals fall into two categories: department and company. 1) Department approval sends the request to every “Manager” in the member’s department; any one Manager can approve. 2) If multiple Managers exist, any one can approve; if none exist, the request is escalated to the parent department. 3) For three- or four-level departments, approvals cascade up to the top-level department. 4) Company approval sends the request to every “BOSS” role (including administrators); any BOSS can give final approval.Approval settings for collaboration orders