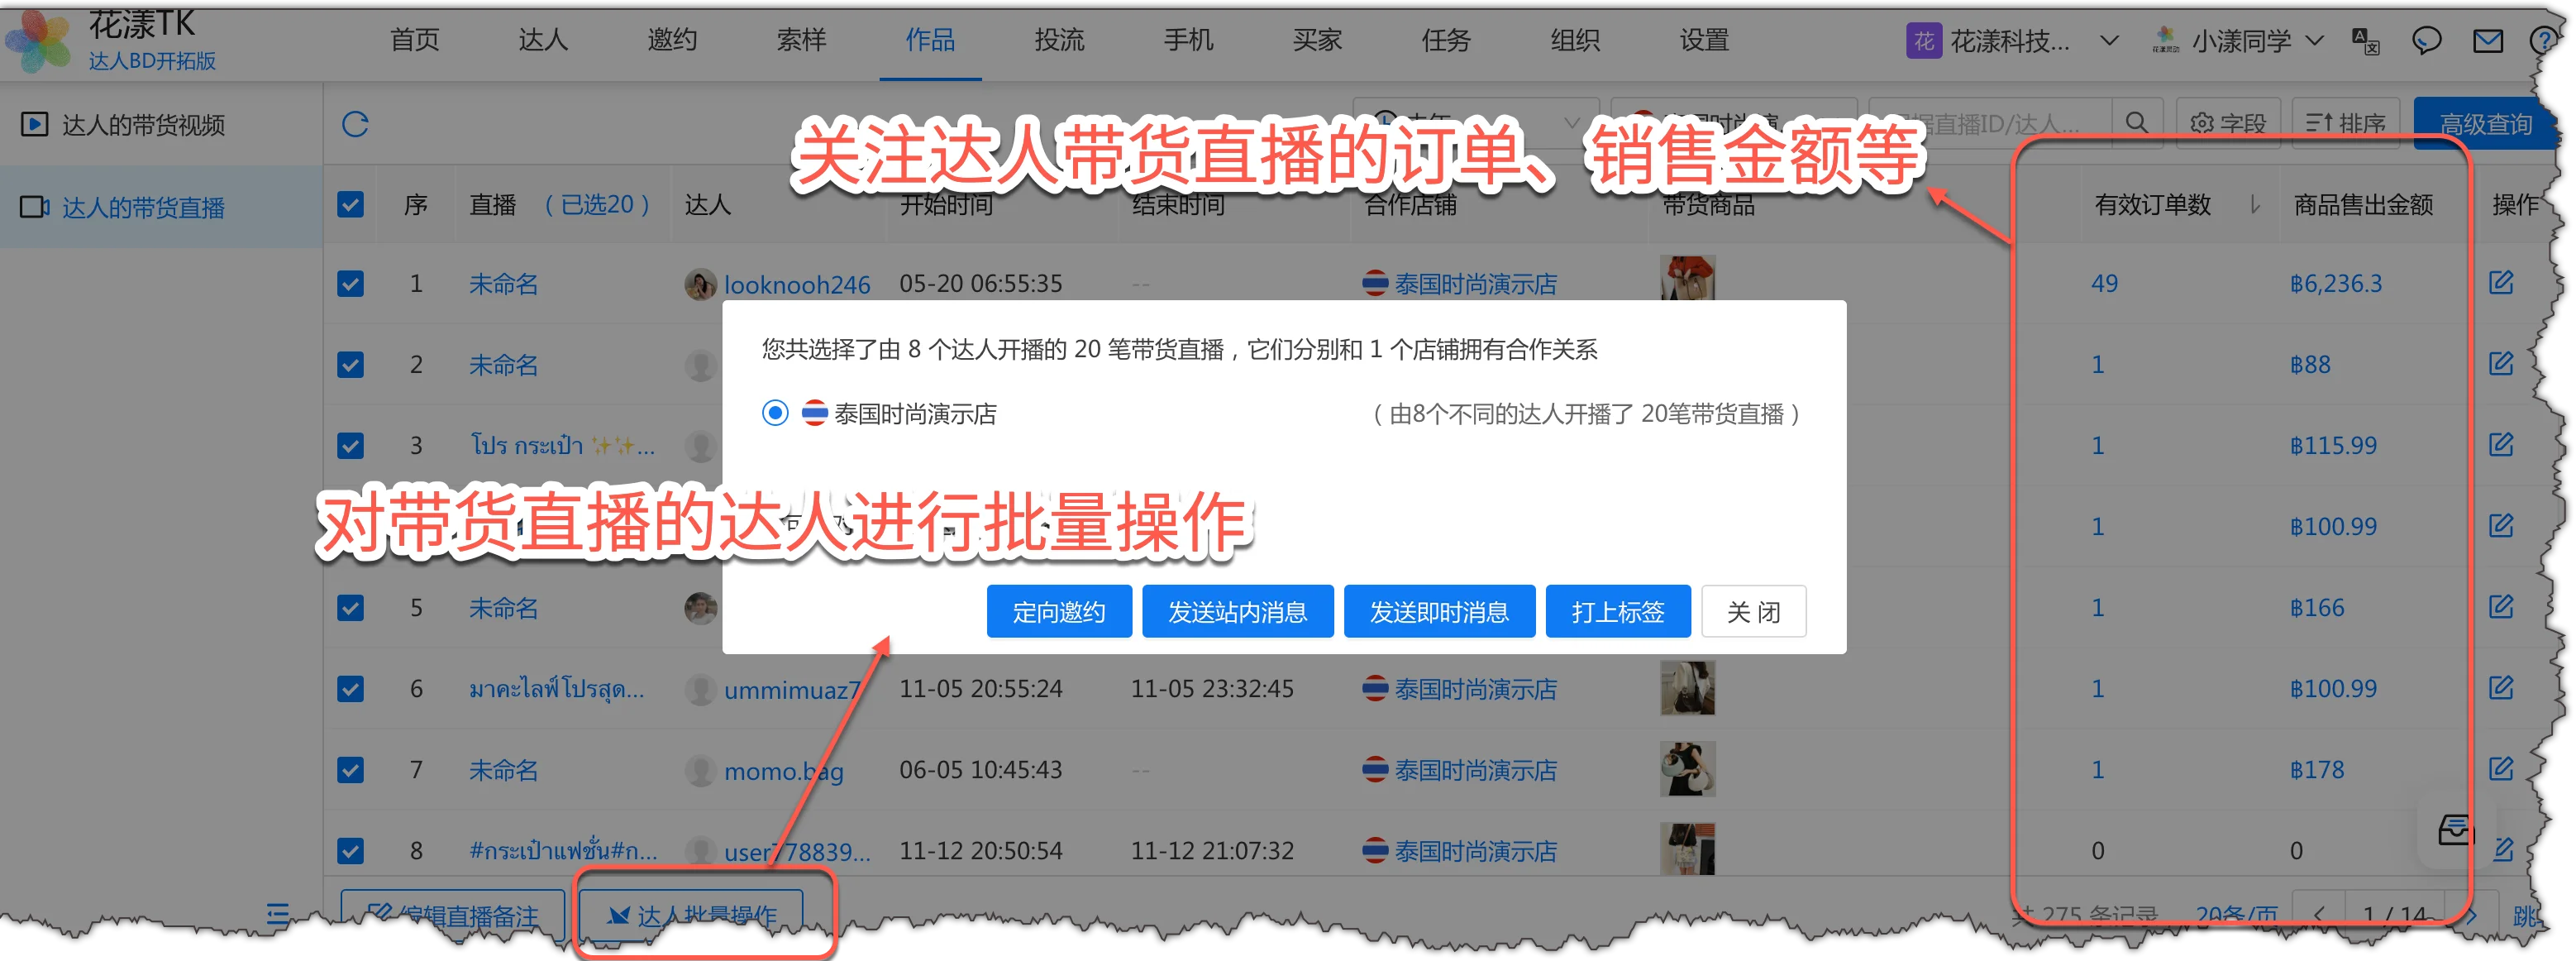
HuaYoung Creator Marketing Suite is more than a tool for bulk creator outreach — it is a full-lifecycle operations system for creator marketing.
Shop data sync pulls the latest products, sample requests, invitations, orders, and more into HuaYoung, providing the data foundation for downstream operations such as creator invitation and outreach, sample approval, content management, ad campaigns, and private-domain nurturing, as well as for the system’s intelligent analytics.
1.1
Sync Shop Data
Open the HuaYoung TK portal in a regular browser (not Ziniao, Zhanfu, or other fingerprint browsers): tkshop.szdamai.com
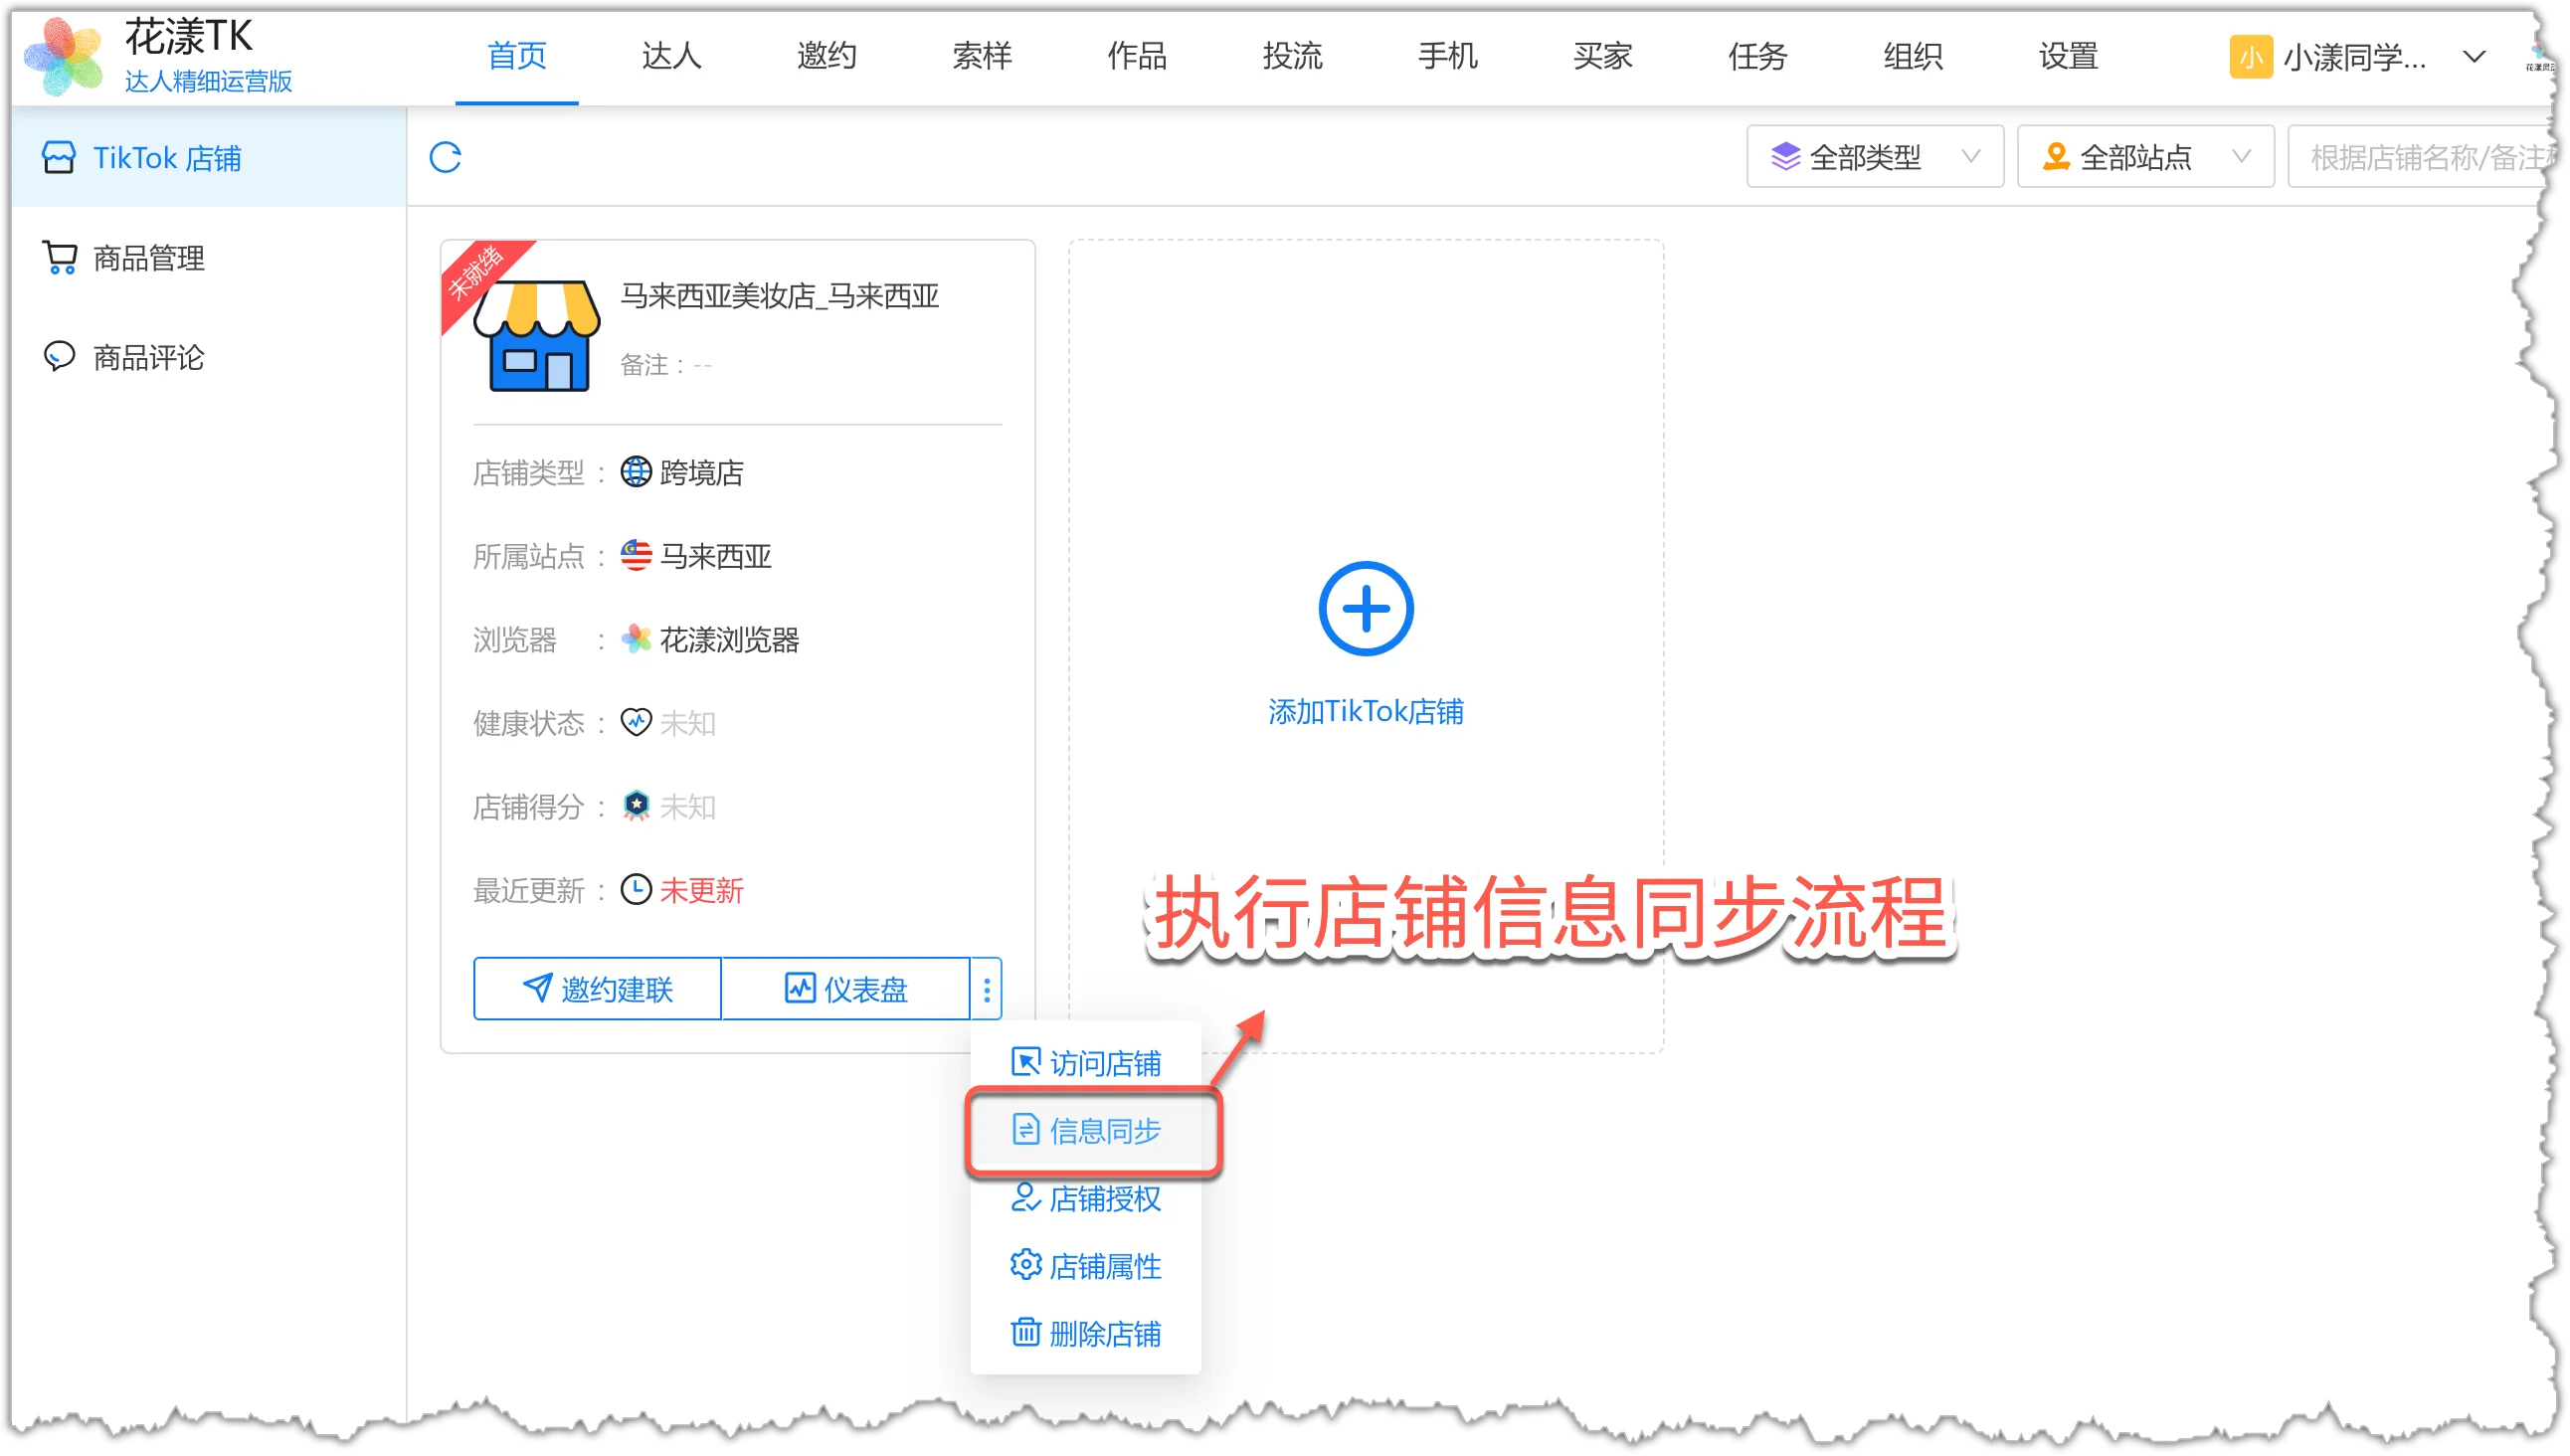
In the left menu of the HuaYoung TK portal, choose “TikTok Stores”, then click the “More” dropdown on the target store card and select “Sync Data”.
Under “TikTok Stores”, click “More → Sync Data” on the target store cardNote: When the flow actually runs, the system uses the fingerprint browser that hosts the HuaYoung TK extension (Ziniao, Zhanfu, AdsPower, etc.) or the HuaYoung Browser built into the HuaYoung Client to access the store and execute the flow, keeping the network environment secure.
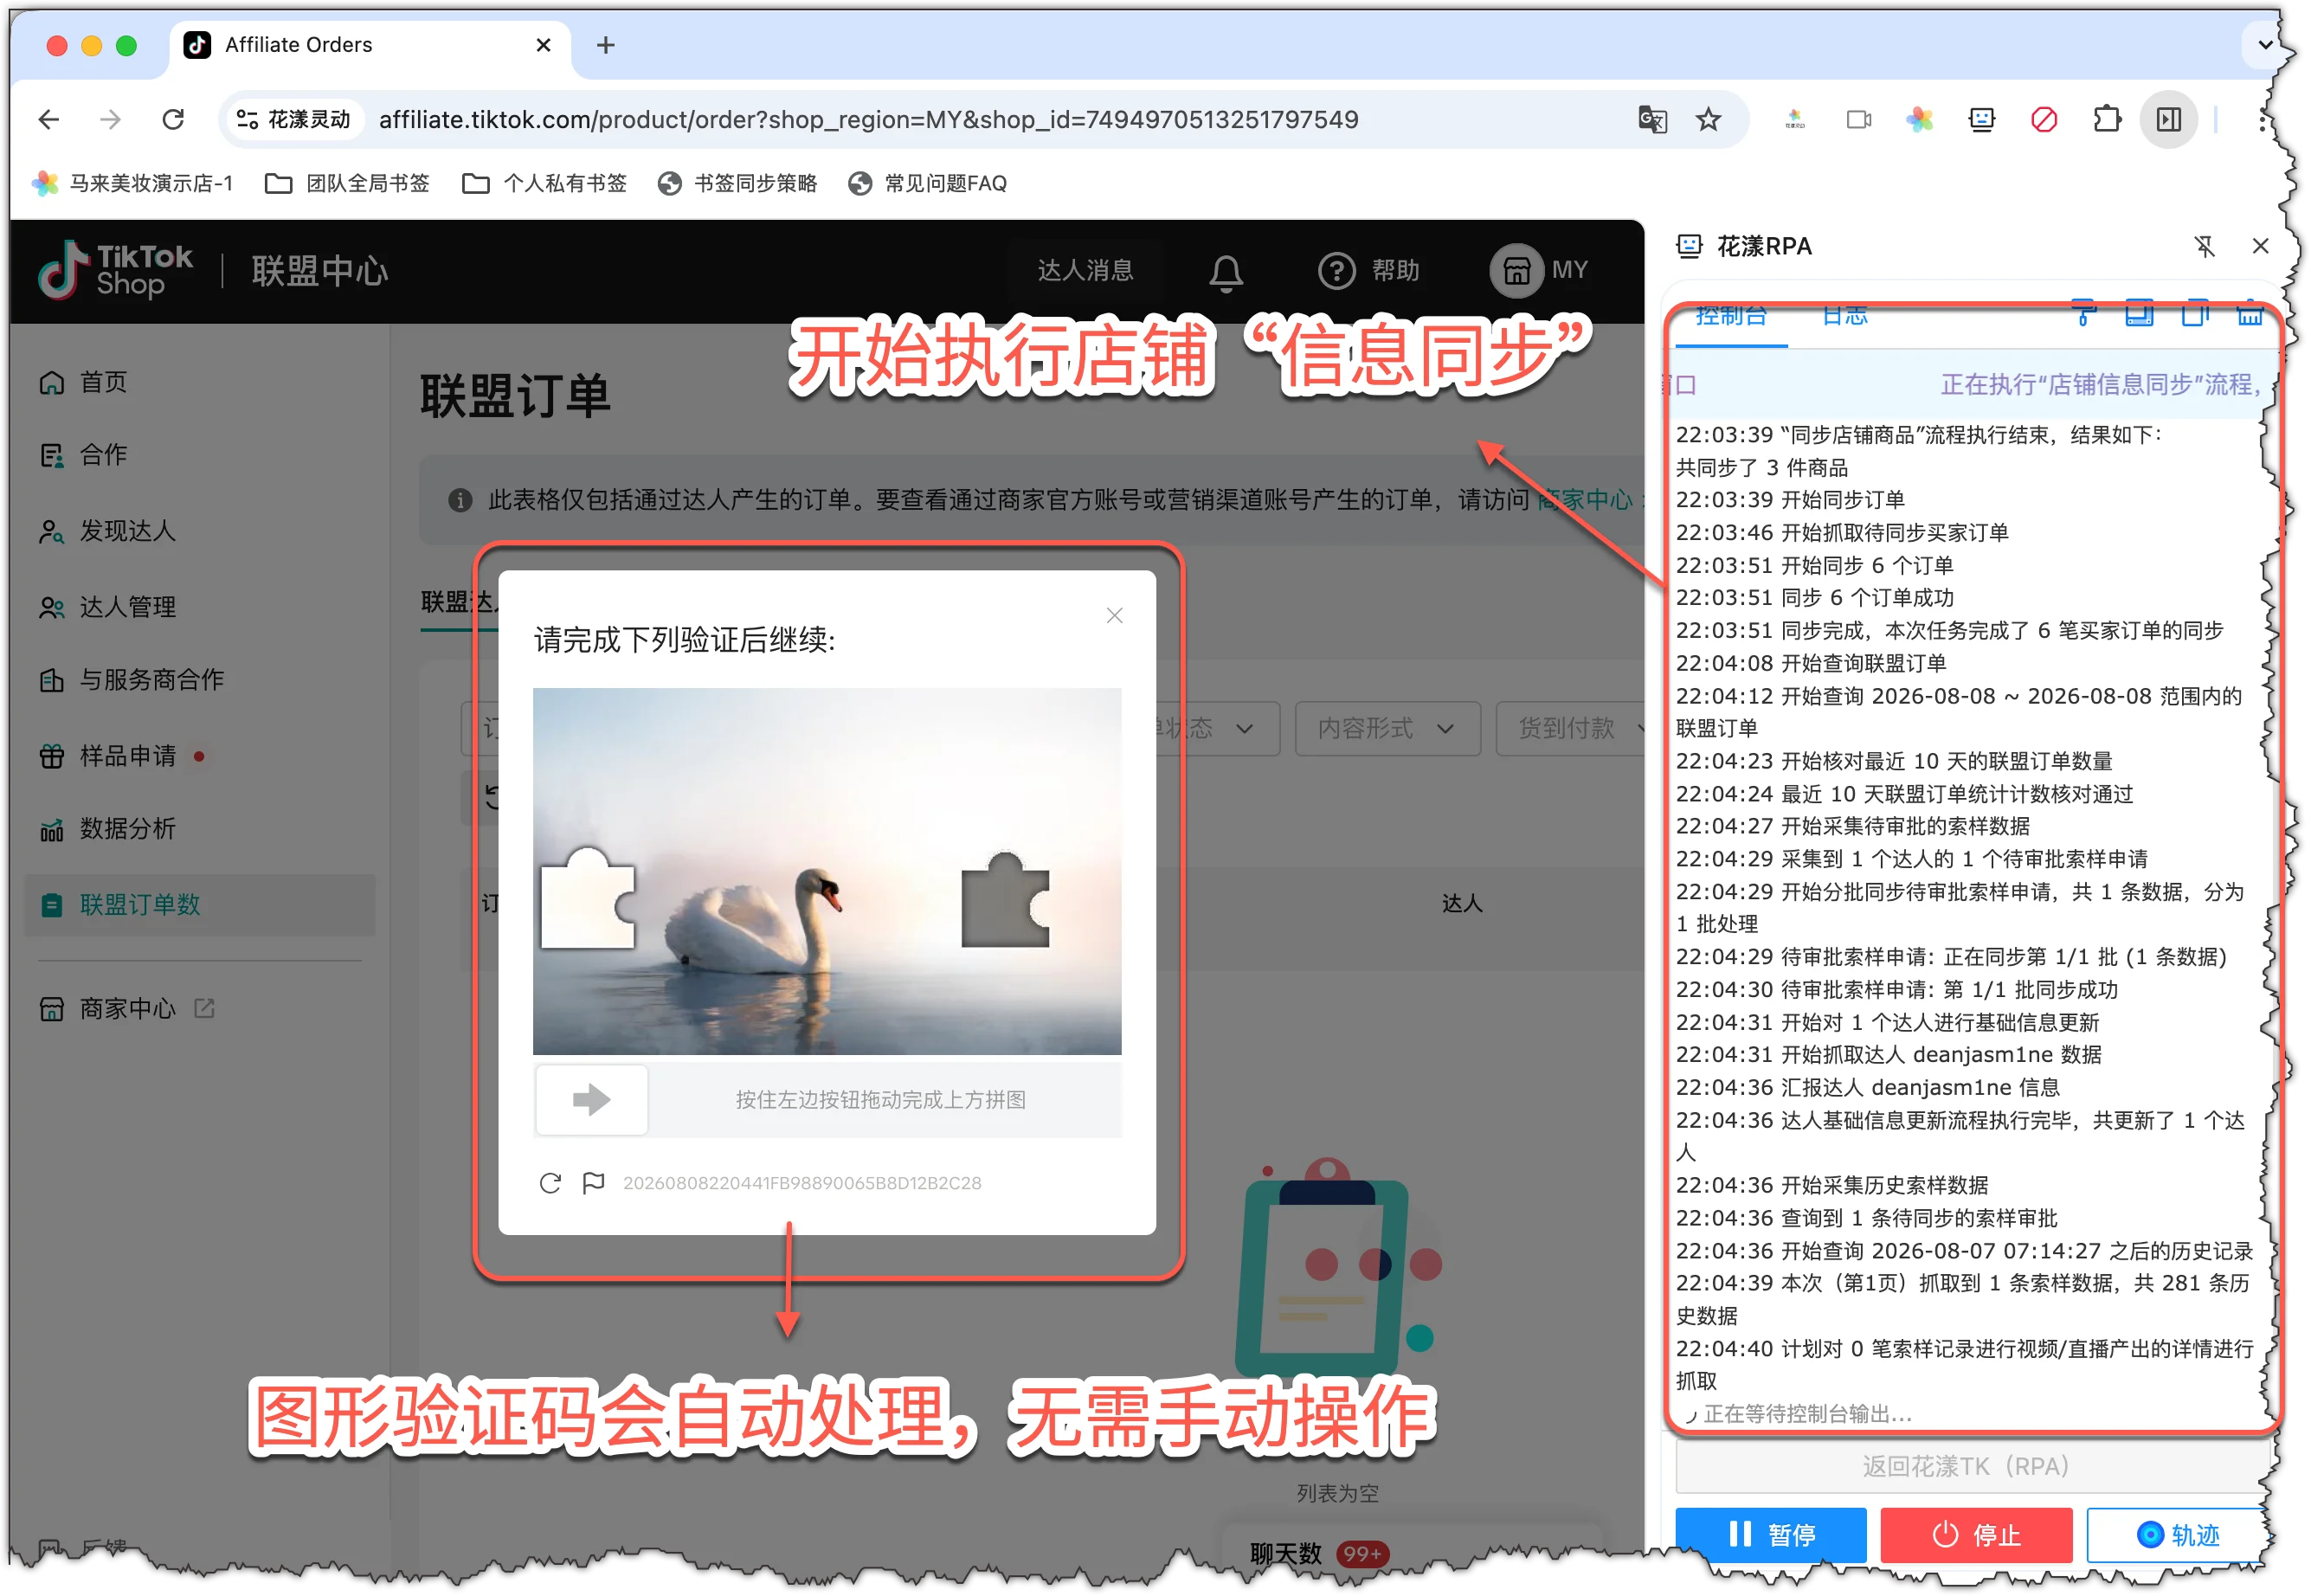
3. The system automatically opens a fingerprint browser (Ziniao, Zhanfu, AdsPower, HuaYoung, etc.) and runs the sync flow in the store backend.The system automatically opens a fingerprint browser to run shop data sync
Notes:
The first run is a full crawl and can take a while — please be patient. Subsequent runs are incremental and much faster;
During sync, do not close the browser, switch tabs, or minimize the window, as this may interrupt the task;
If a CAPTCHA appears, it is handled automatically — no manual action is required.
1.2
Check the Sync Result
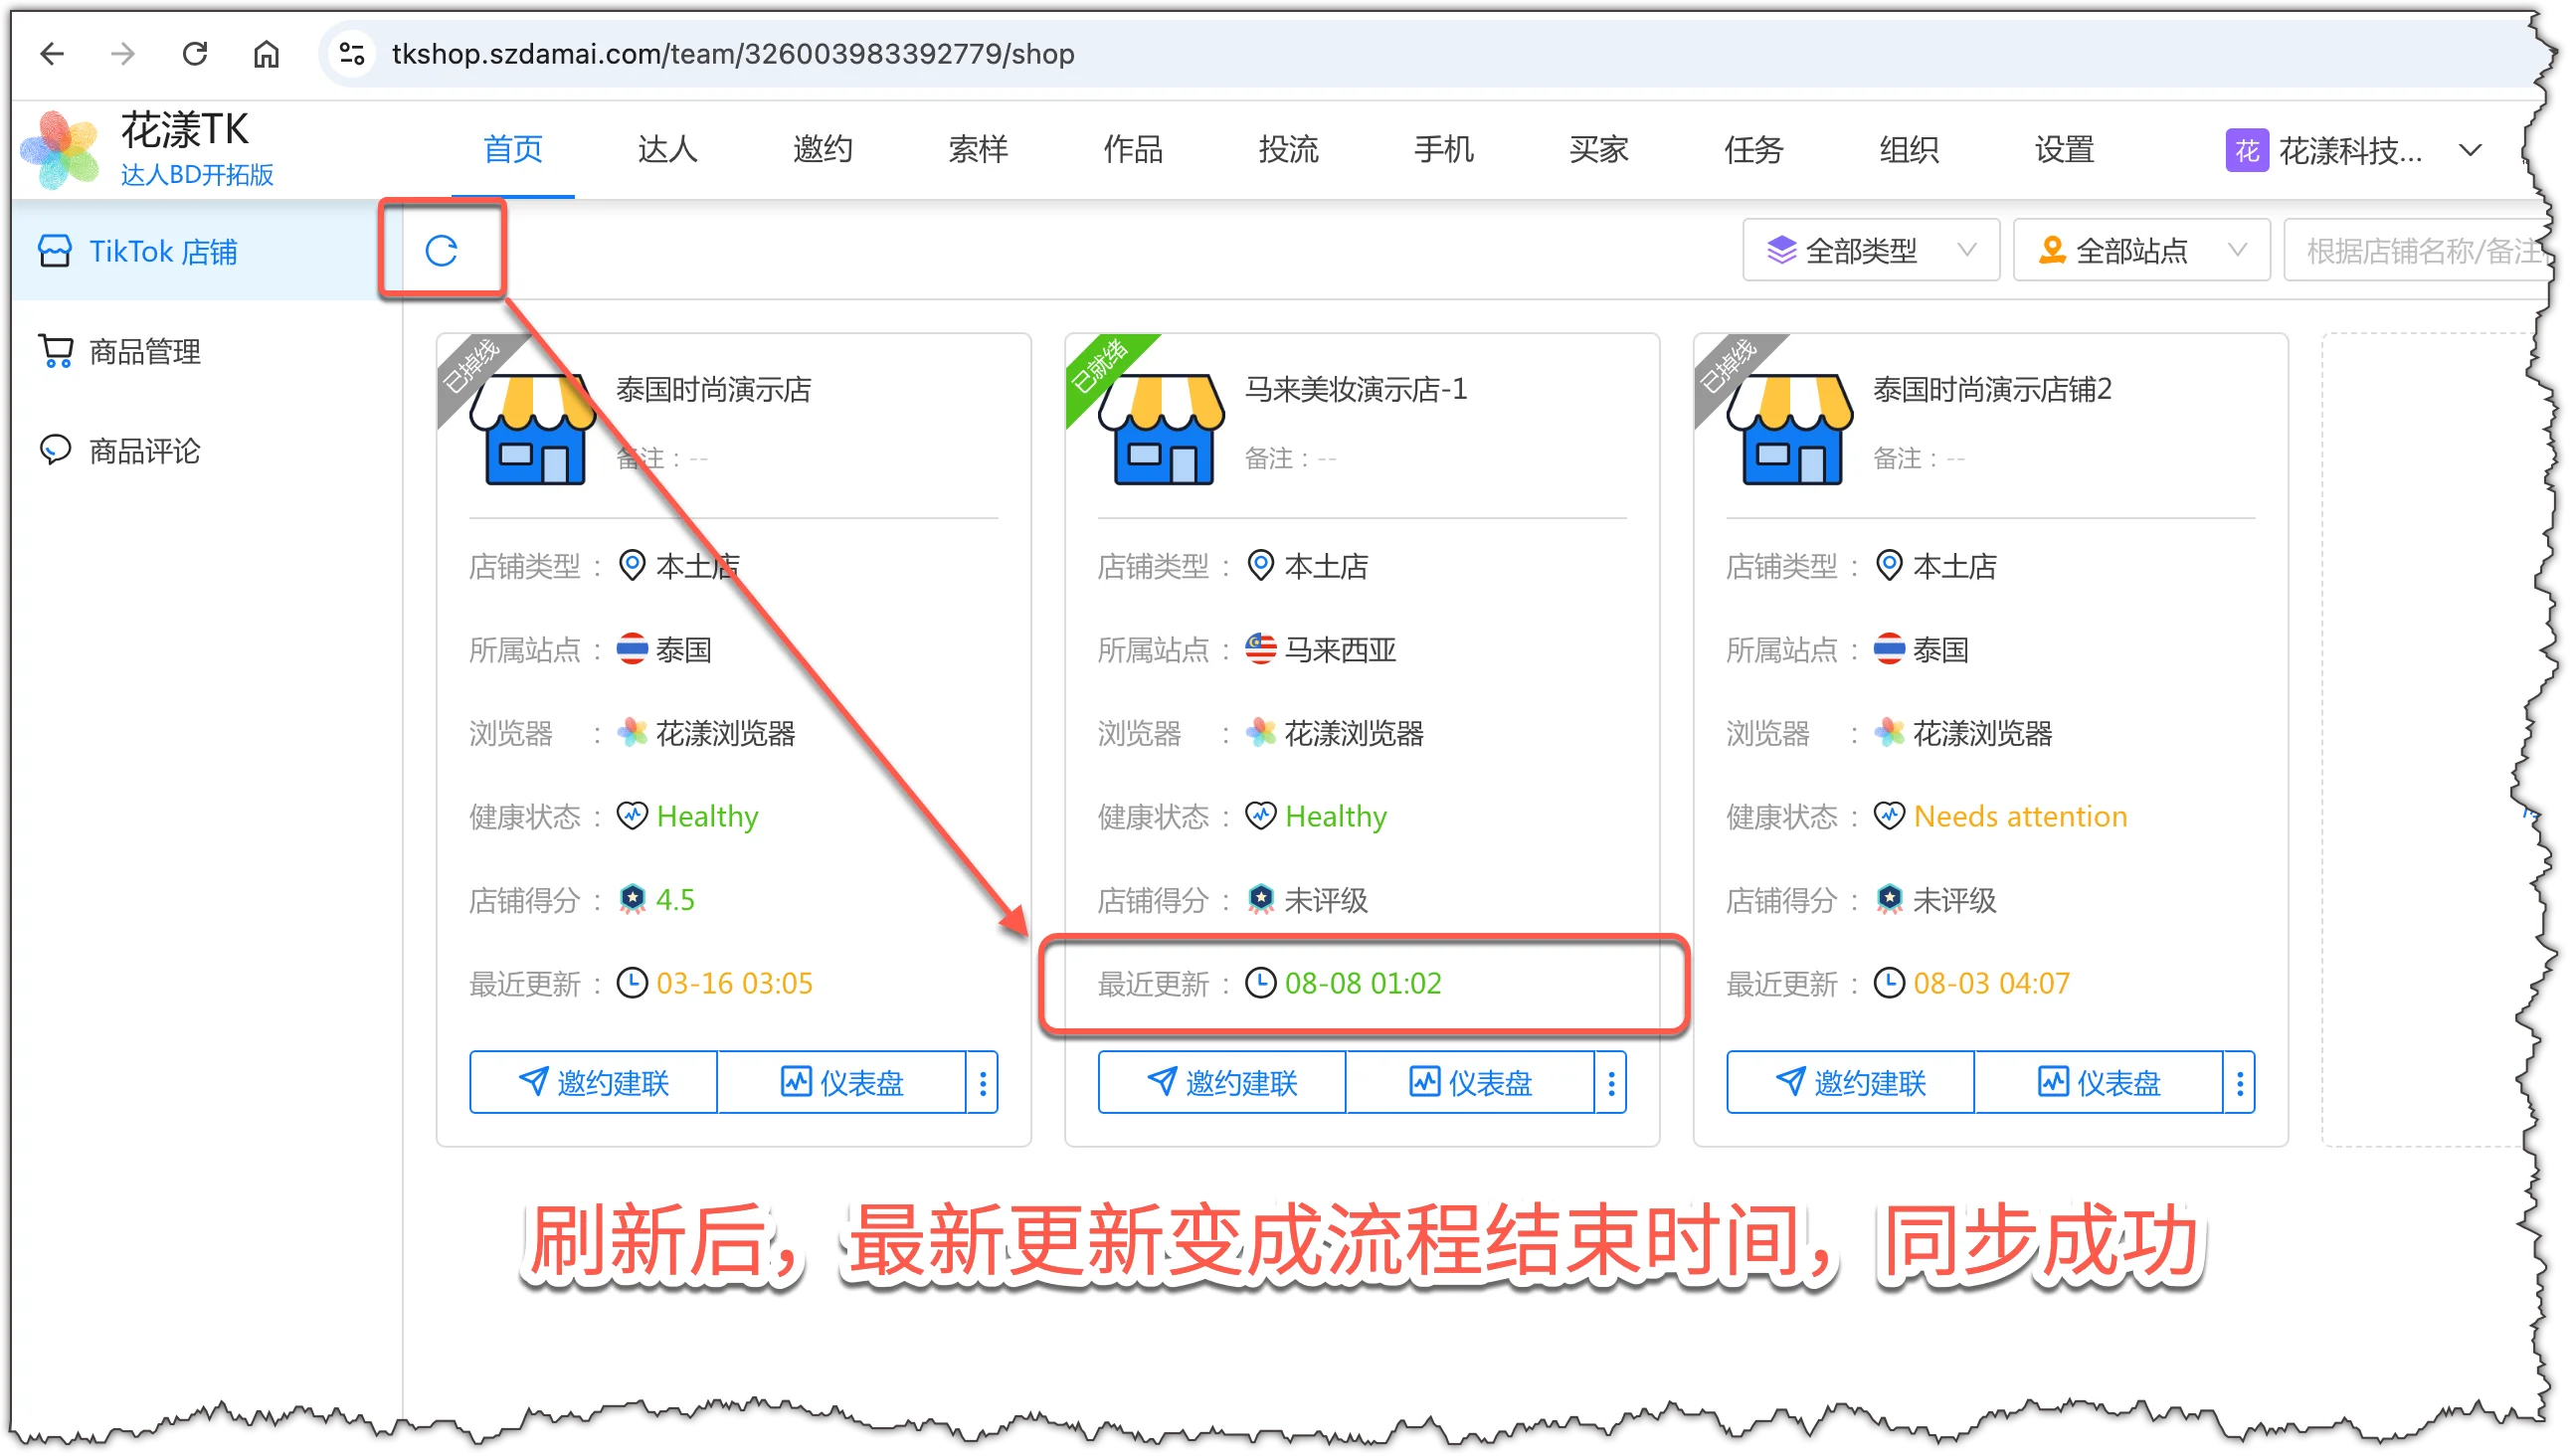
After sync completes, return to the portal and click “Refresh”. If the “Last Updated” time on the store card is updated to the time when the flow just finished, the shop data has been refreshed and you can start follow-up operations.After refresh, the store card shows the updated “Last Updated” time, confirming sync is complete
Notes:
For daily operations, run the shop data sync flow 1–2 times a day (once in the morning and once in the evening).
2.
Creator Invitation and Outreach
Creator invitation and outreach means sellers proactively contact content creators on TikTok to invite them to promote products, leveraging the creators’ reach and influence to lift shop sales. This is one of the key differences between a TikTok Shop and other e-commerce platforms.
HuaYoung TK supports multiple creator invitation and outreach methods, all of which are “one-click to start, fully automatic”:
Targeted Invitation: Create an invitation plan, set the products, commission, contact method and validity period — this is the core collaboration method;
Inbox Messages: Communicate with creators through the TikTok Shop backend inbox, often used for follow-ups after a targeted invitation or for everyday communication;
Email: Reach overseas creators by email — especially important on US and European sites as a supplementary channel;
Off-platform Outreach: Send instant messages to creators through their social accounts (such as WhatsApp, Line, Viber, Zalo, Facebook, iMessage, etc.) to contact, communicate, and collaborate.
2.1
Targeted Invitation
Targeted invitation creates an invitation plan for creators, setting the products, commission, contact method and validity period to invite creators to promote products.
2.1.1 Step 1: Open “Targeted Invitation”
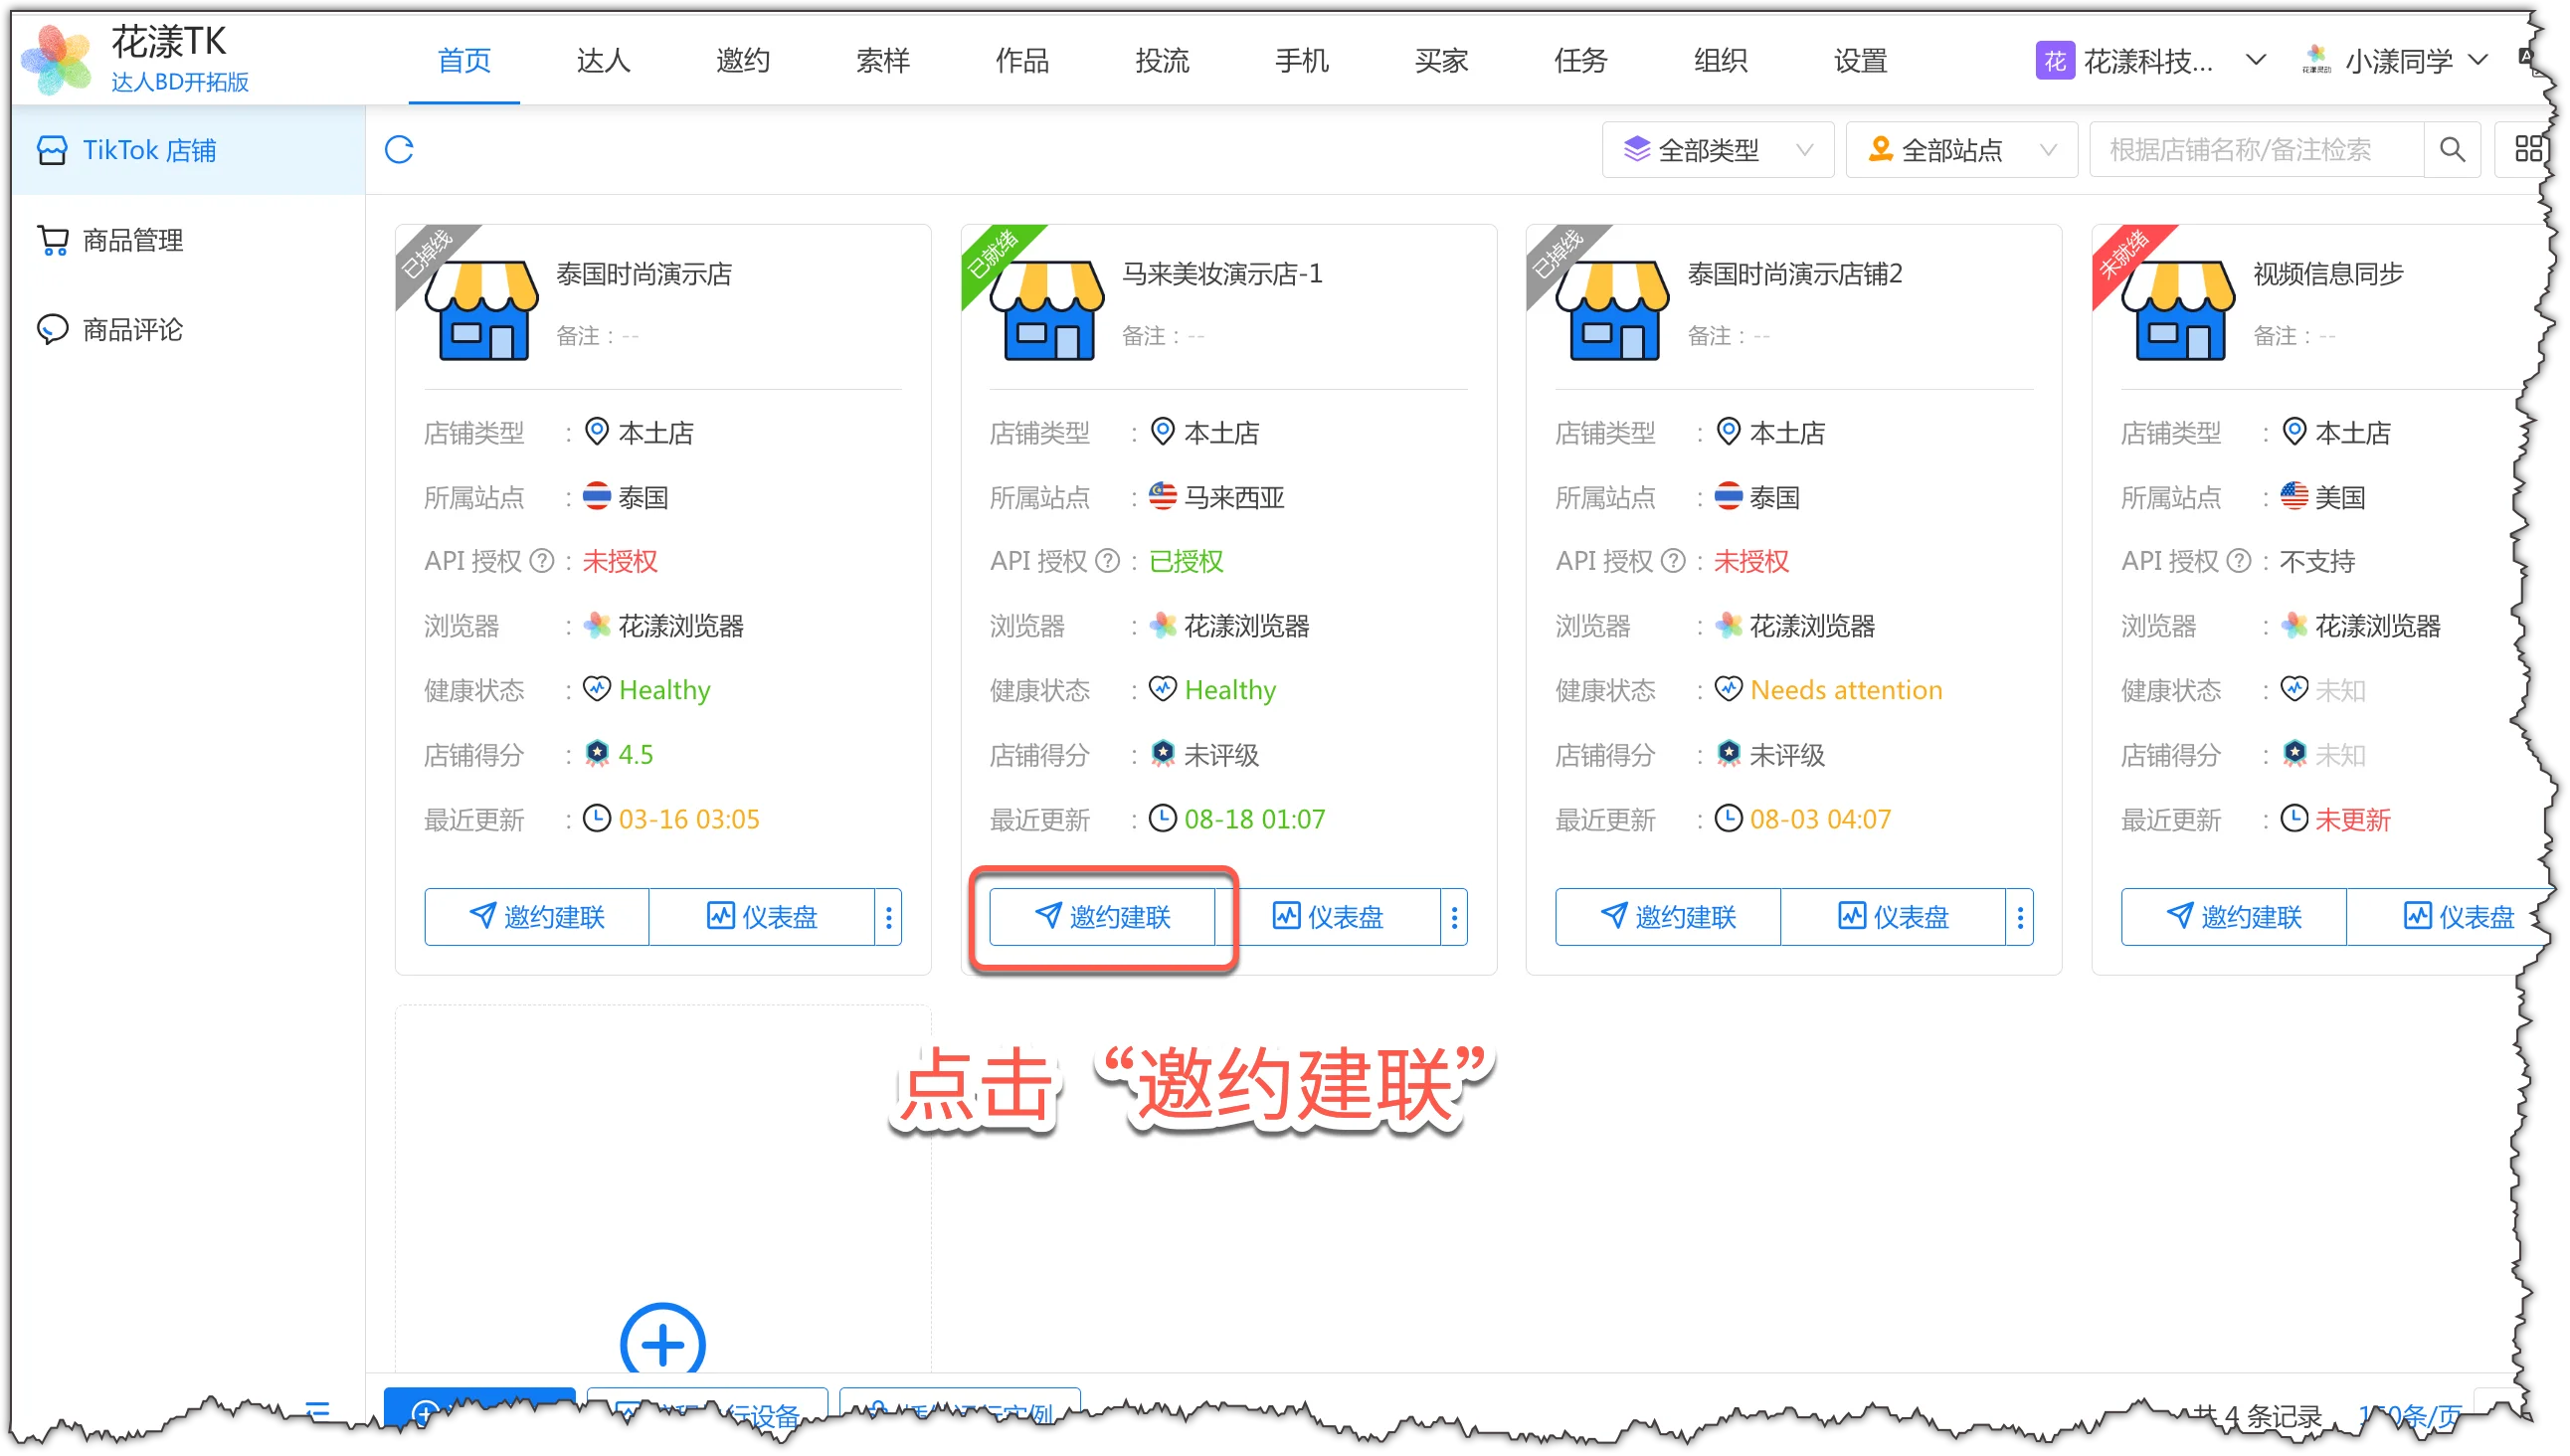
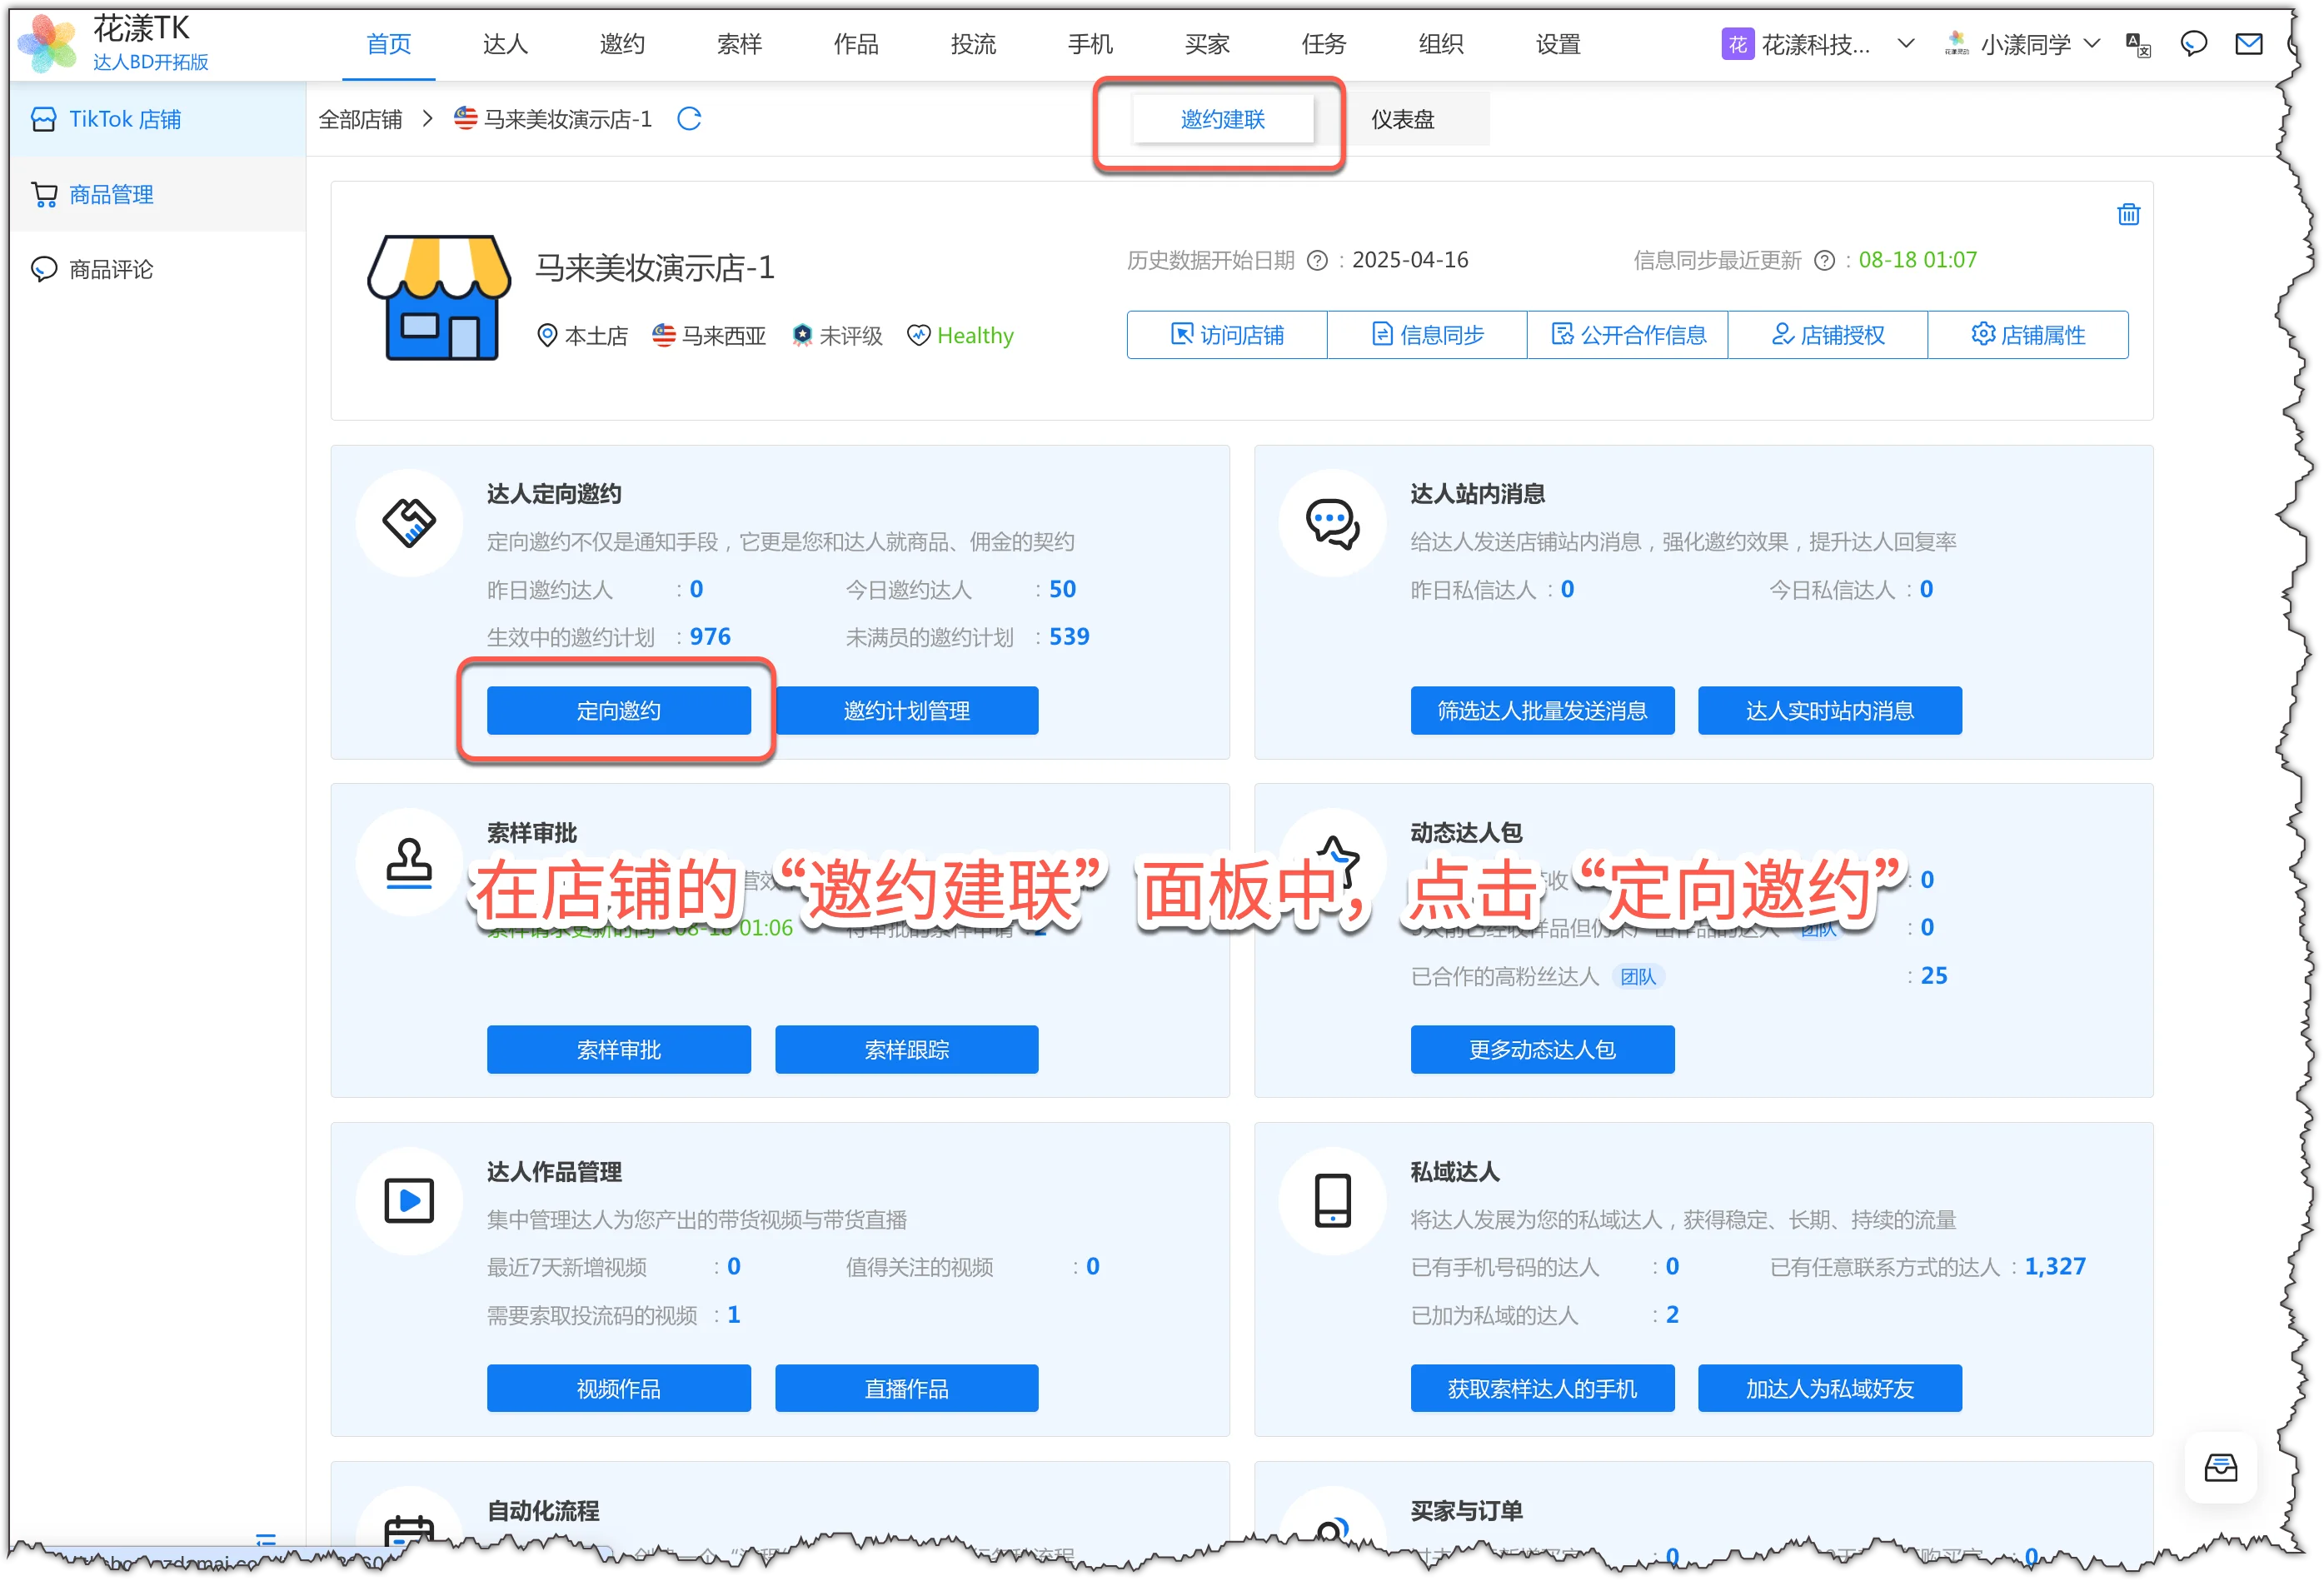
On the HuaYoung TK portal, go to “Home – TikTok Stores” and click the “Invite & Outreach” button on the store card;
On “Home – TikTok Stores”, click the “Invite & Outreach” button on the store card
Then click “Targeted Invitation” on the page — the targeted invitation wizard dialog will pop up.
In the store “Invite & Outreach” panel, click “Targeted Invitation”
2.1.2 Step 2: Choose Products
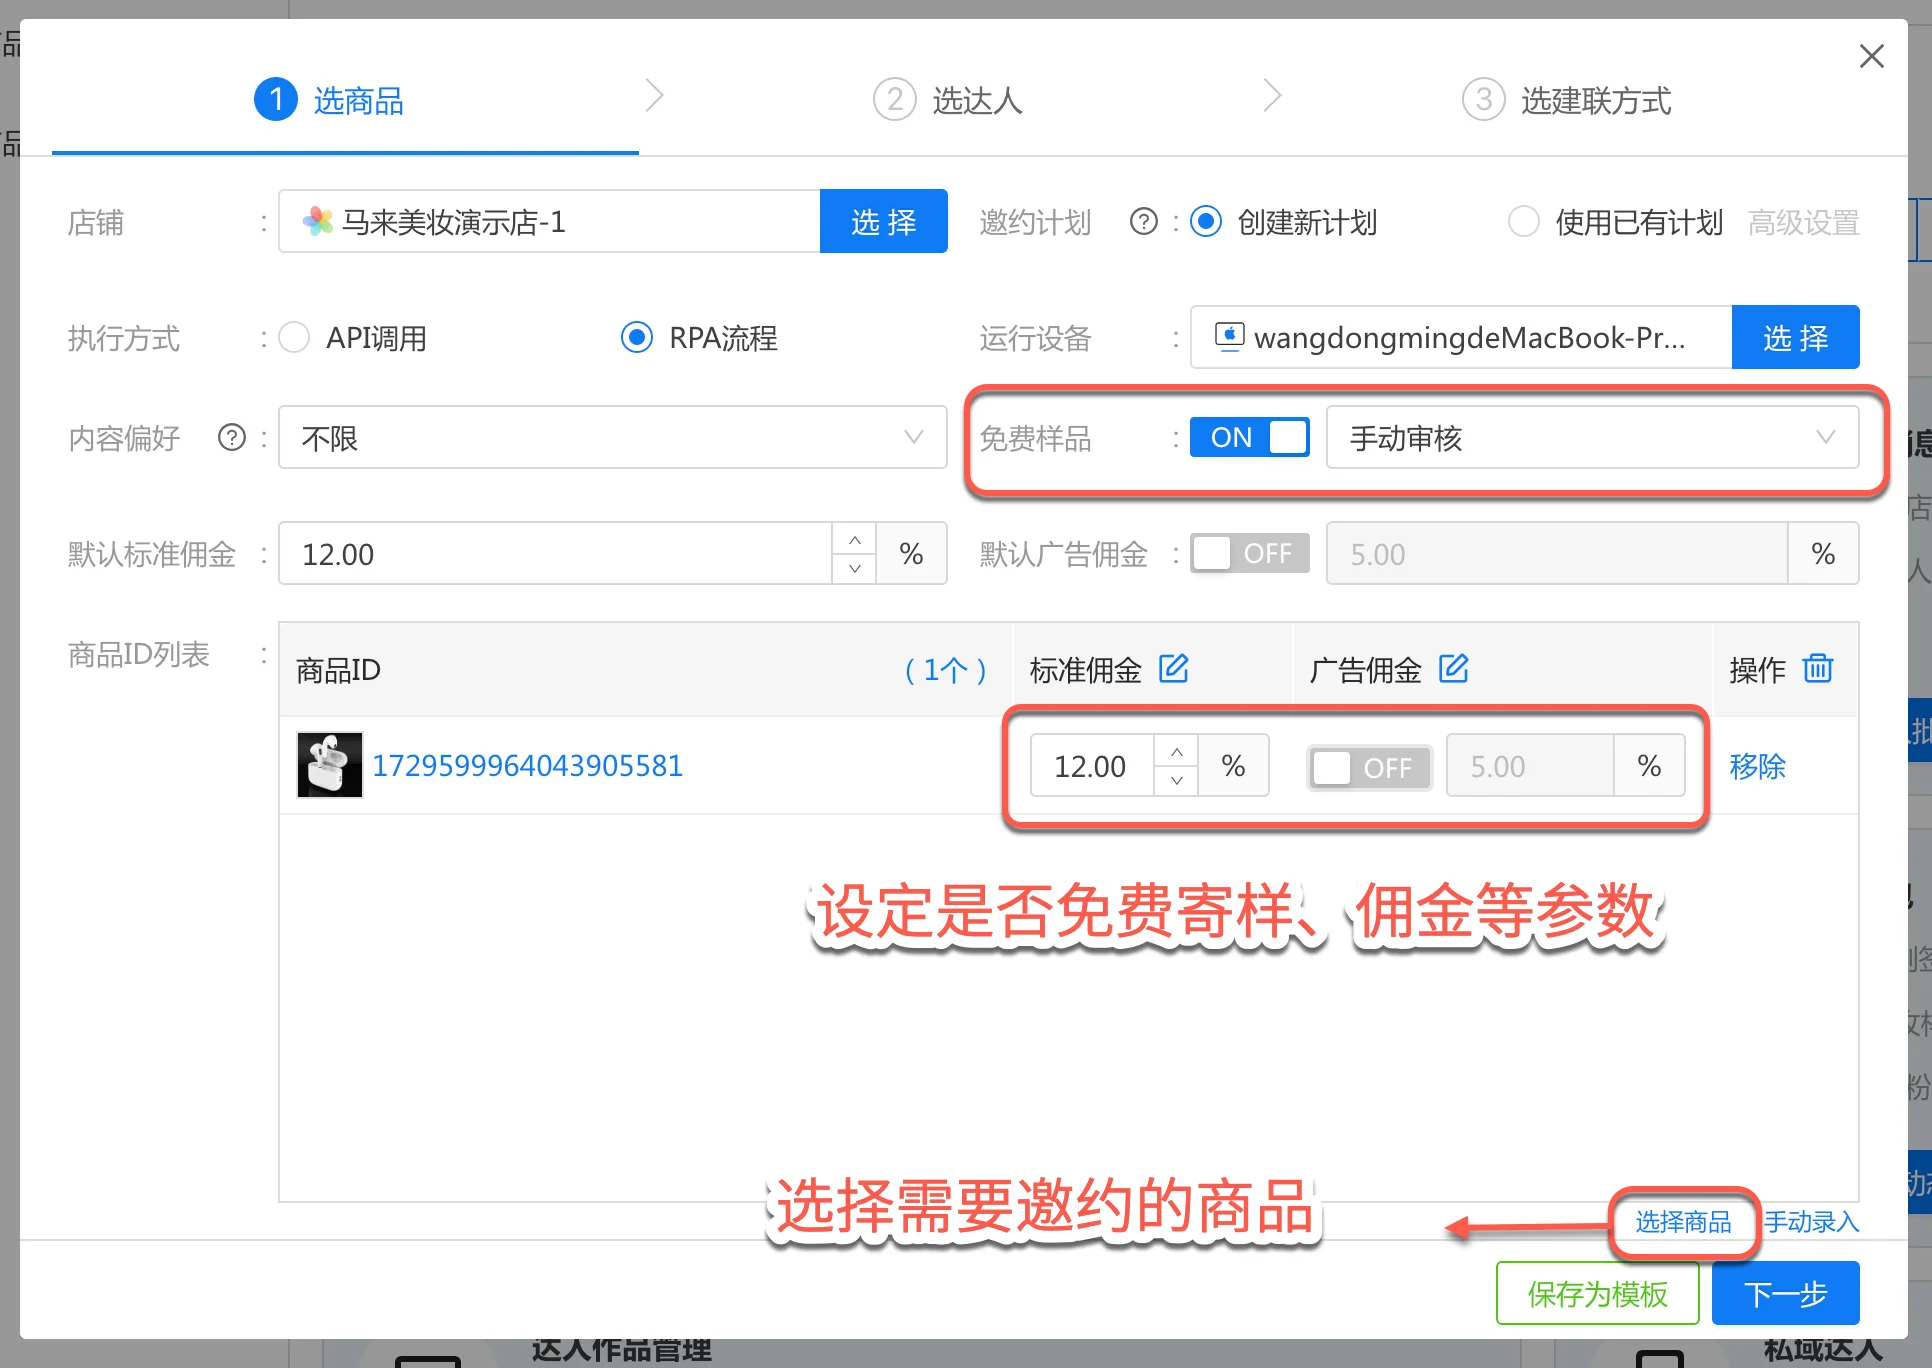
In the wizard dialog, on the “Select Products” tab, click “Select Products” to add products;
Set parameters such as “Free Sample” and “Standard Commission”;
Select products and set commission, free-sample options, and more
Then click “Next” to go to the “Select Creators” tab.
Notes:
When the execution method is an “RPA flow”, the runtime device is the fingerprint browser where the HuaYoung TK extension is installed (such as Ziniao, Zhanfu, AdsPower, etc.) or the HuaYoung Client — please make sure they are all open.
2.1.3 Step 3: Select Creators
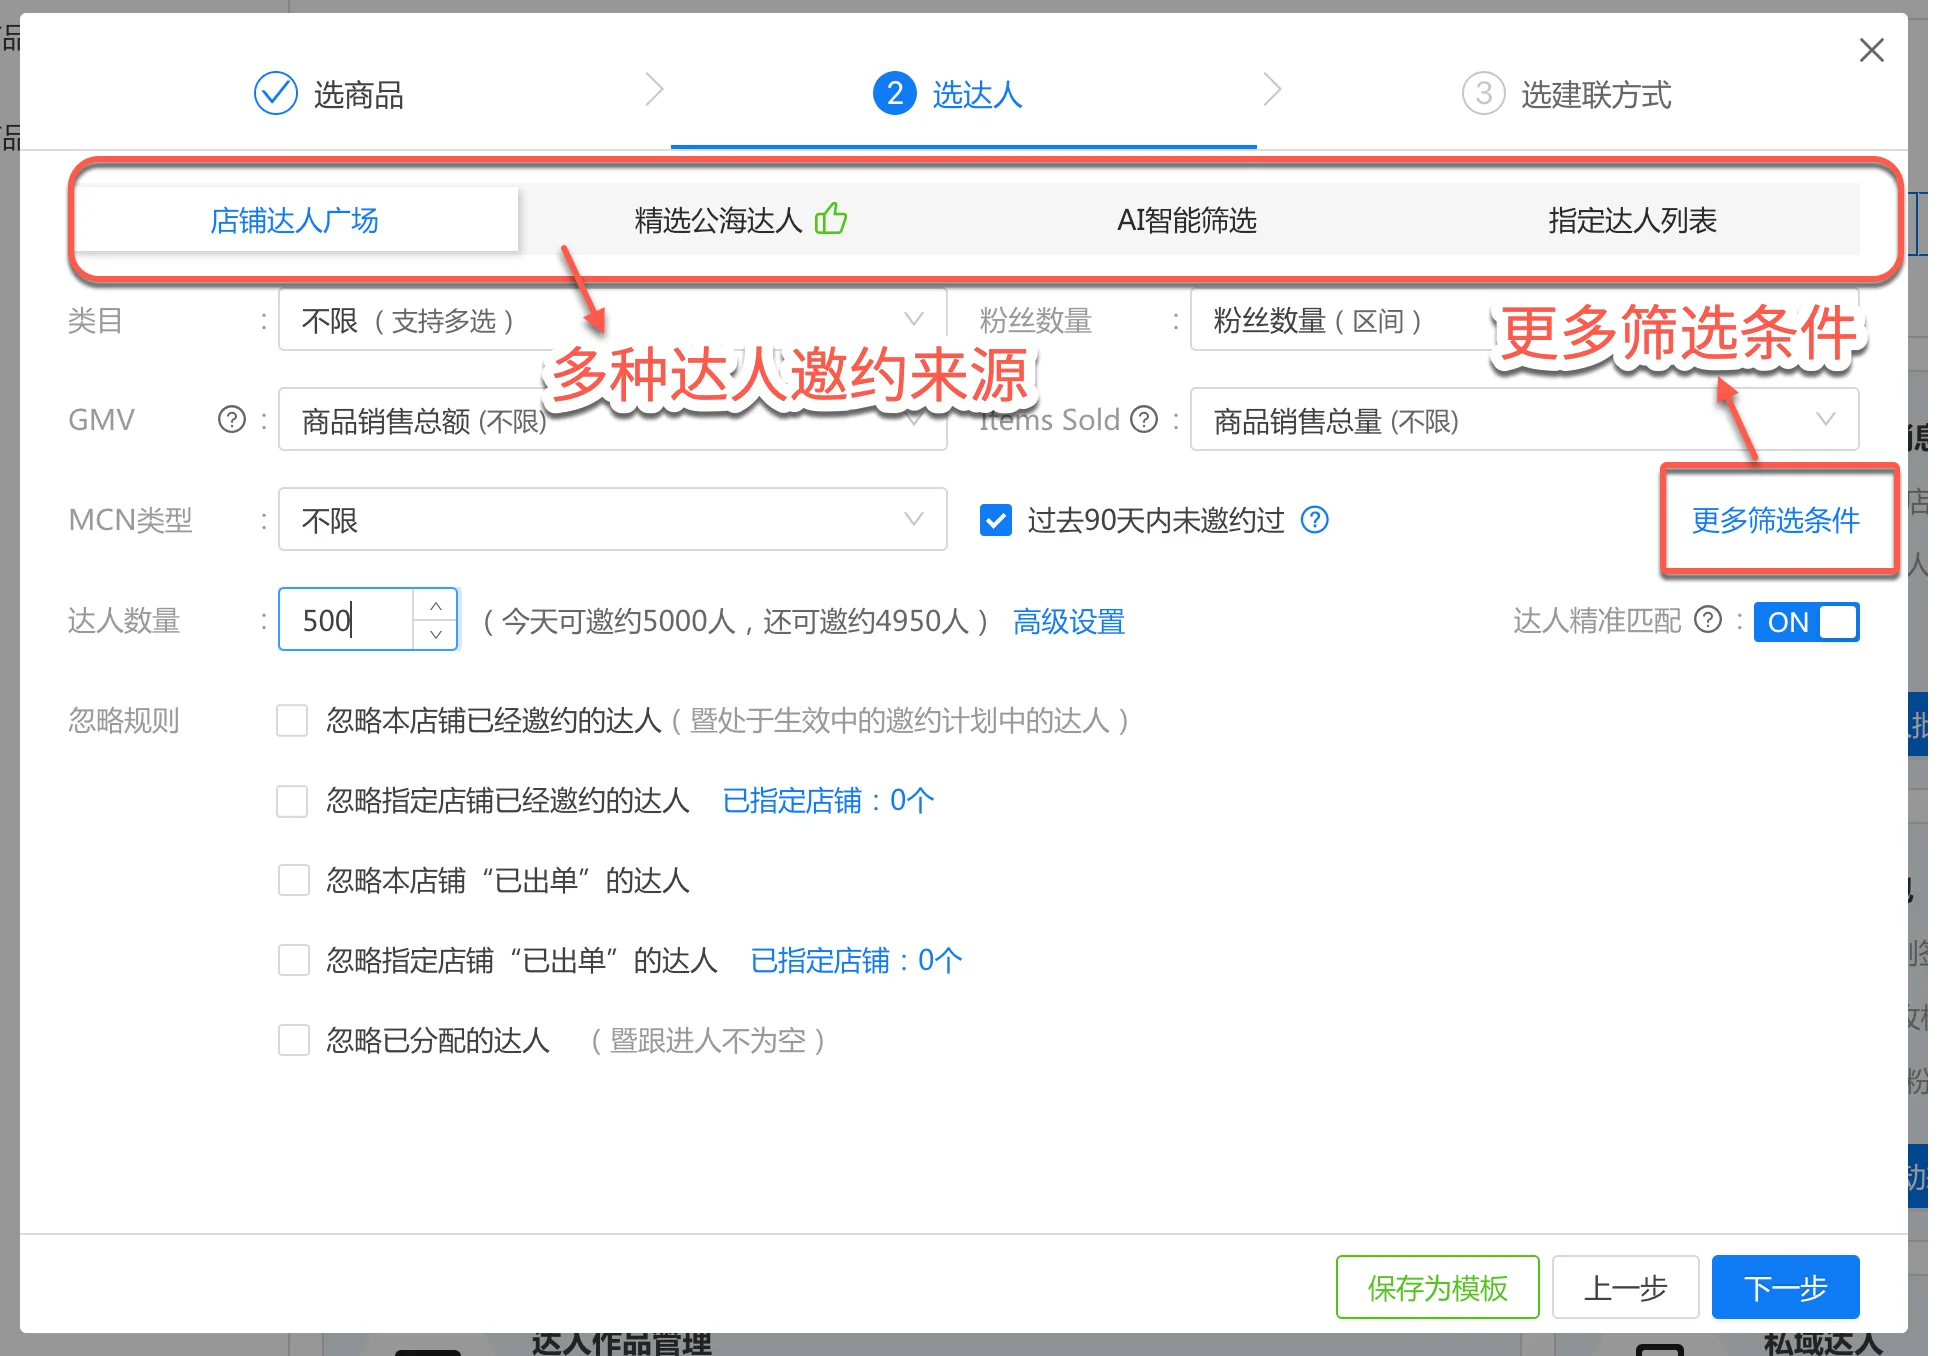
In most cases, you can invite creators through the “Shop Creator Marketplace”;
Set filter parameters such as category and GMV, and enter the number of creators to invite;
Turn on “Precise Creator Matching”, and for ignore rules, you may check the option to avoid duplicate invitations;
Set creator filters such as category and GMV
Then click “Next” to go to the “Select Contact Method” tab.
Notes:
Do not invite more than 500 creators at once — going over that easily triggers CAPTCHAs and reduces efficiency. For example, to invite 1,500 creators, split into 3 batches of 500. Or, build a scheduled automated workflow so the system automatically runs the creator invitation 3 times per day. See the “Schedule Automated Tasks” section later in this article.
When the creator marketplace supply is low or invitations frequently trigger CAPTCHAs, you can also invite through “Featured Public Pool Creators”.
2.1.4 Step 4: Choose Contact Method
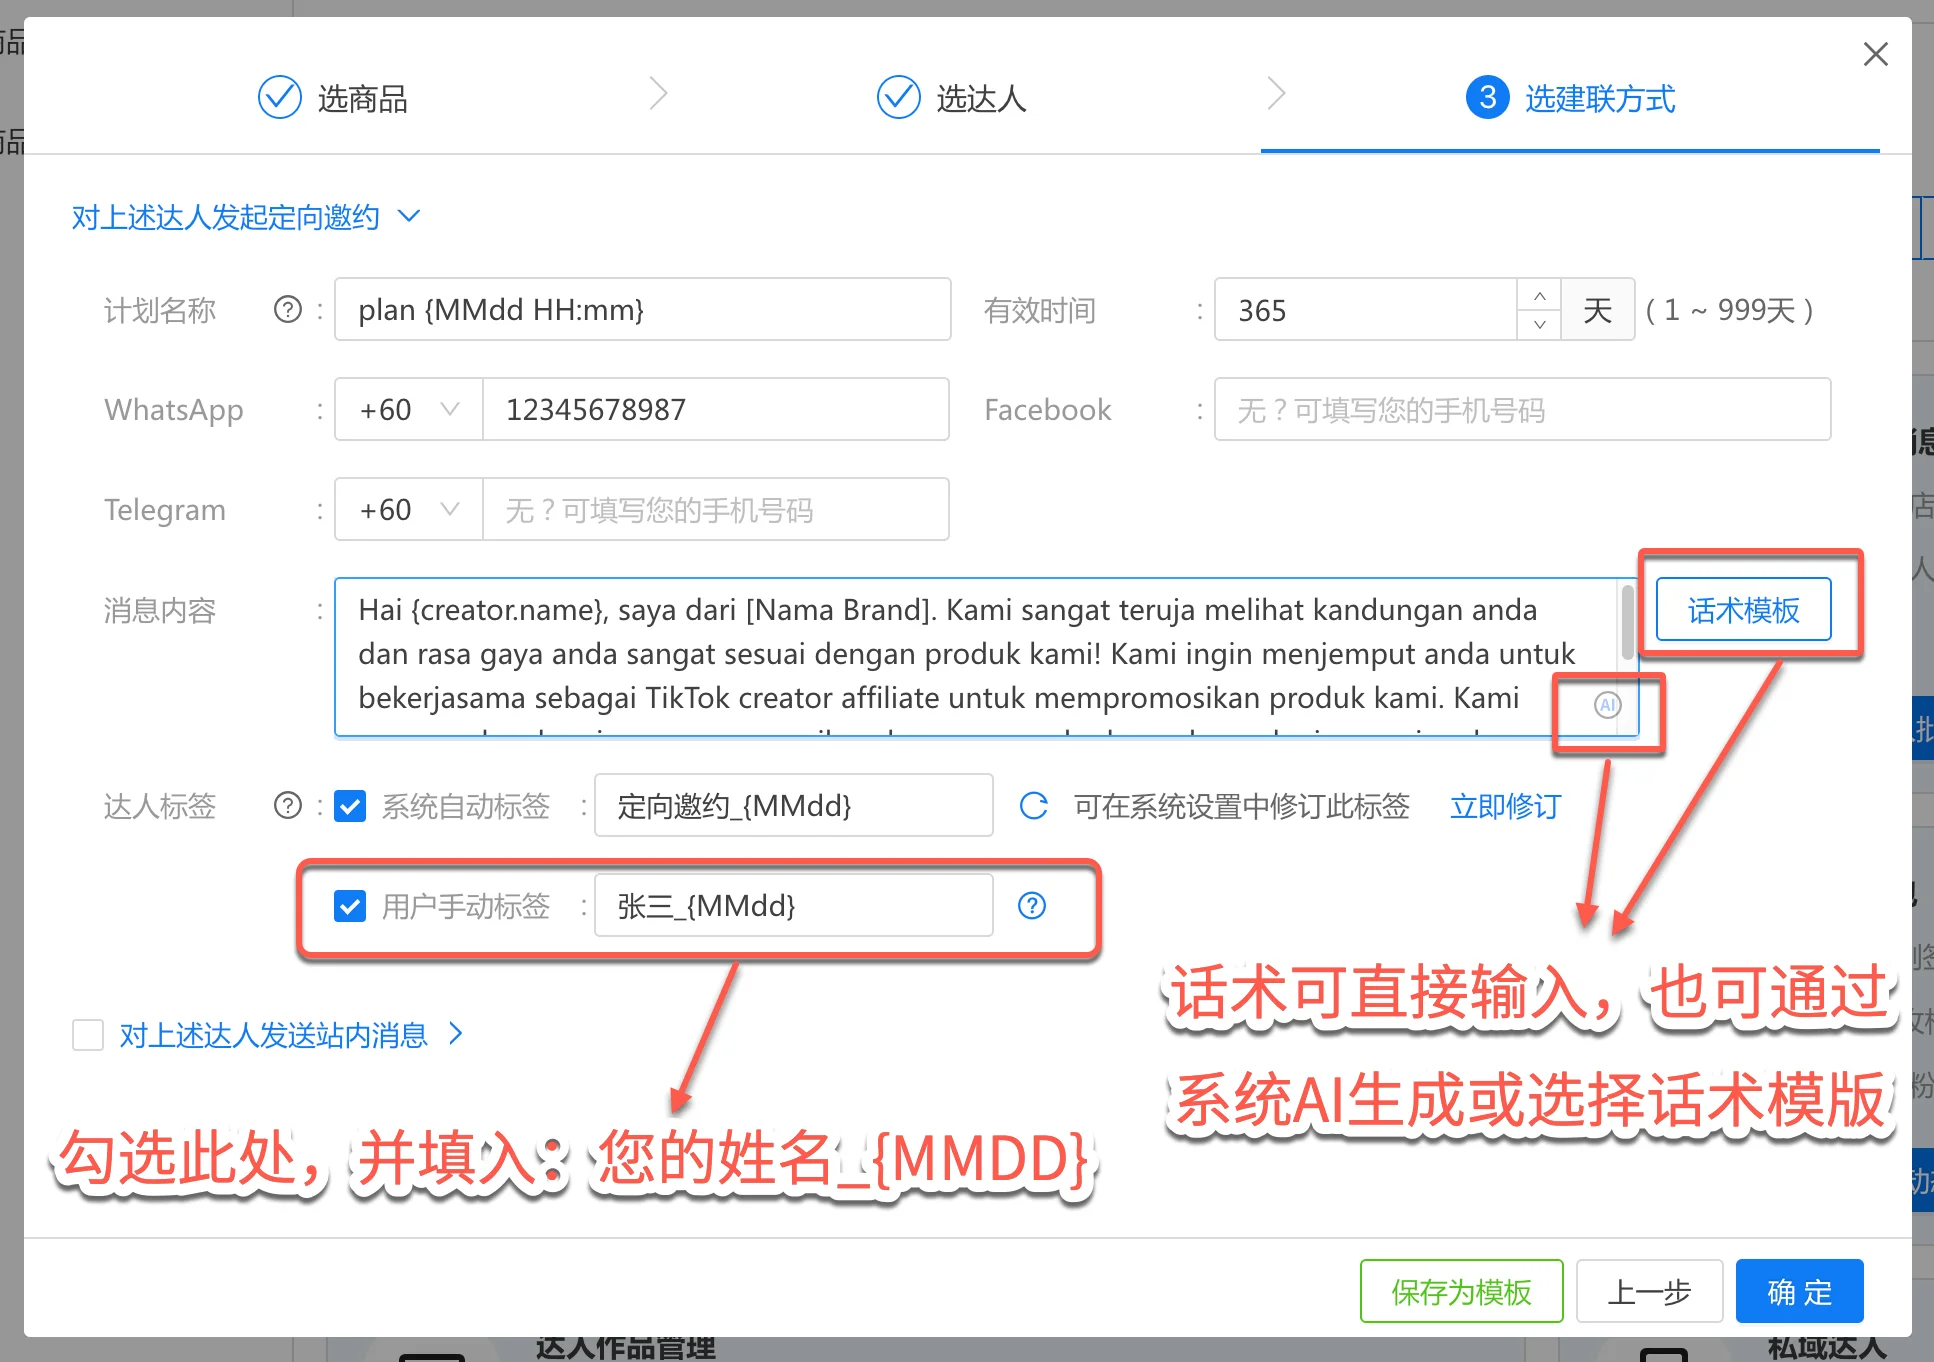
Enter a contact method;
Type your invitation script in the message content — you can also click “Script Templates” to pick a preset script, or click “AI Script Assistant” to let the system’s AI generate an invitation script for you;
Here, remember to check “Custom Tag” and enter: your name_{MMdd}. This makes daily operations much easier later;
Set contact method, invitation script, and custom tag
Then click “Confirm”.
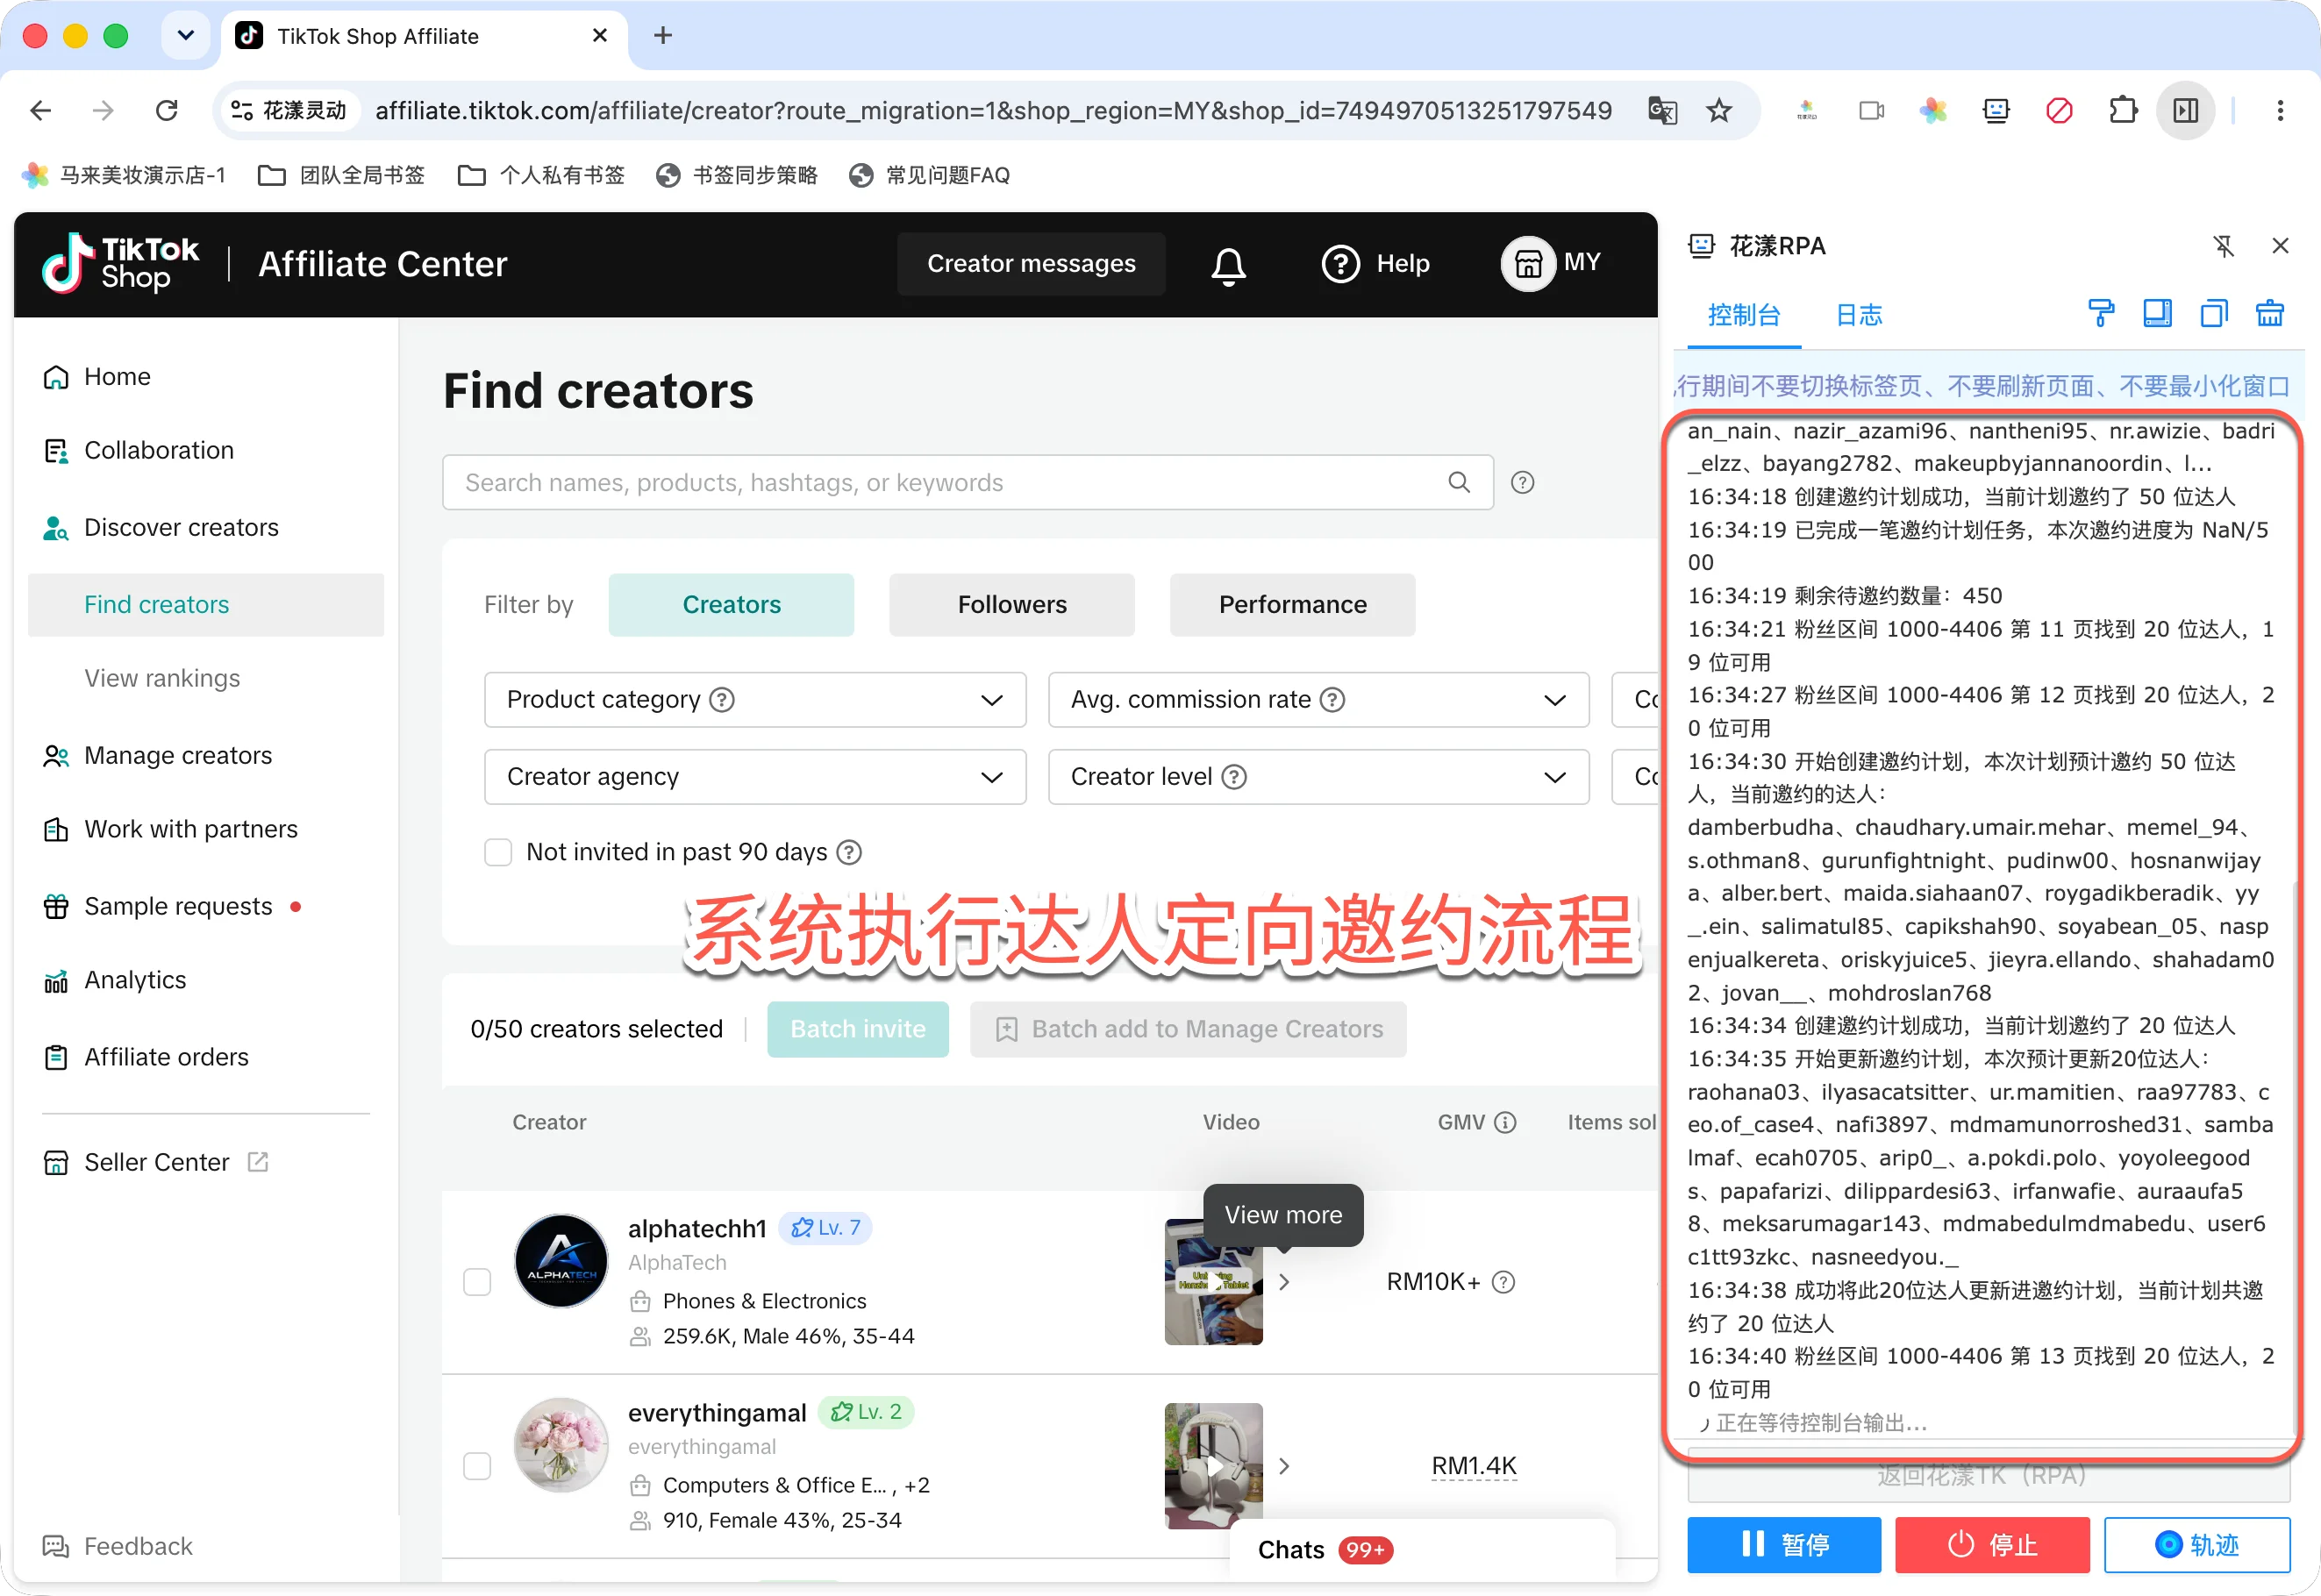
2.1.5 System Executes the Flow
After you click Confirm, the system schedules the task and automatically switches to the fingerprint browser where the HuaYoung TK extension is installed (Ziniao, Zhanfu, AdsPower, etc.) or the HuaYoung Browser, and starts the targeted invitation flow.The system starts the targeted invitation flow
Notes:
During the process, do not close the browser, switch tabs, or minimize the window, as this may interrupt the task.
2.1.6 View Invited Creators
After the flow finishes, return to the HuaYoung portal;
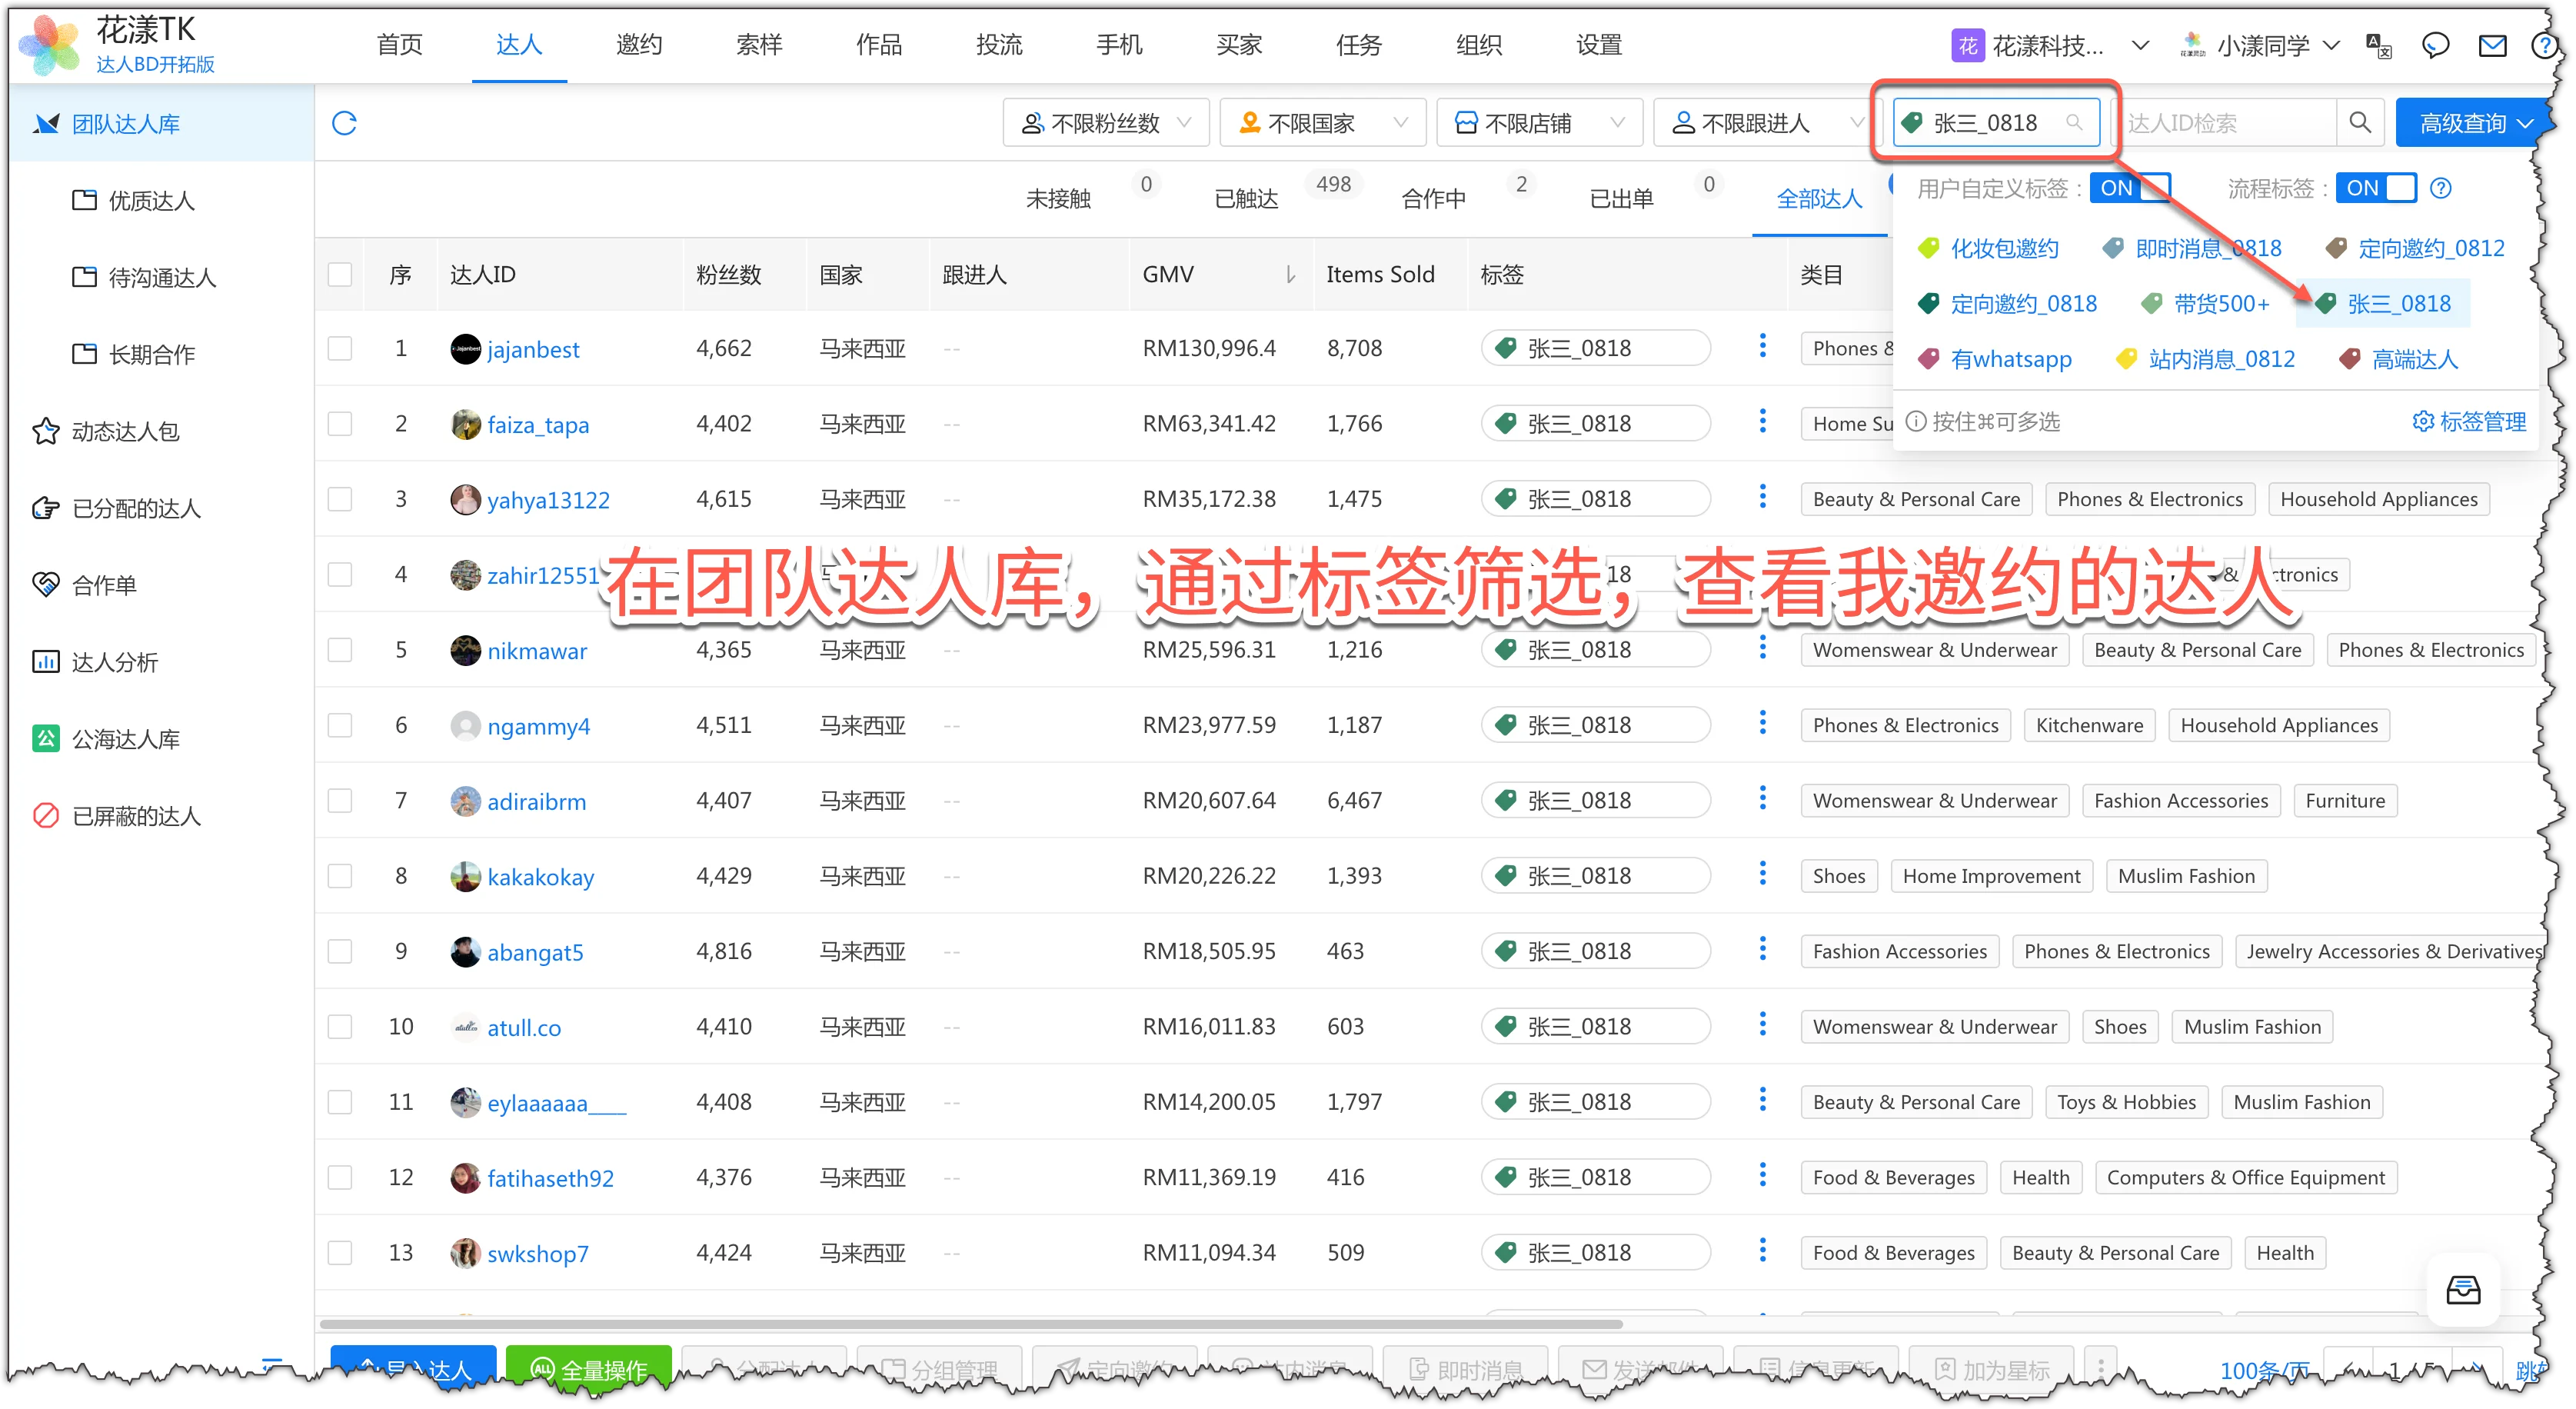
Click “Creators – Team Creators” and use tags to see how many creators you just invited.
View your invited creators by tag
Notes:
Make sure the creator list is set to “All Creators”. If you do not see the “Tag” column in the list, look for the “Fields” button in the top-right corner and click it to display the “Tag” column.
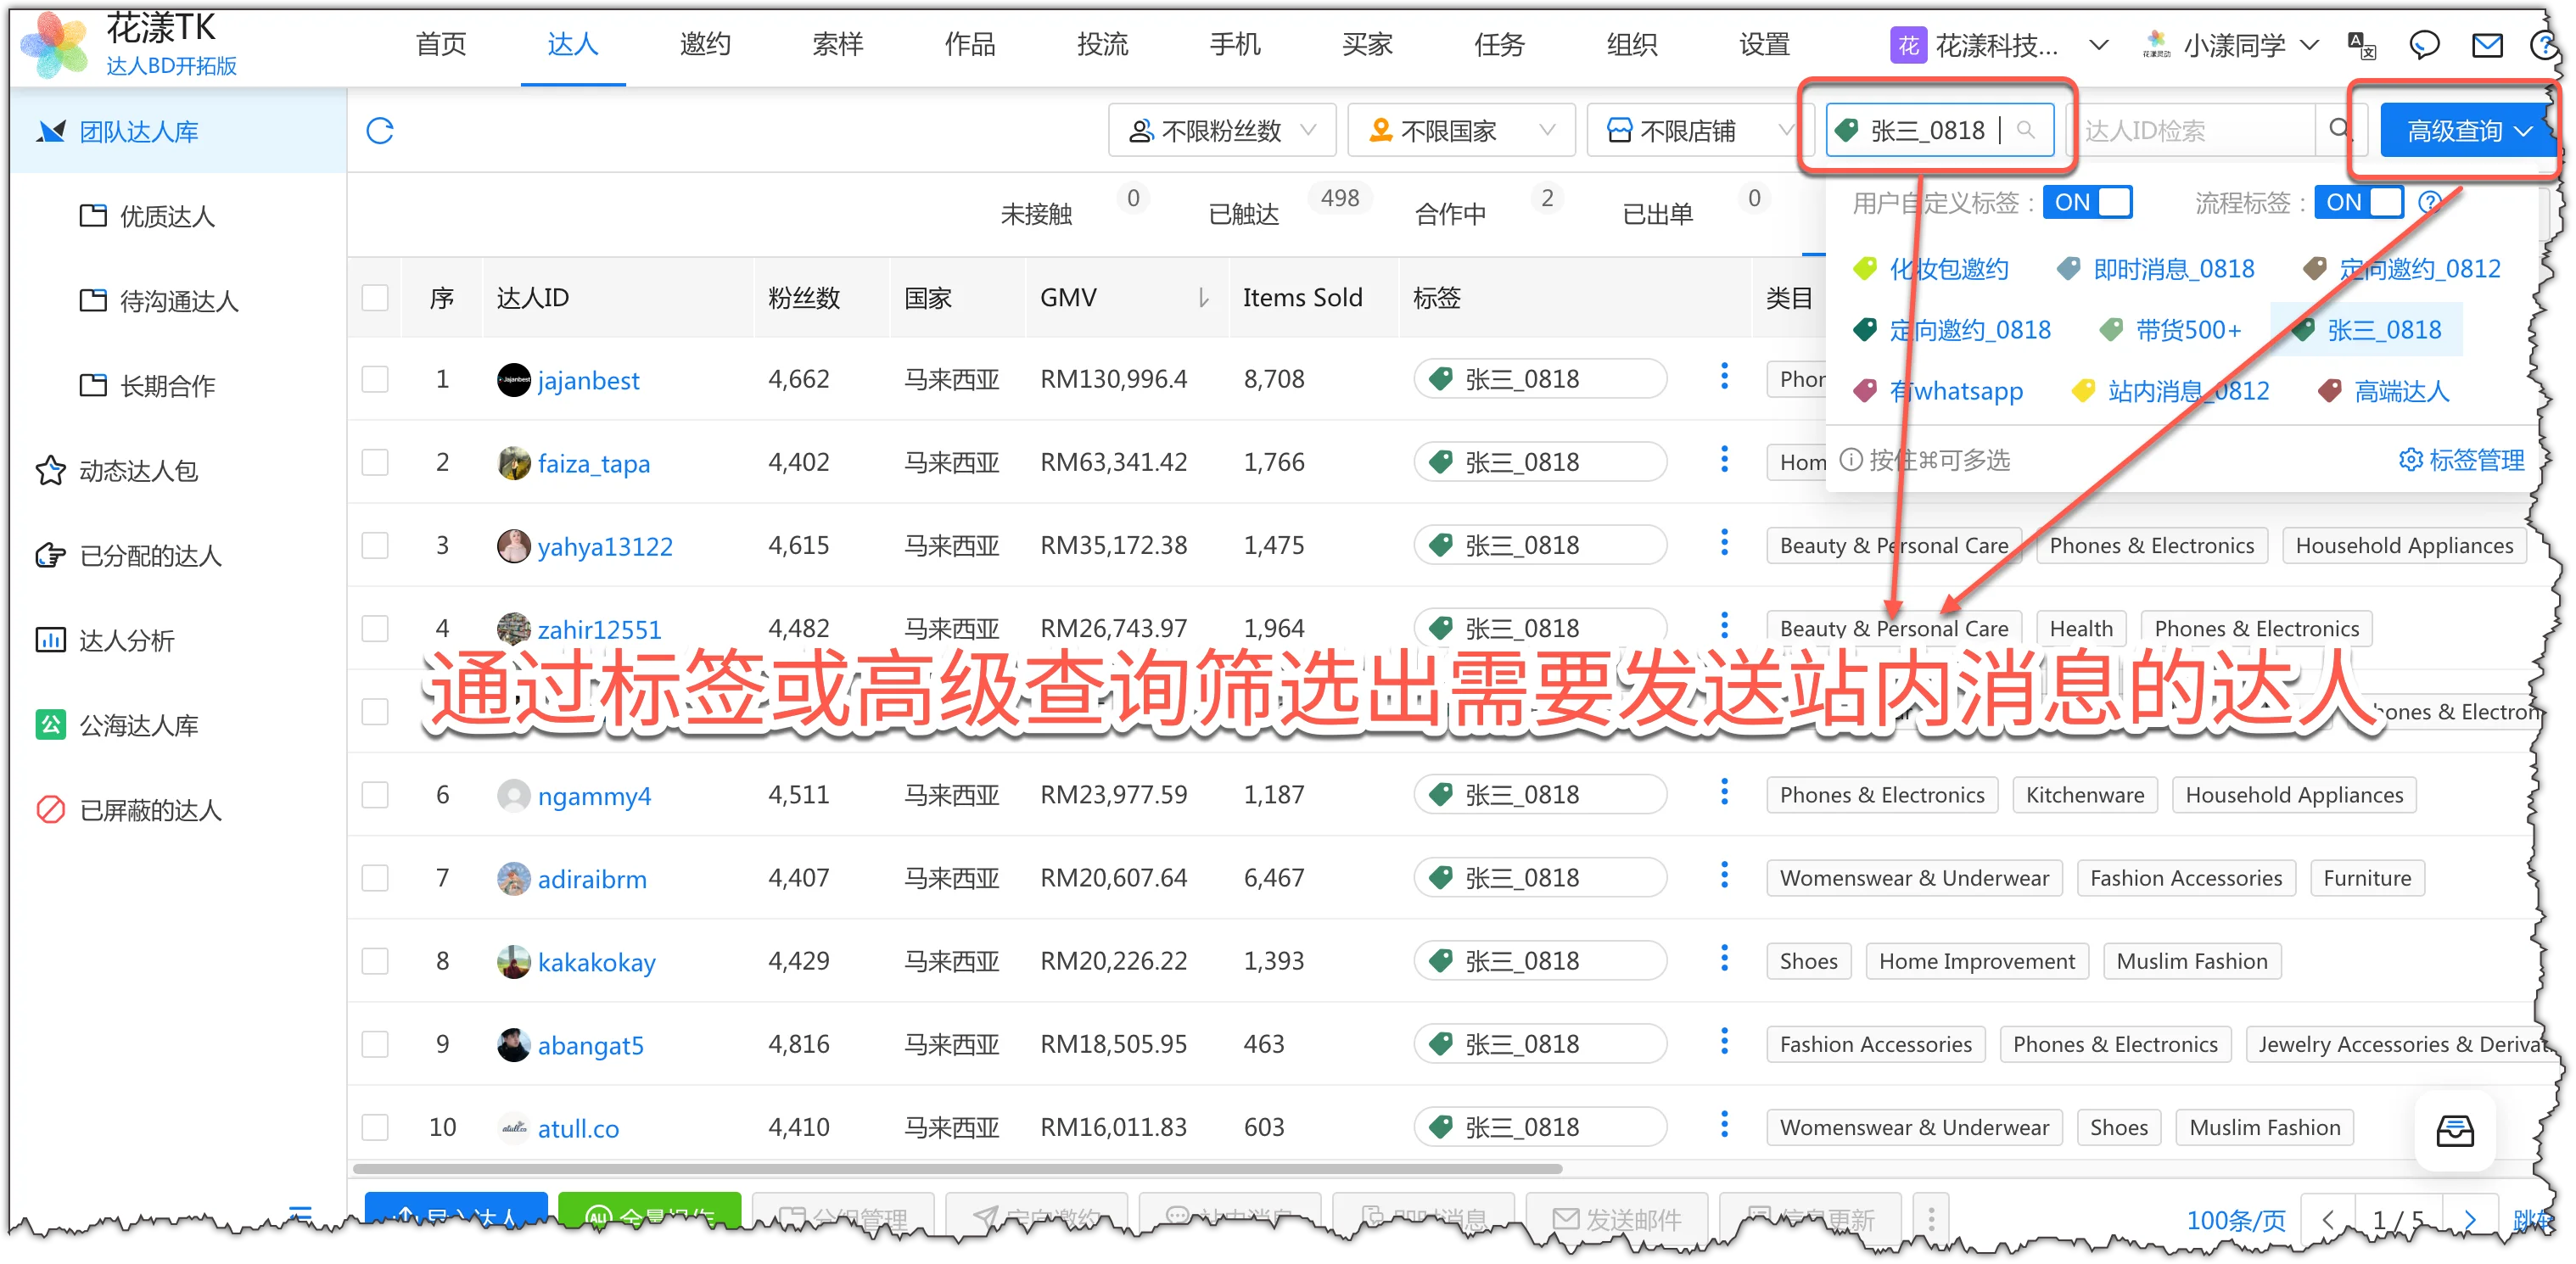
Go to “Creators – Team Creators” and filter the creators you want to message by tag (e.g., filter creators I invited on a given day), or use the “Advanced Query” button for a more complex query;
Filter the creators to message in “Team Creators”
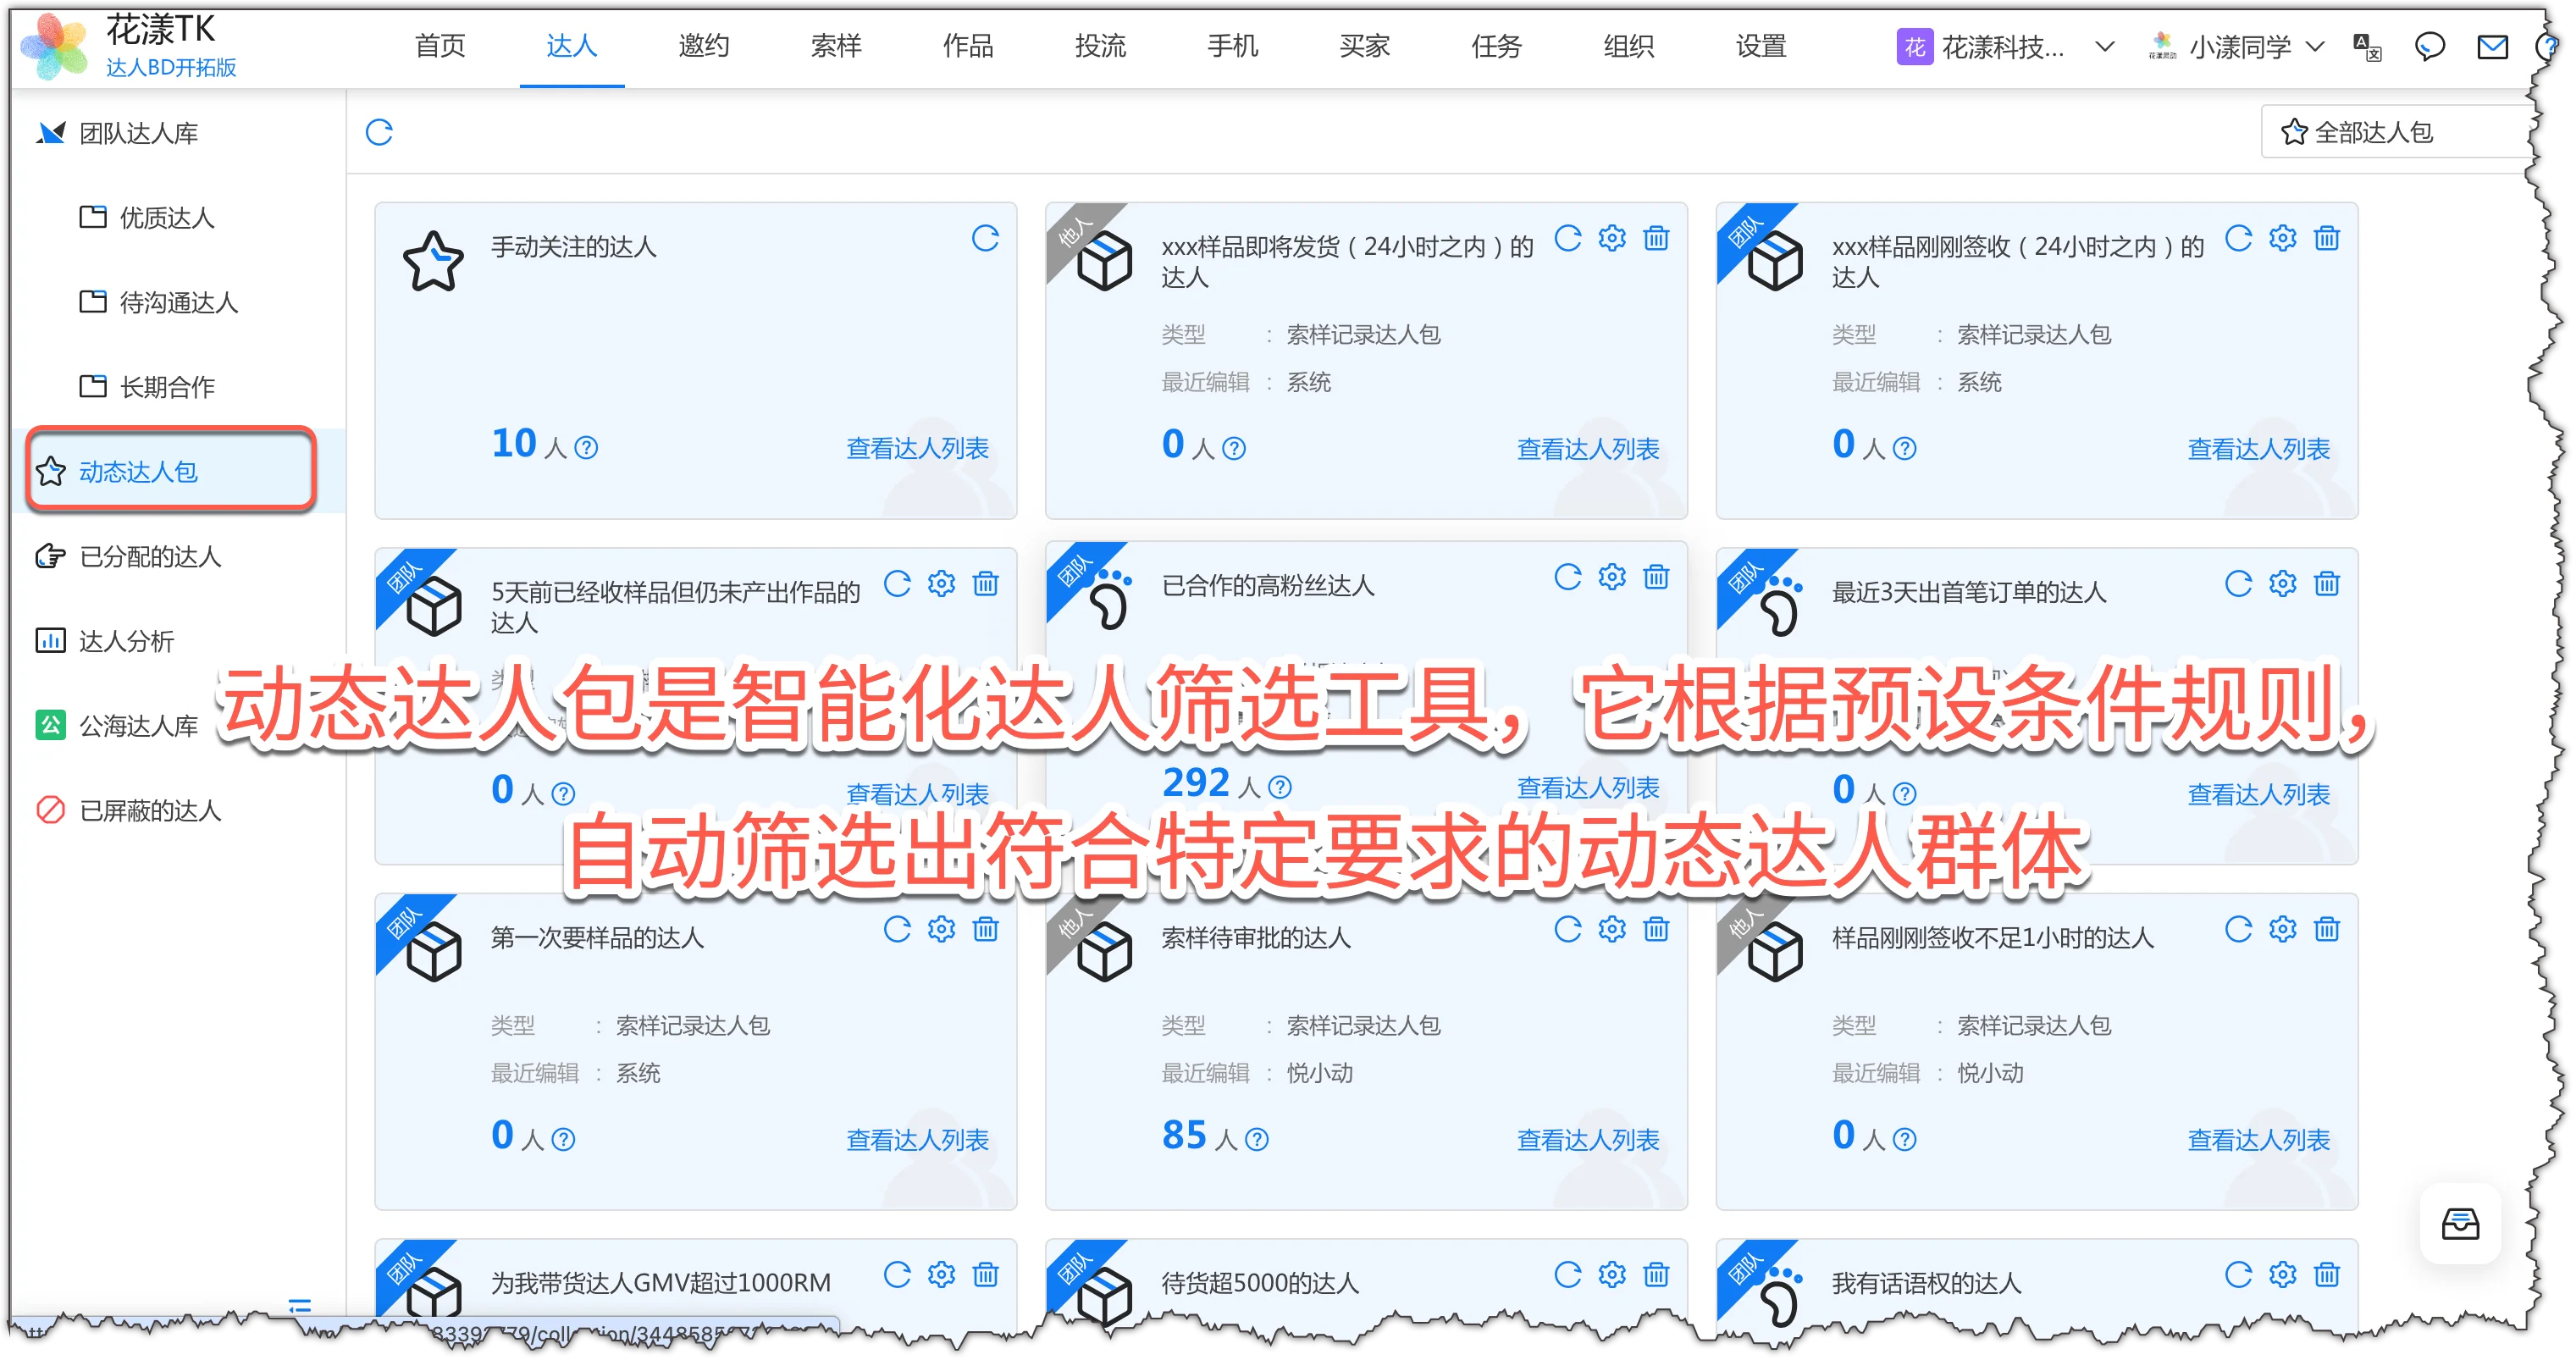
Or, go to “Creators – Dynamic Creator Packs” and click a pack you are interested in (e.g., high-follower creators you have already worked with);
“Dynamic Creator Packs” auto-filter and live-update creator groups by preset rules
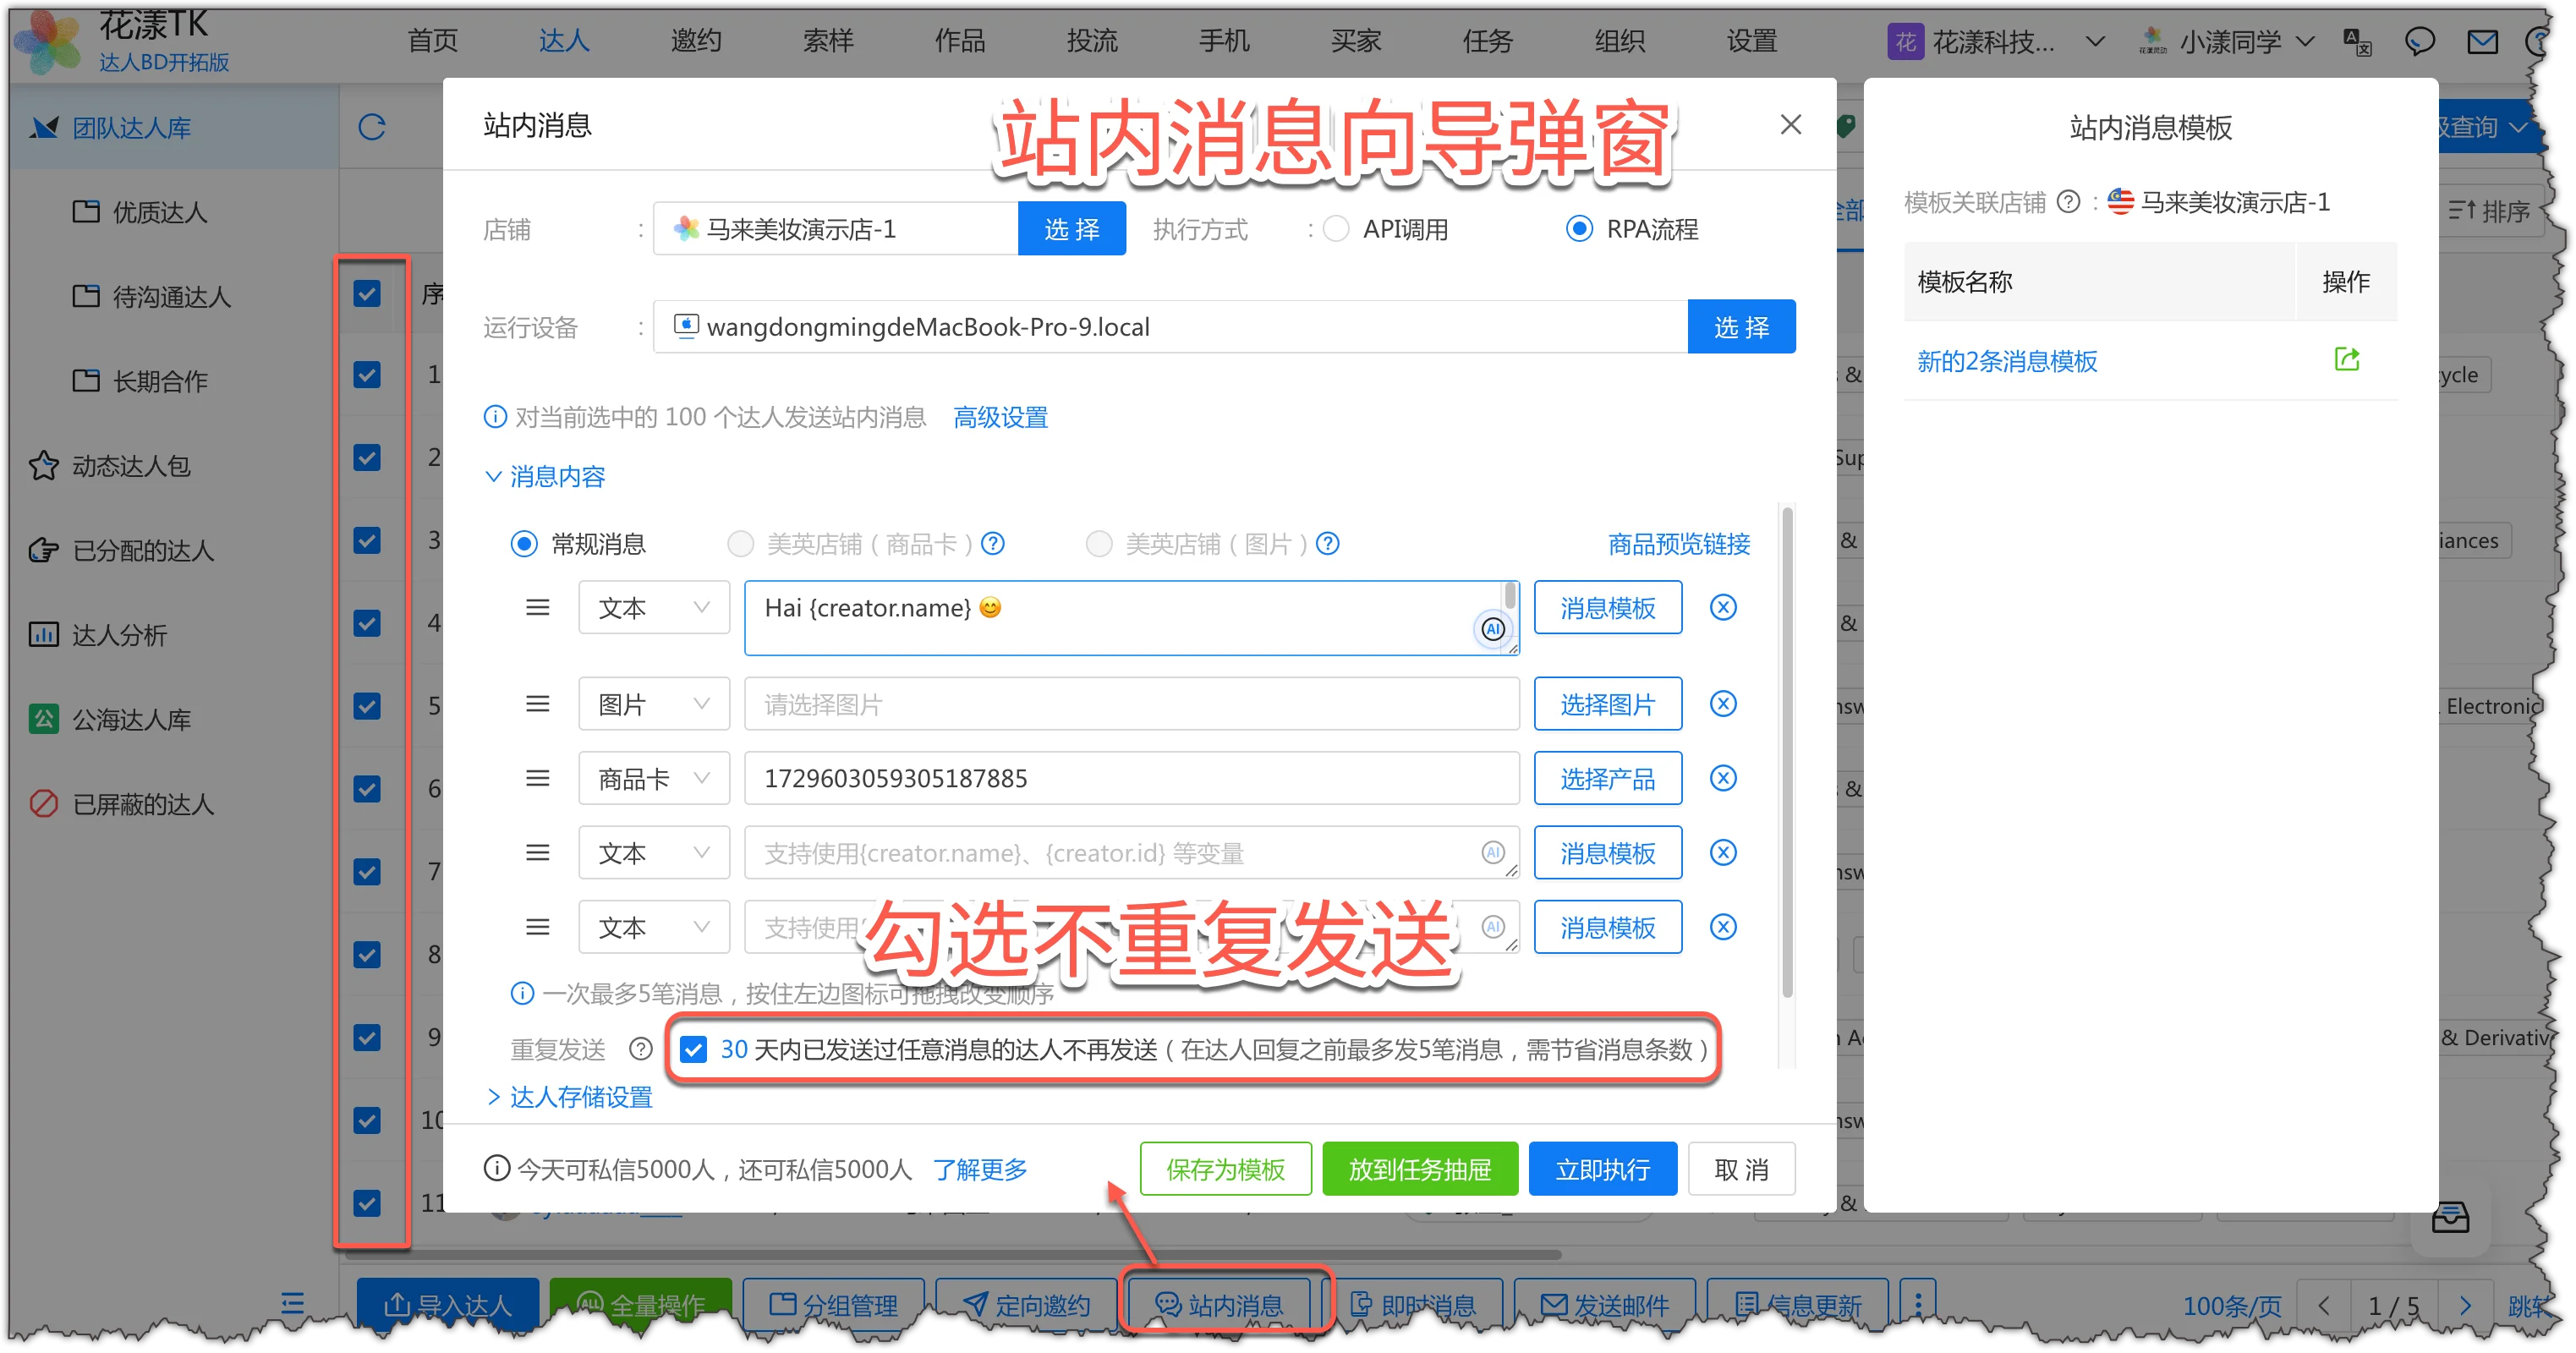
Then, in the creator list, select creators in bulk, and click “Inbox Message” in the action bar;
In the “Inbox Message” popover, enter the message, select product cards, and check the no-duplicate option
In the “Inbox Message” dialog, enter the message, select product cards, and check the no-duplicate option to avoid resending;
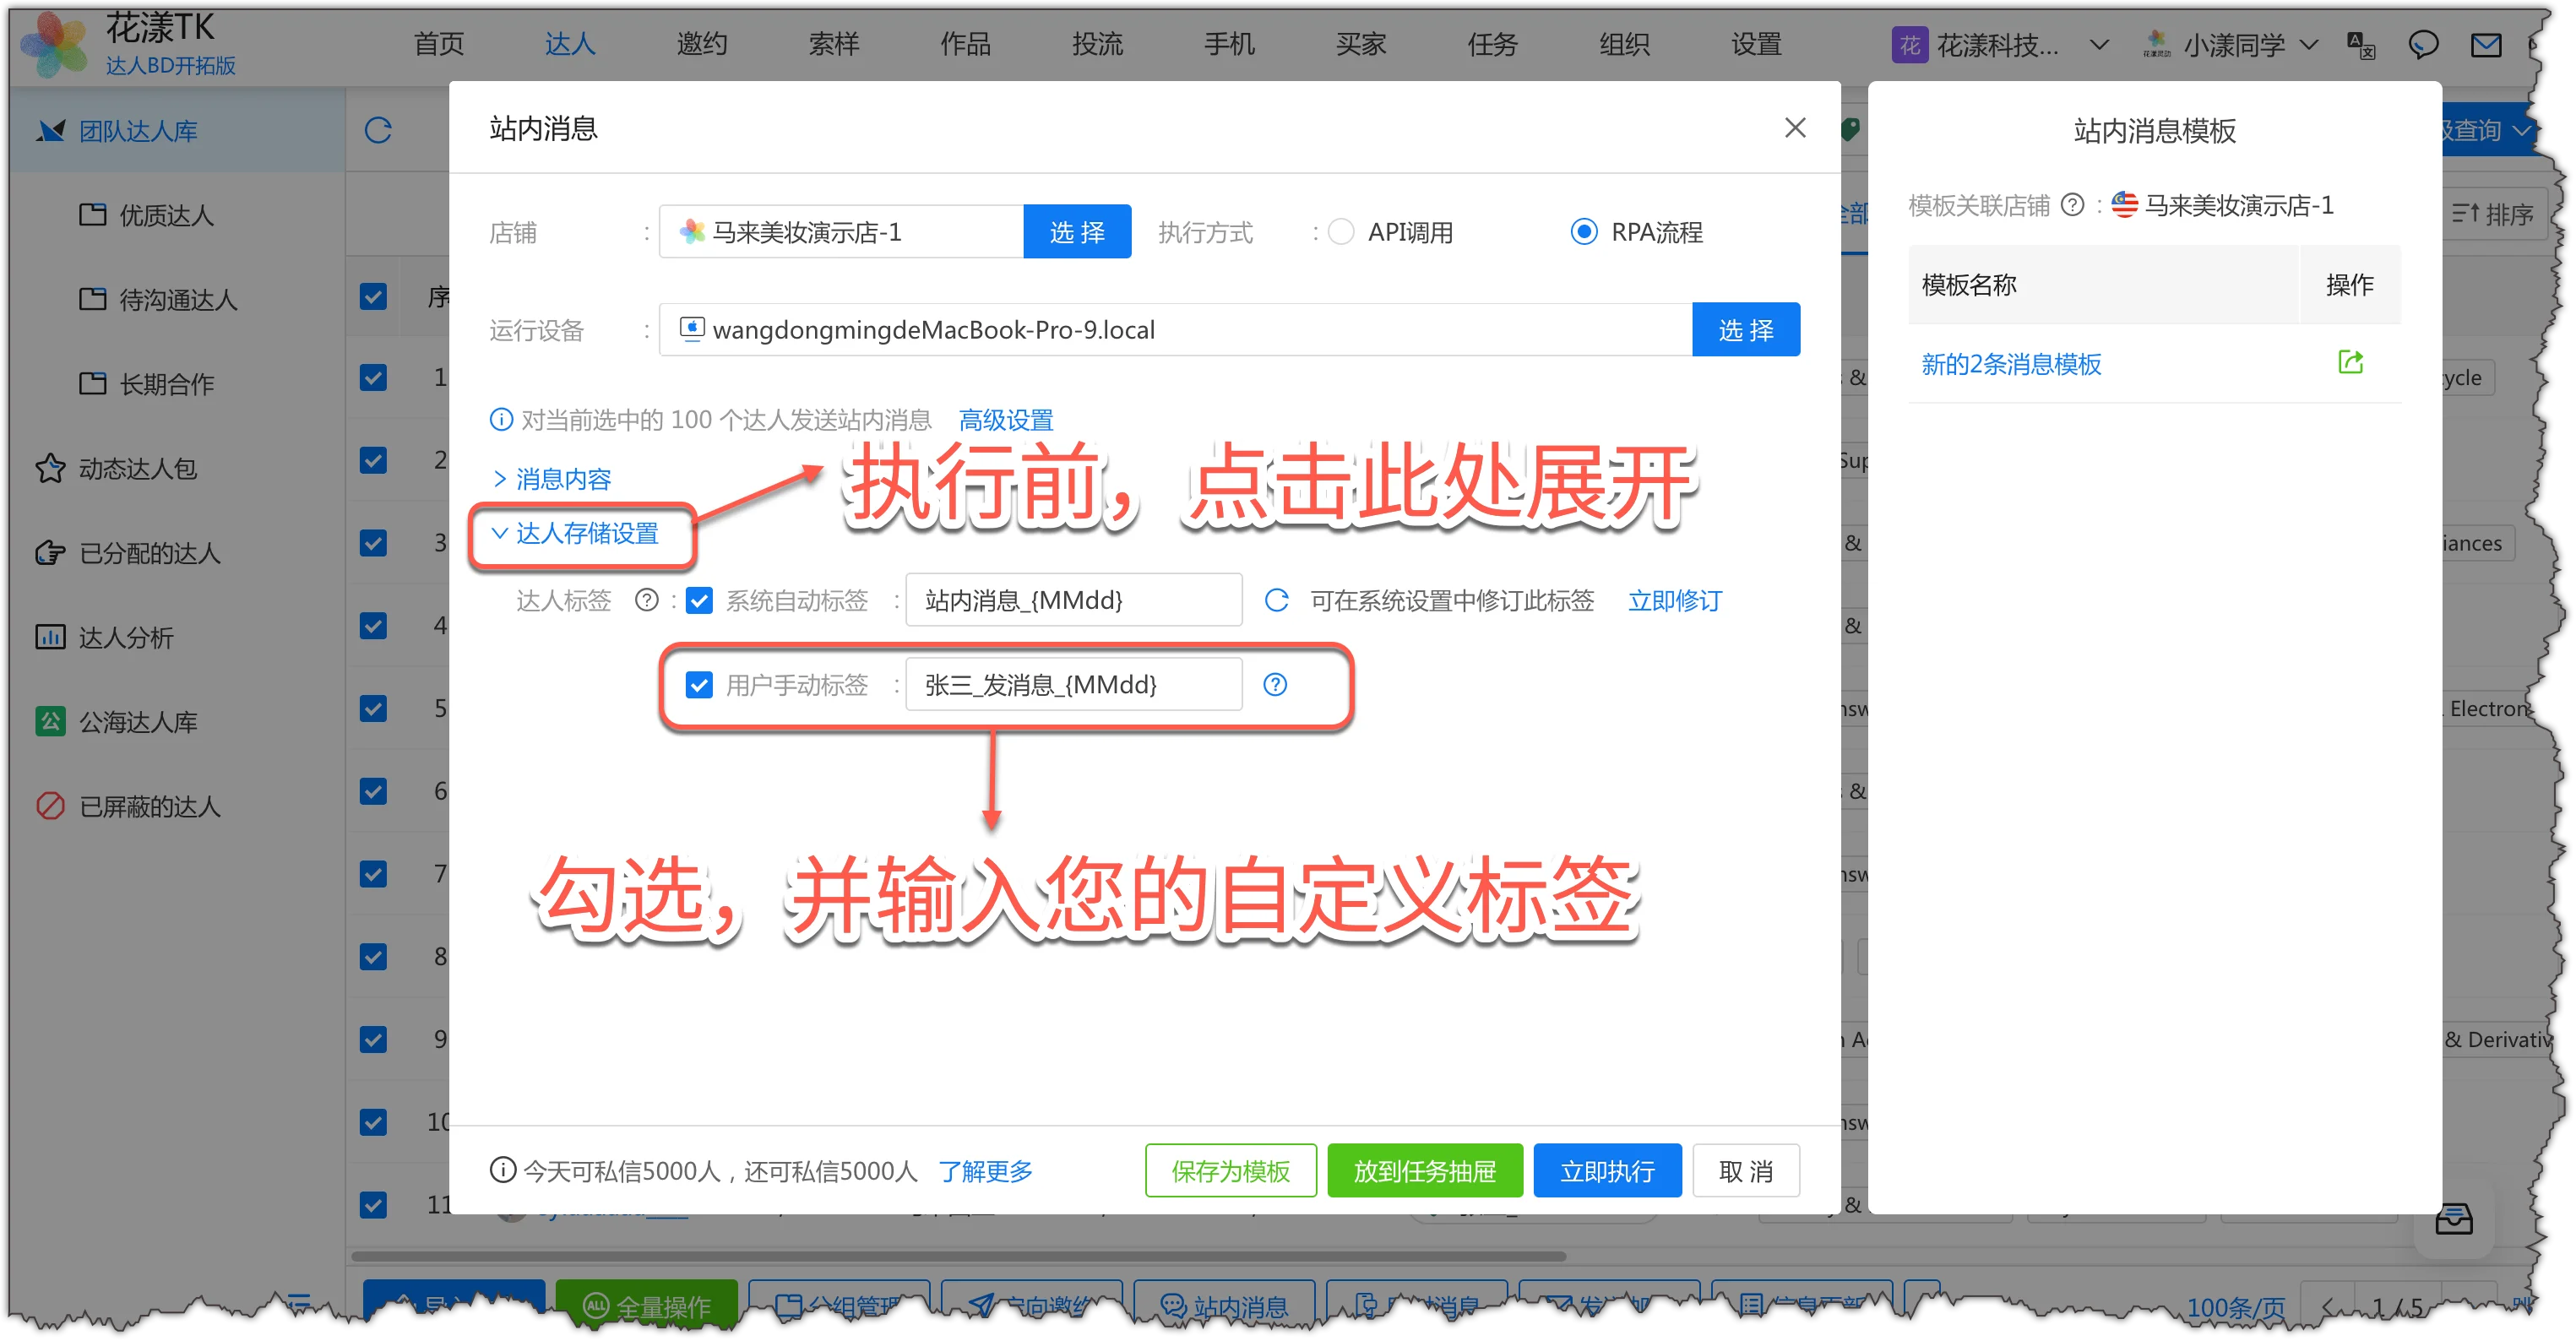
Then click “Creator Save Settings”, check “Custom Tag” and enter: your name_message_{MMdd} — this makes daily operations much easier later;
Set custom tag: your name_message_{MMdd}
Finally, click “Run Now” — the system schedules and runs the flow;
Same as the post-invite review in the previous step, you can go to “Team Creators” and use the tag created above (e.g., “John_message_0818”) to see all creators you sent bulk inbox messages to on that day, for easy follow-up.
HuaYoung TK supports sending emails to creators in bulk. US and European creators in particular still treat email as one of their main communication channels.
Below is the typical bulk email flow in HuaYoung: (for detailed setup and steps, see the doc: Send emails to creators)
Step 1: Configure the email sending service
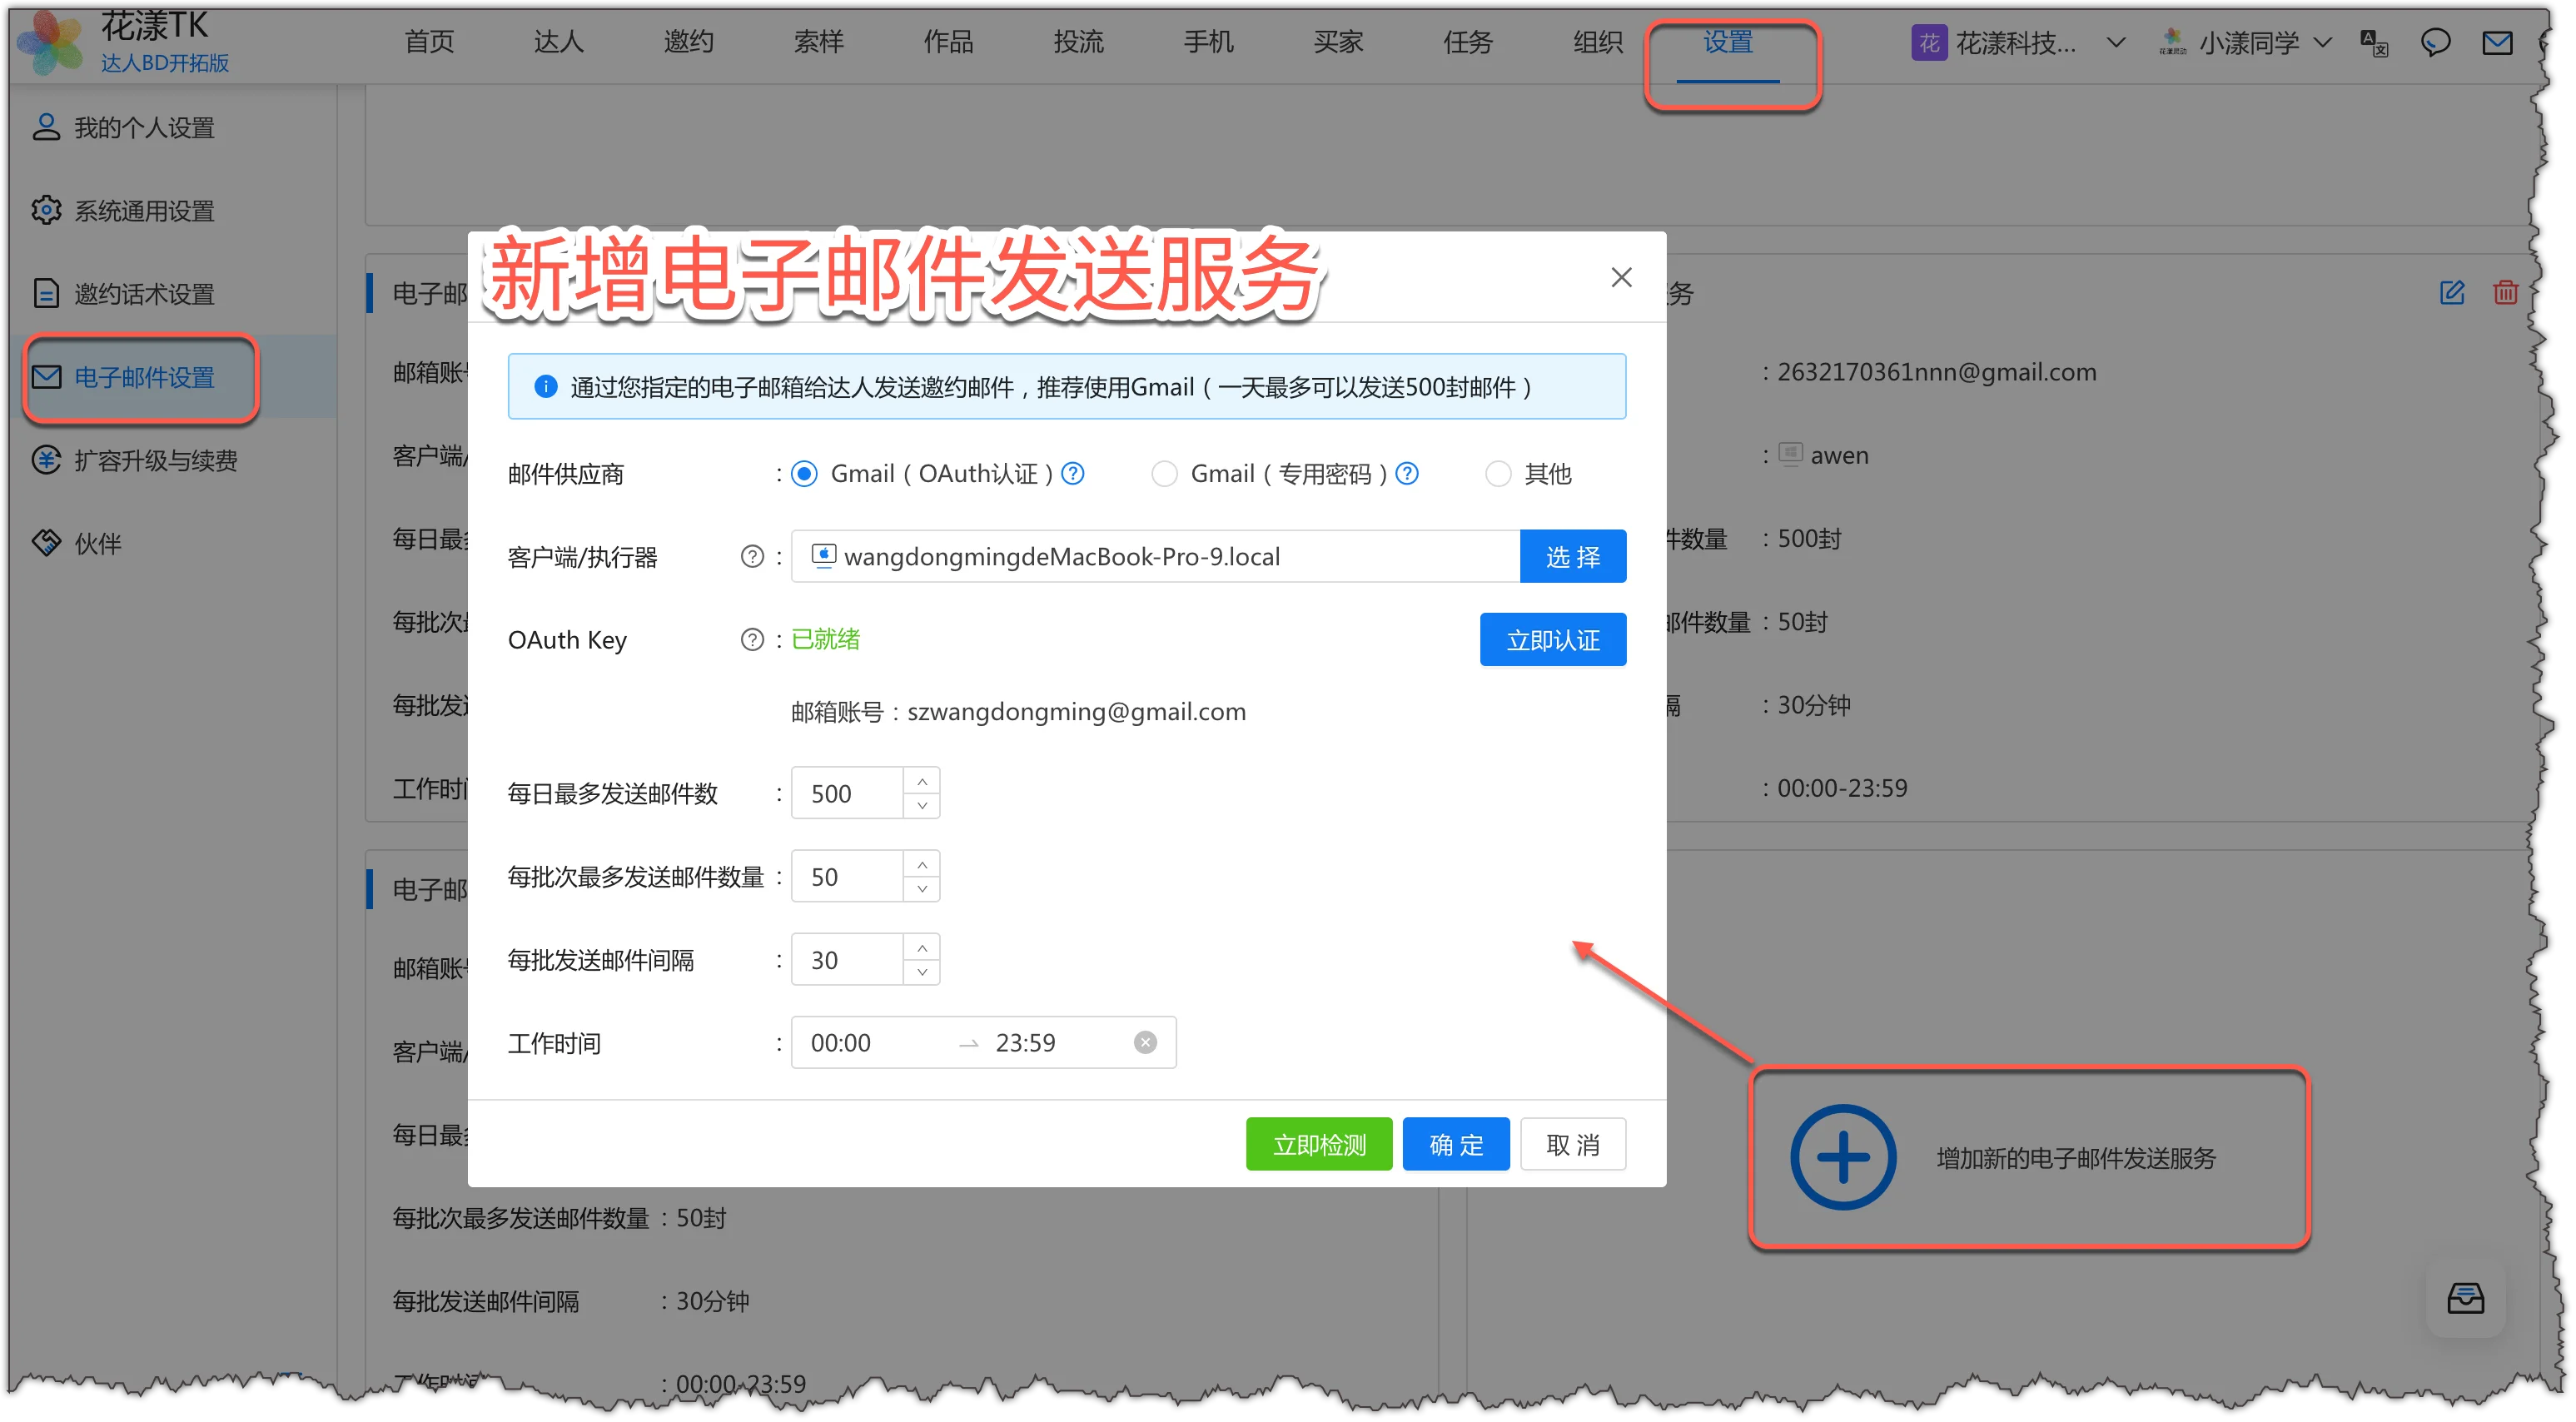
In the HuaYoung TK portal, go to “System Settings – Email Settings” and add a new email sending service. Two types are supported:
Gmail: Recommended — many creators provide a Gmail address, and Gmail is less likely to flag your message as spam.
Other email services: such as Tencent Business Mail — you must first enable POP/SMTP and generate an app-specific password, then choose the “Other” type in the system to configure it.
Add a new email sending service
Step 2: Create an email template
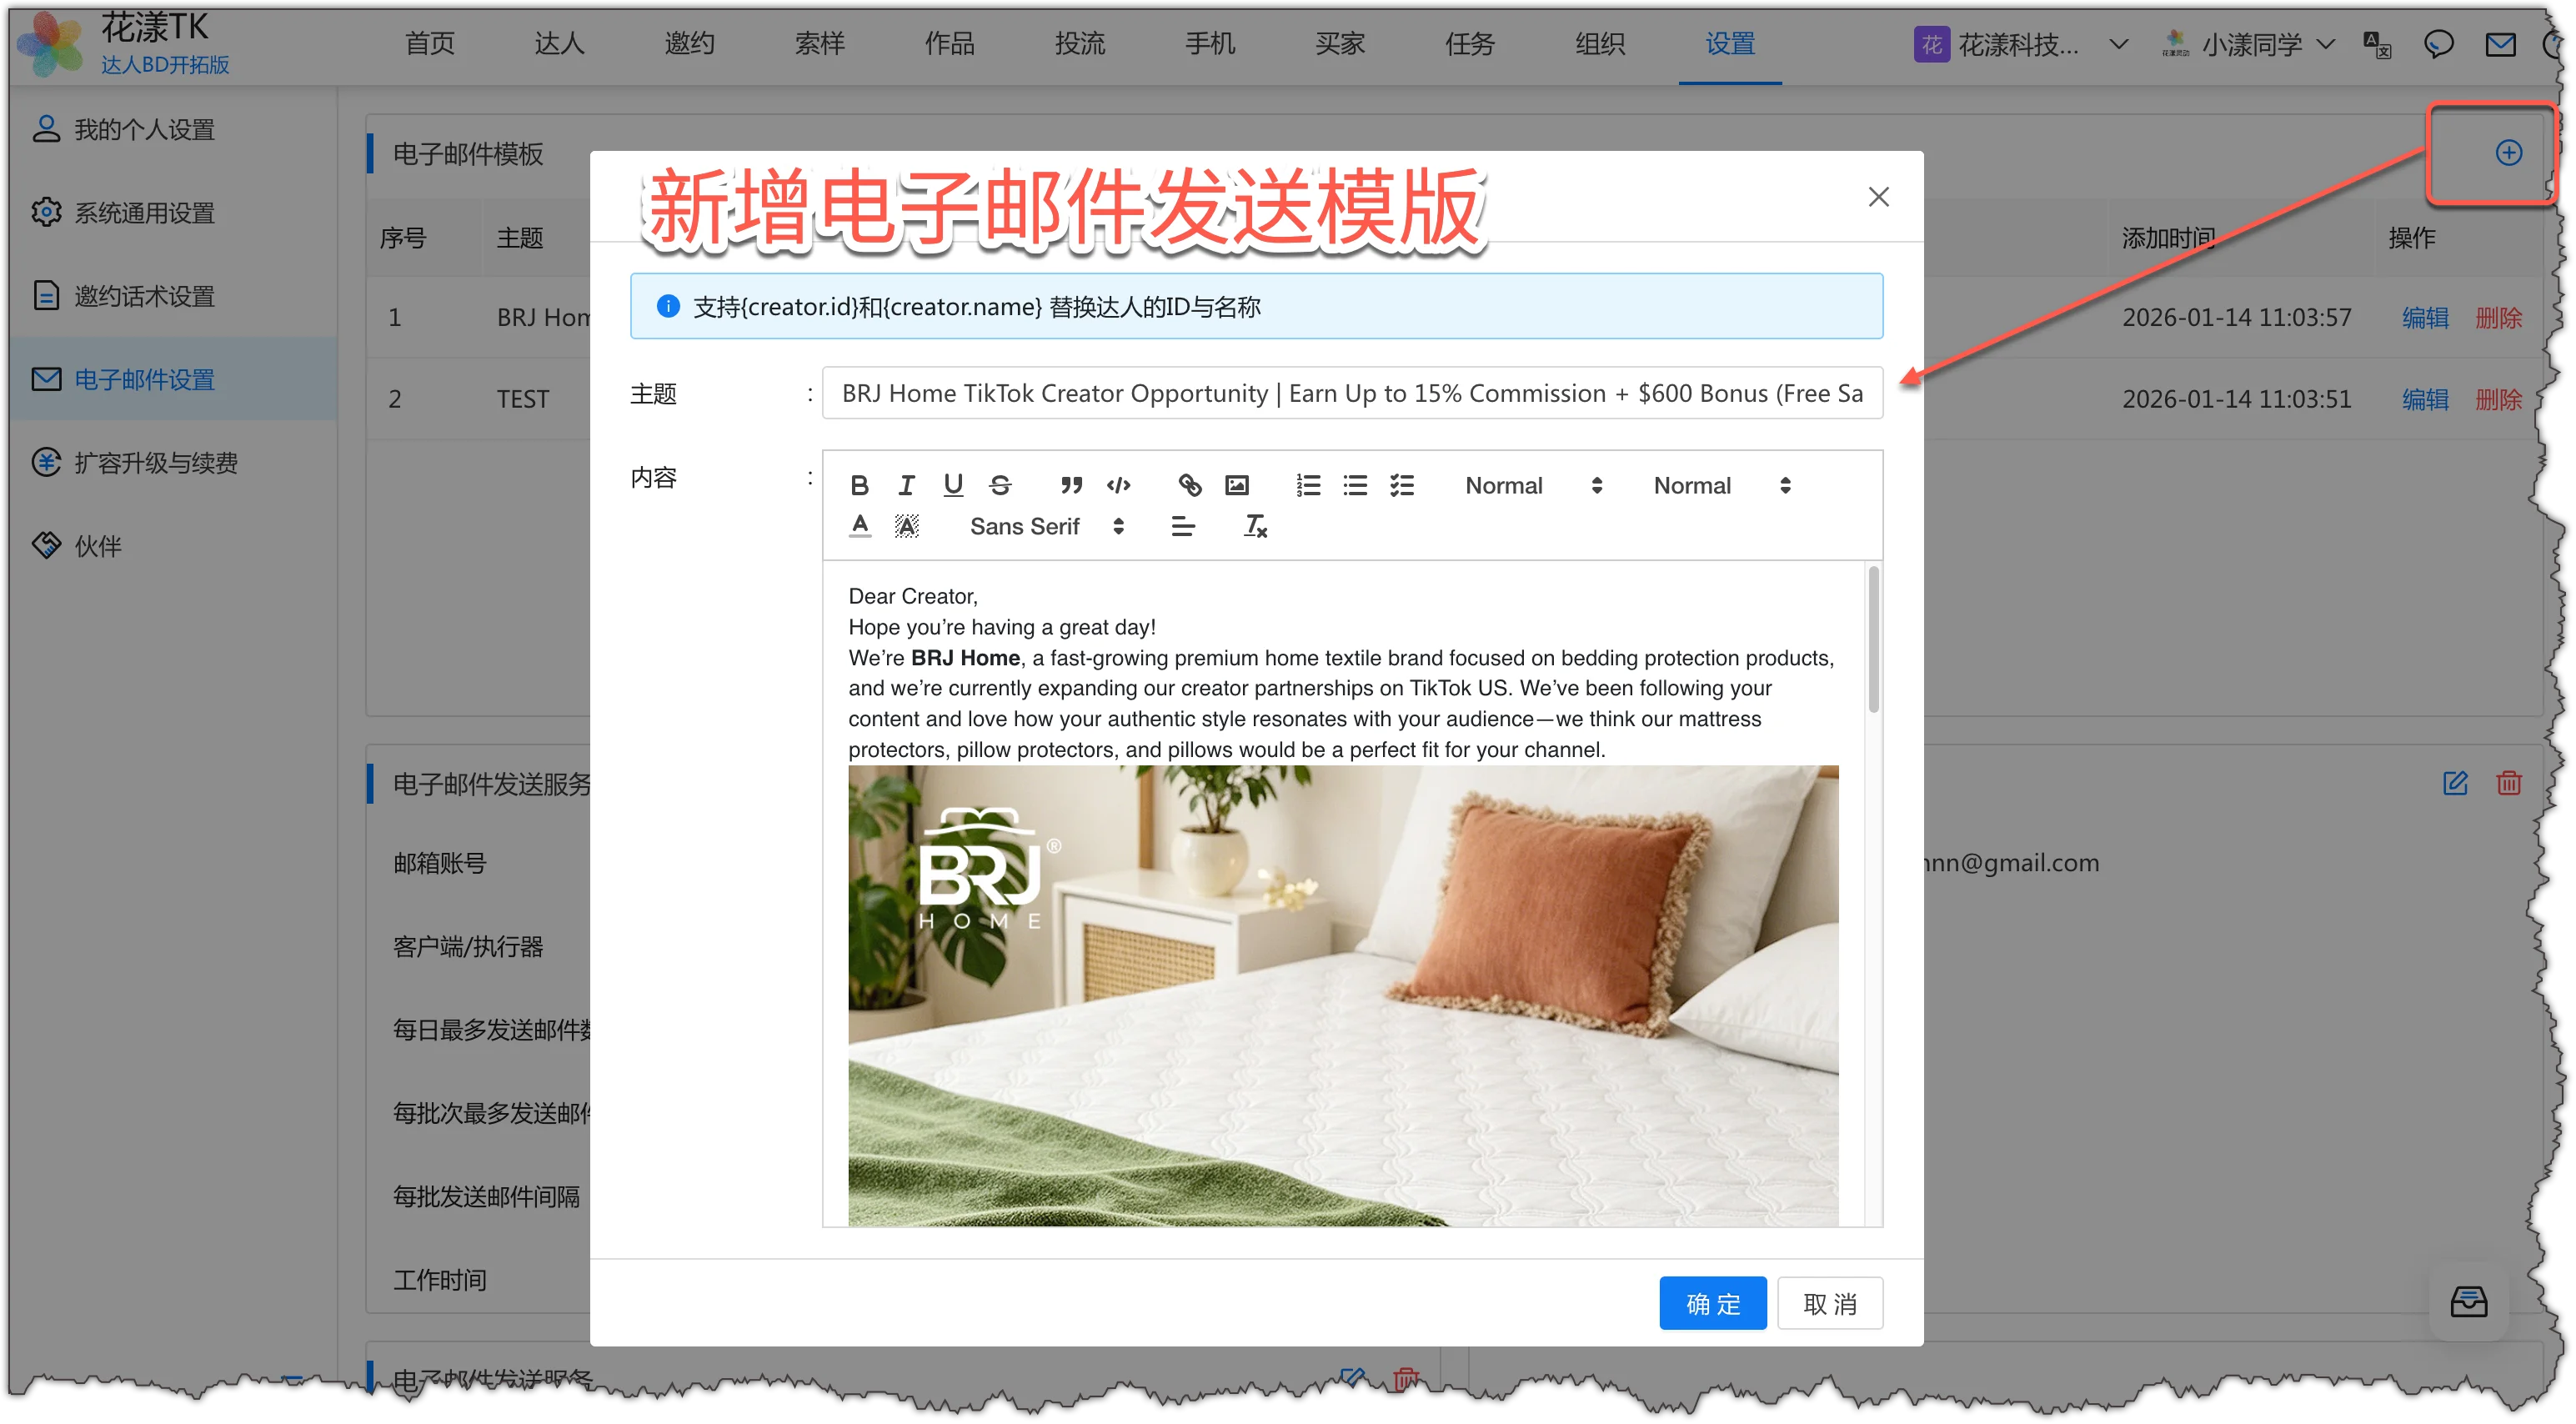
After the email service is configured, create an email template in the system and set the subject and body.
Add shop email template — supports {creator.id} and {creator.name} for substitution
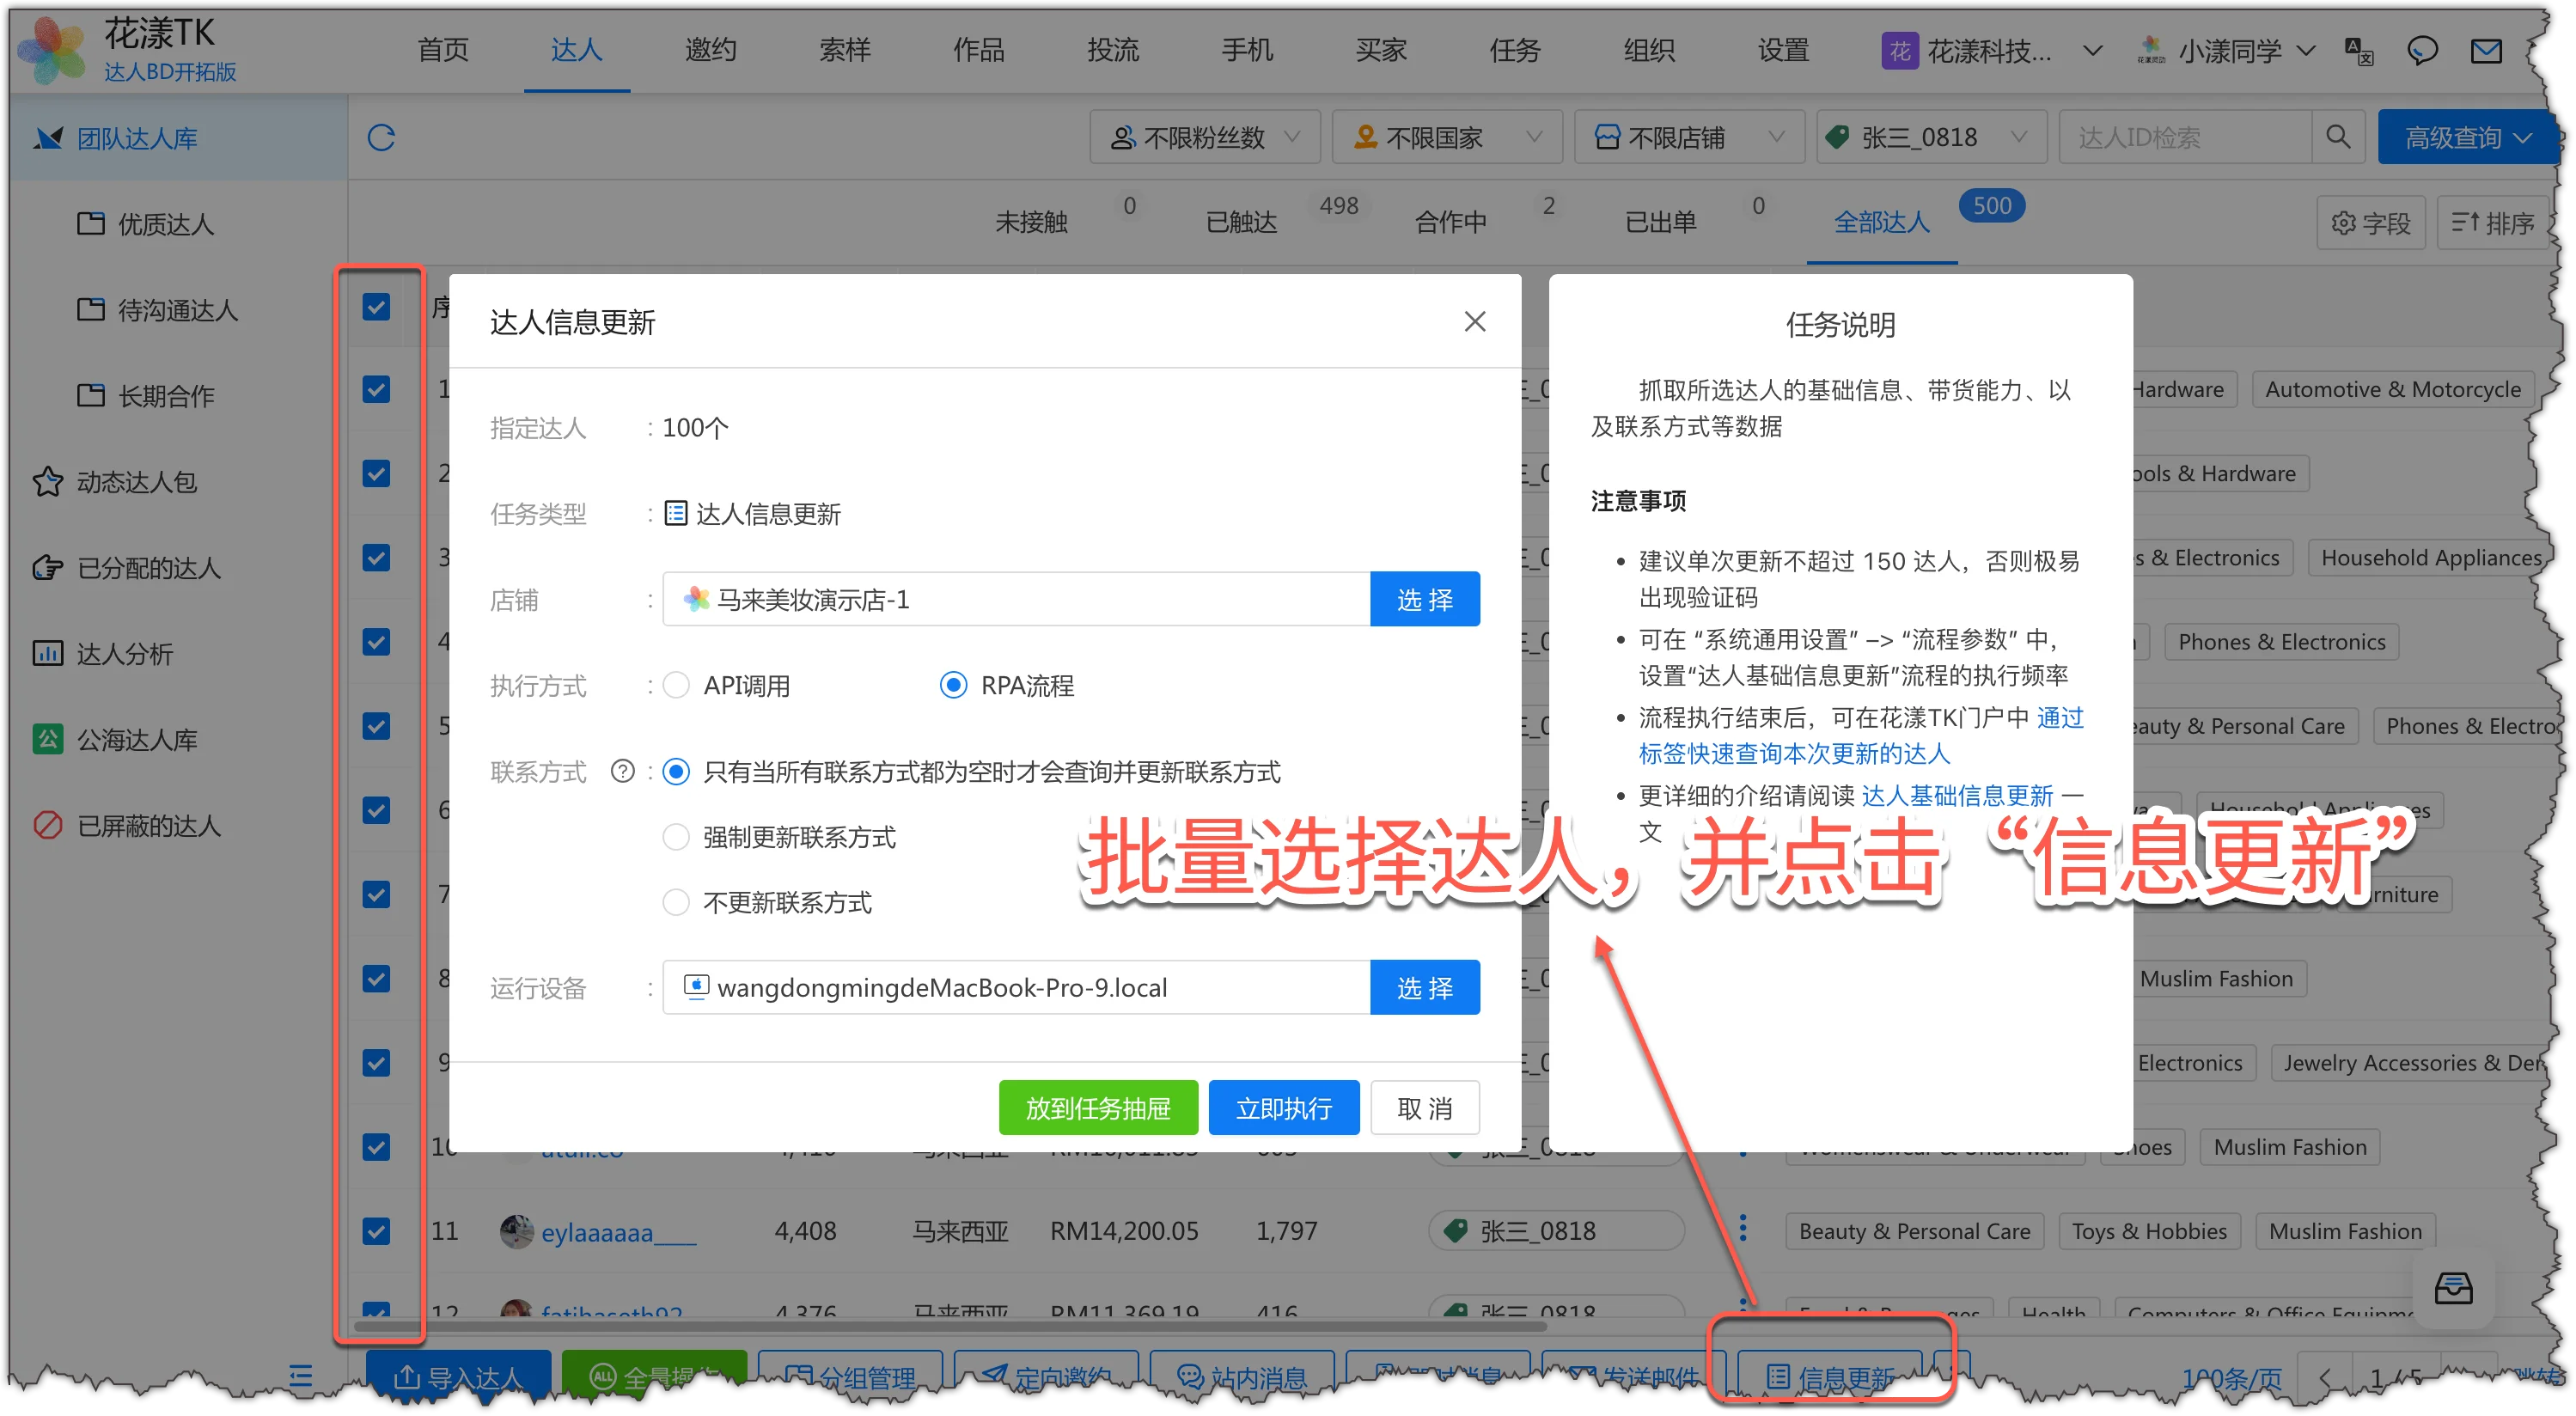
Creator information update — bulk-select creators and click “Information Update”
Step 4: Send emails in bulk
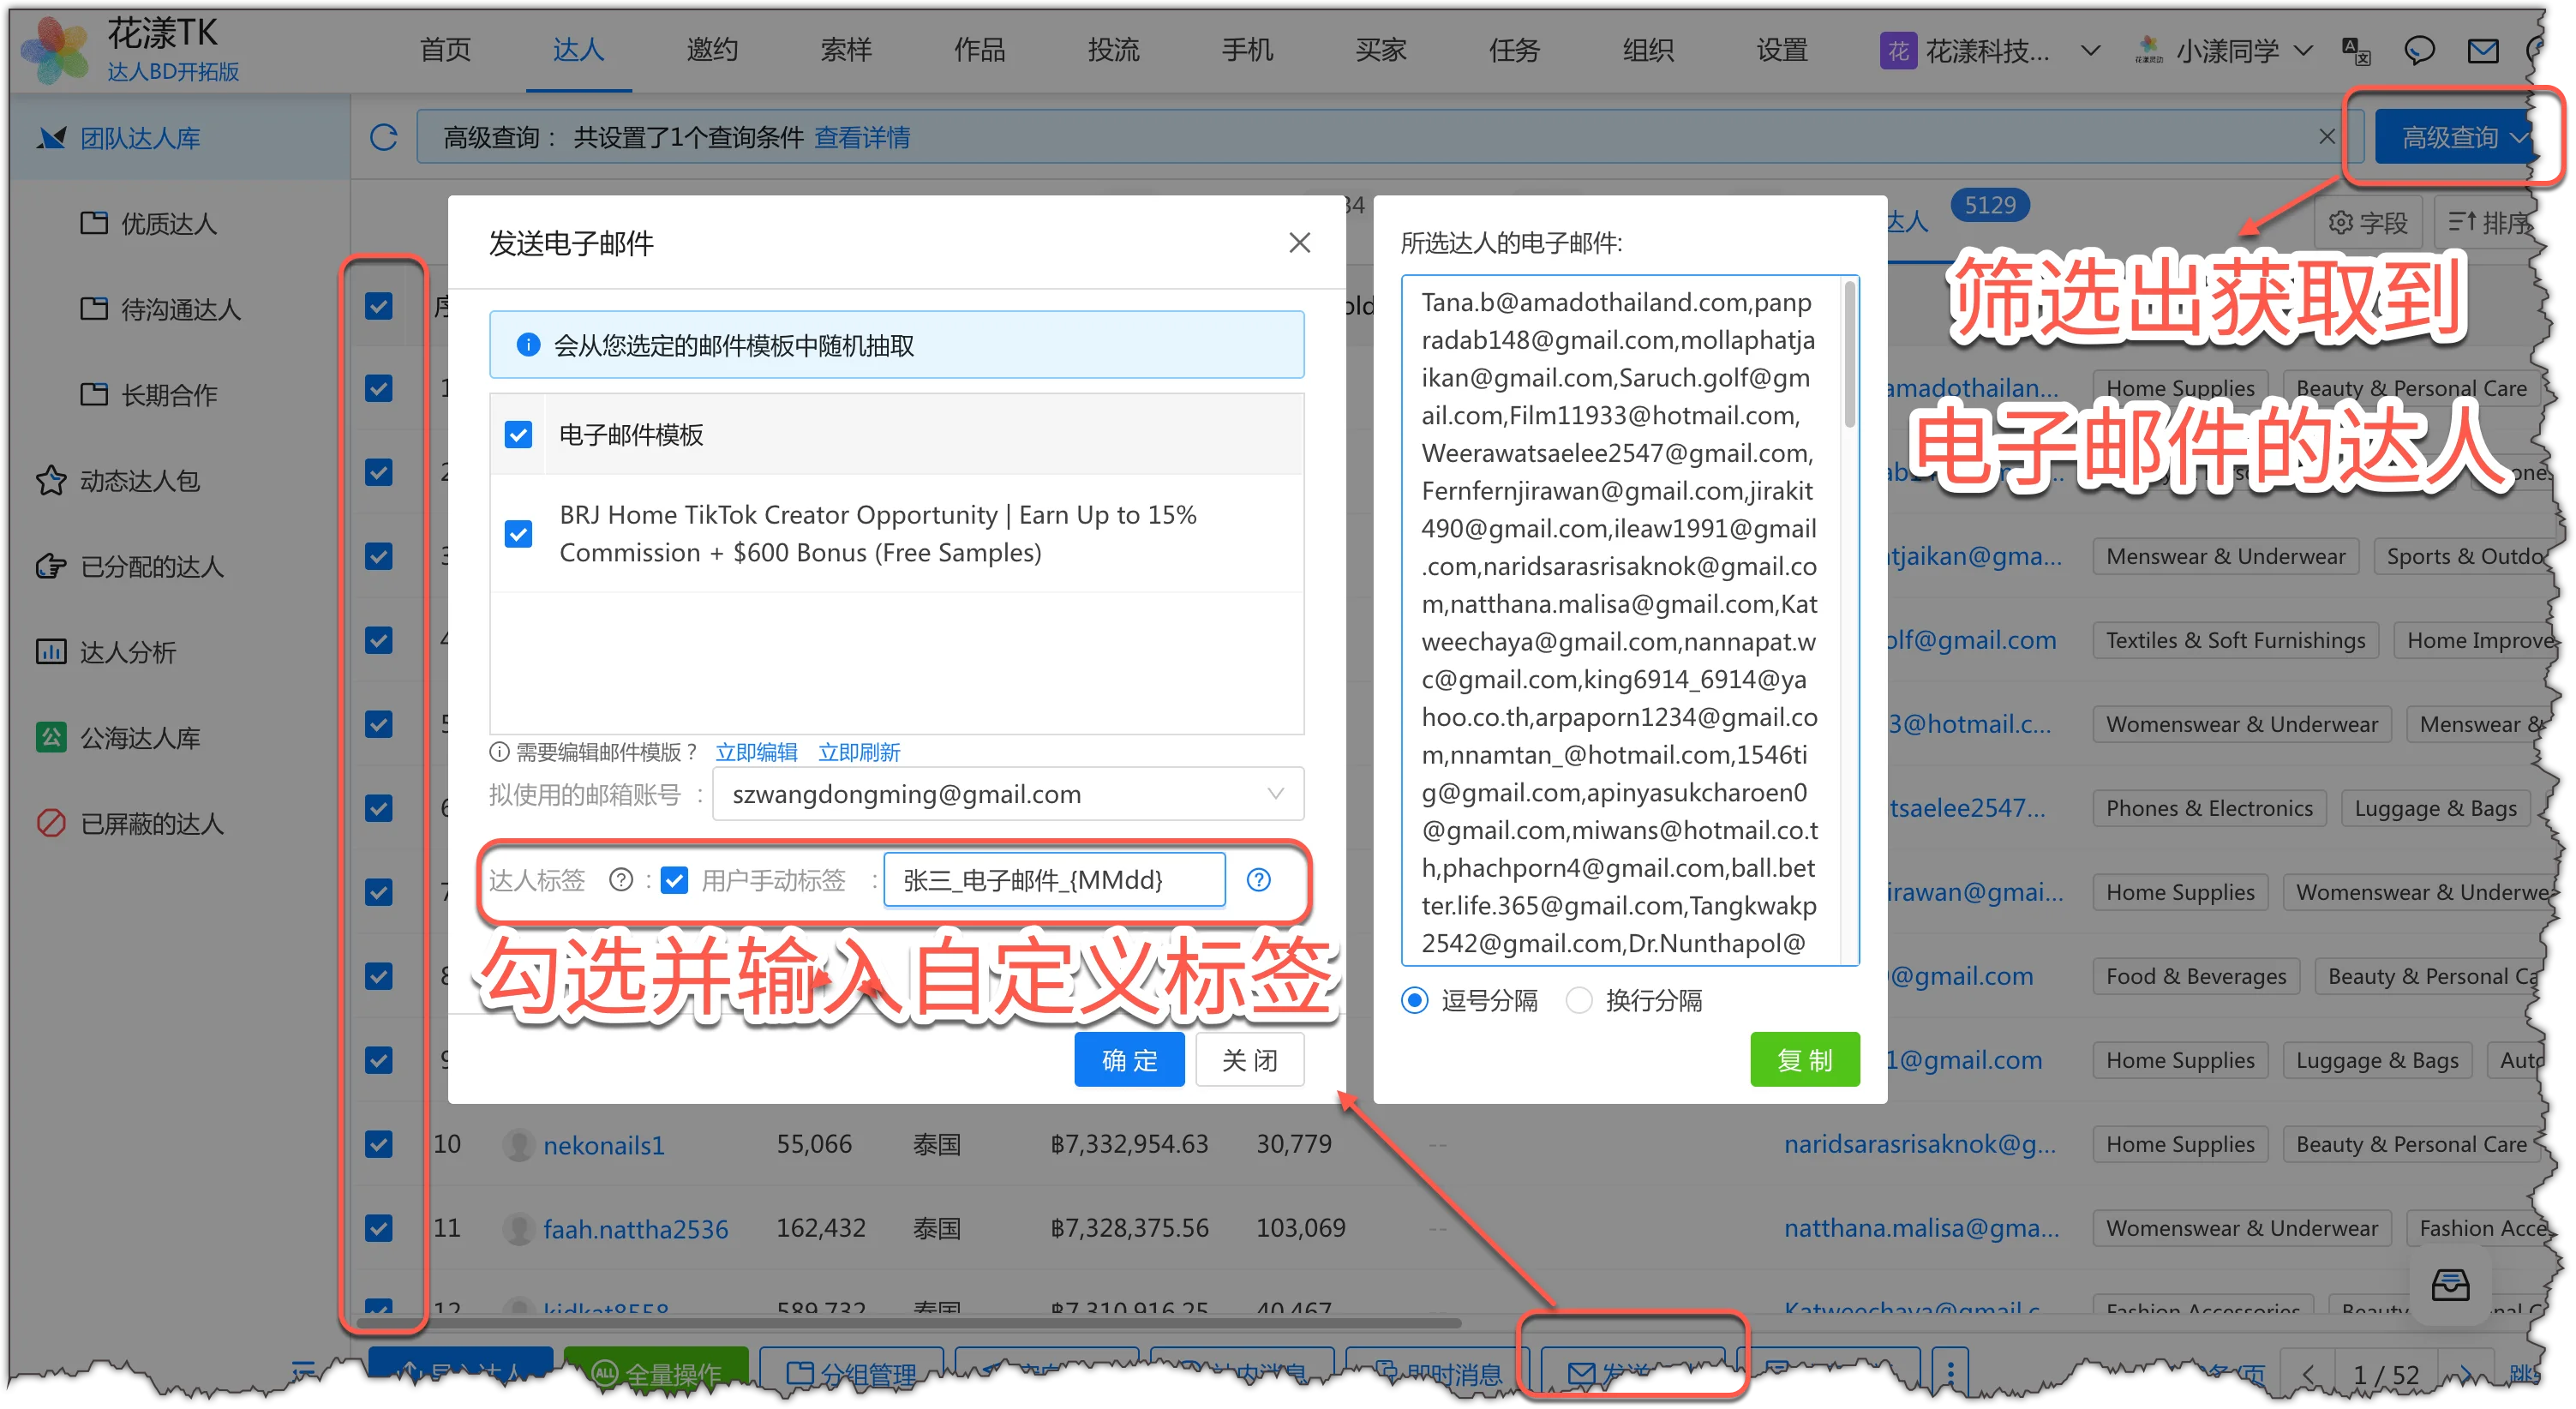
In Team Creators, filter target creators who provided an email address, choose the “Send emails to creators” flow, pick an email template you created, and the system will automatically email all of them.
Send email — filter creators with an email address, select them, and enter a custom tag
2.4
Off-platform Outreach
HuaYoung TK supports off-platform outreach — one of the system’s signature features.
Off-platform outreach means using creators’ instant messaging accounts (such as WhatsApp, Line, Viber, Zalo, Facebook, iMessage, etc.) to add them as contacts in bulk and send them instant messages for contact, communication, and collaboration.
Here is a quick overview of the steps (if you need this feature, please read the reference docs in the Notes below for full details):
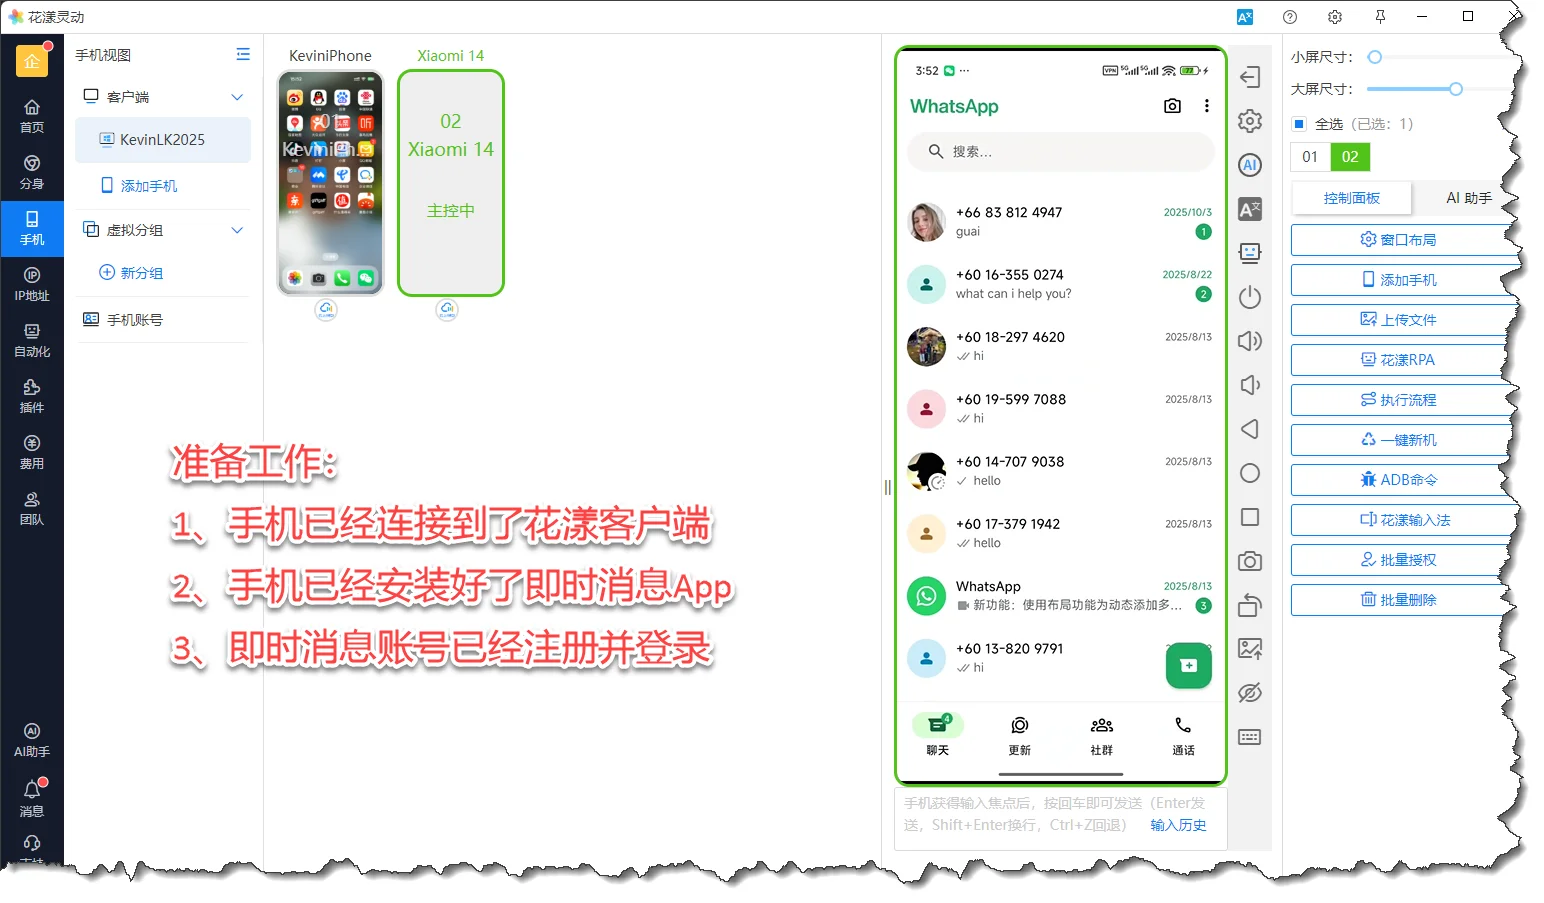
Step 1: Connect phones and IM accounts
The system supports group-controlling Android and iPhone devices, which you can use to drive the IM apps on the phones in preparation for later flows.
Connect phones and IM accounts
Step 2: Obtain creators’ contact info
In the HuaYoung TK portal, run the “Creator Information Update” flow — the system will automatically fetch creators’ IM accounts and other contact details.
Obtain creators’ IM accounts through “Information Update”
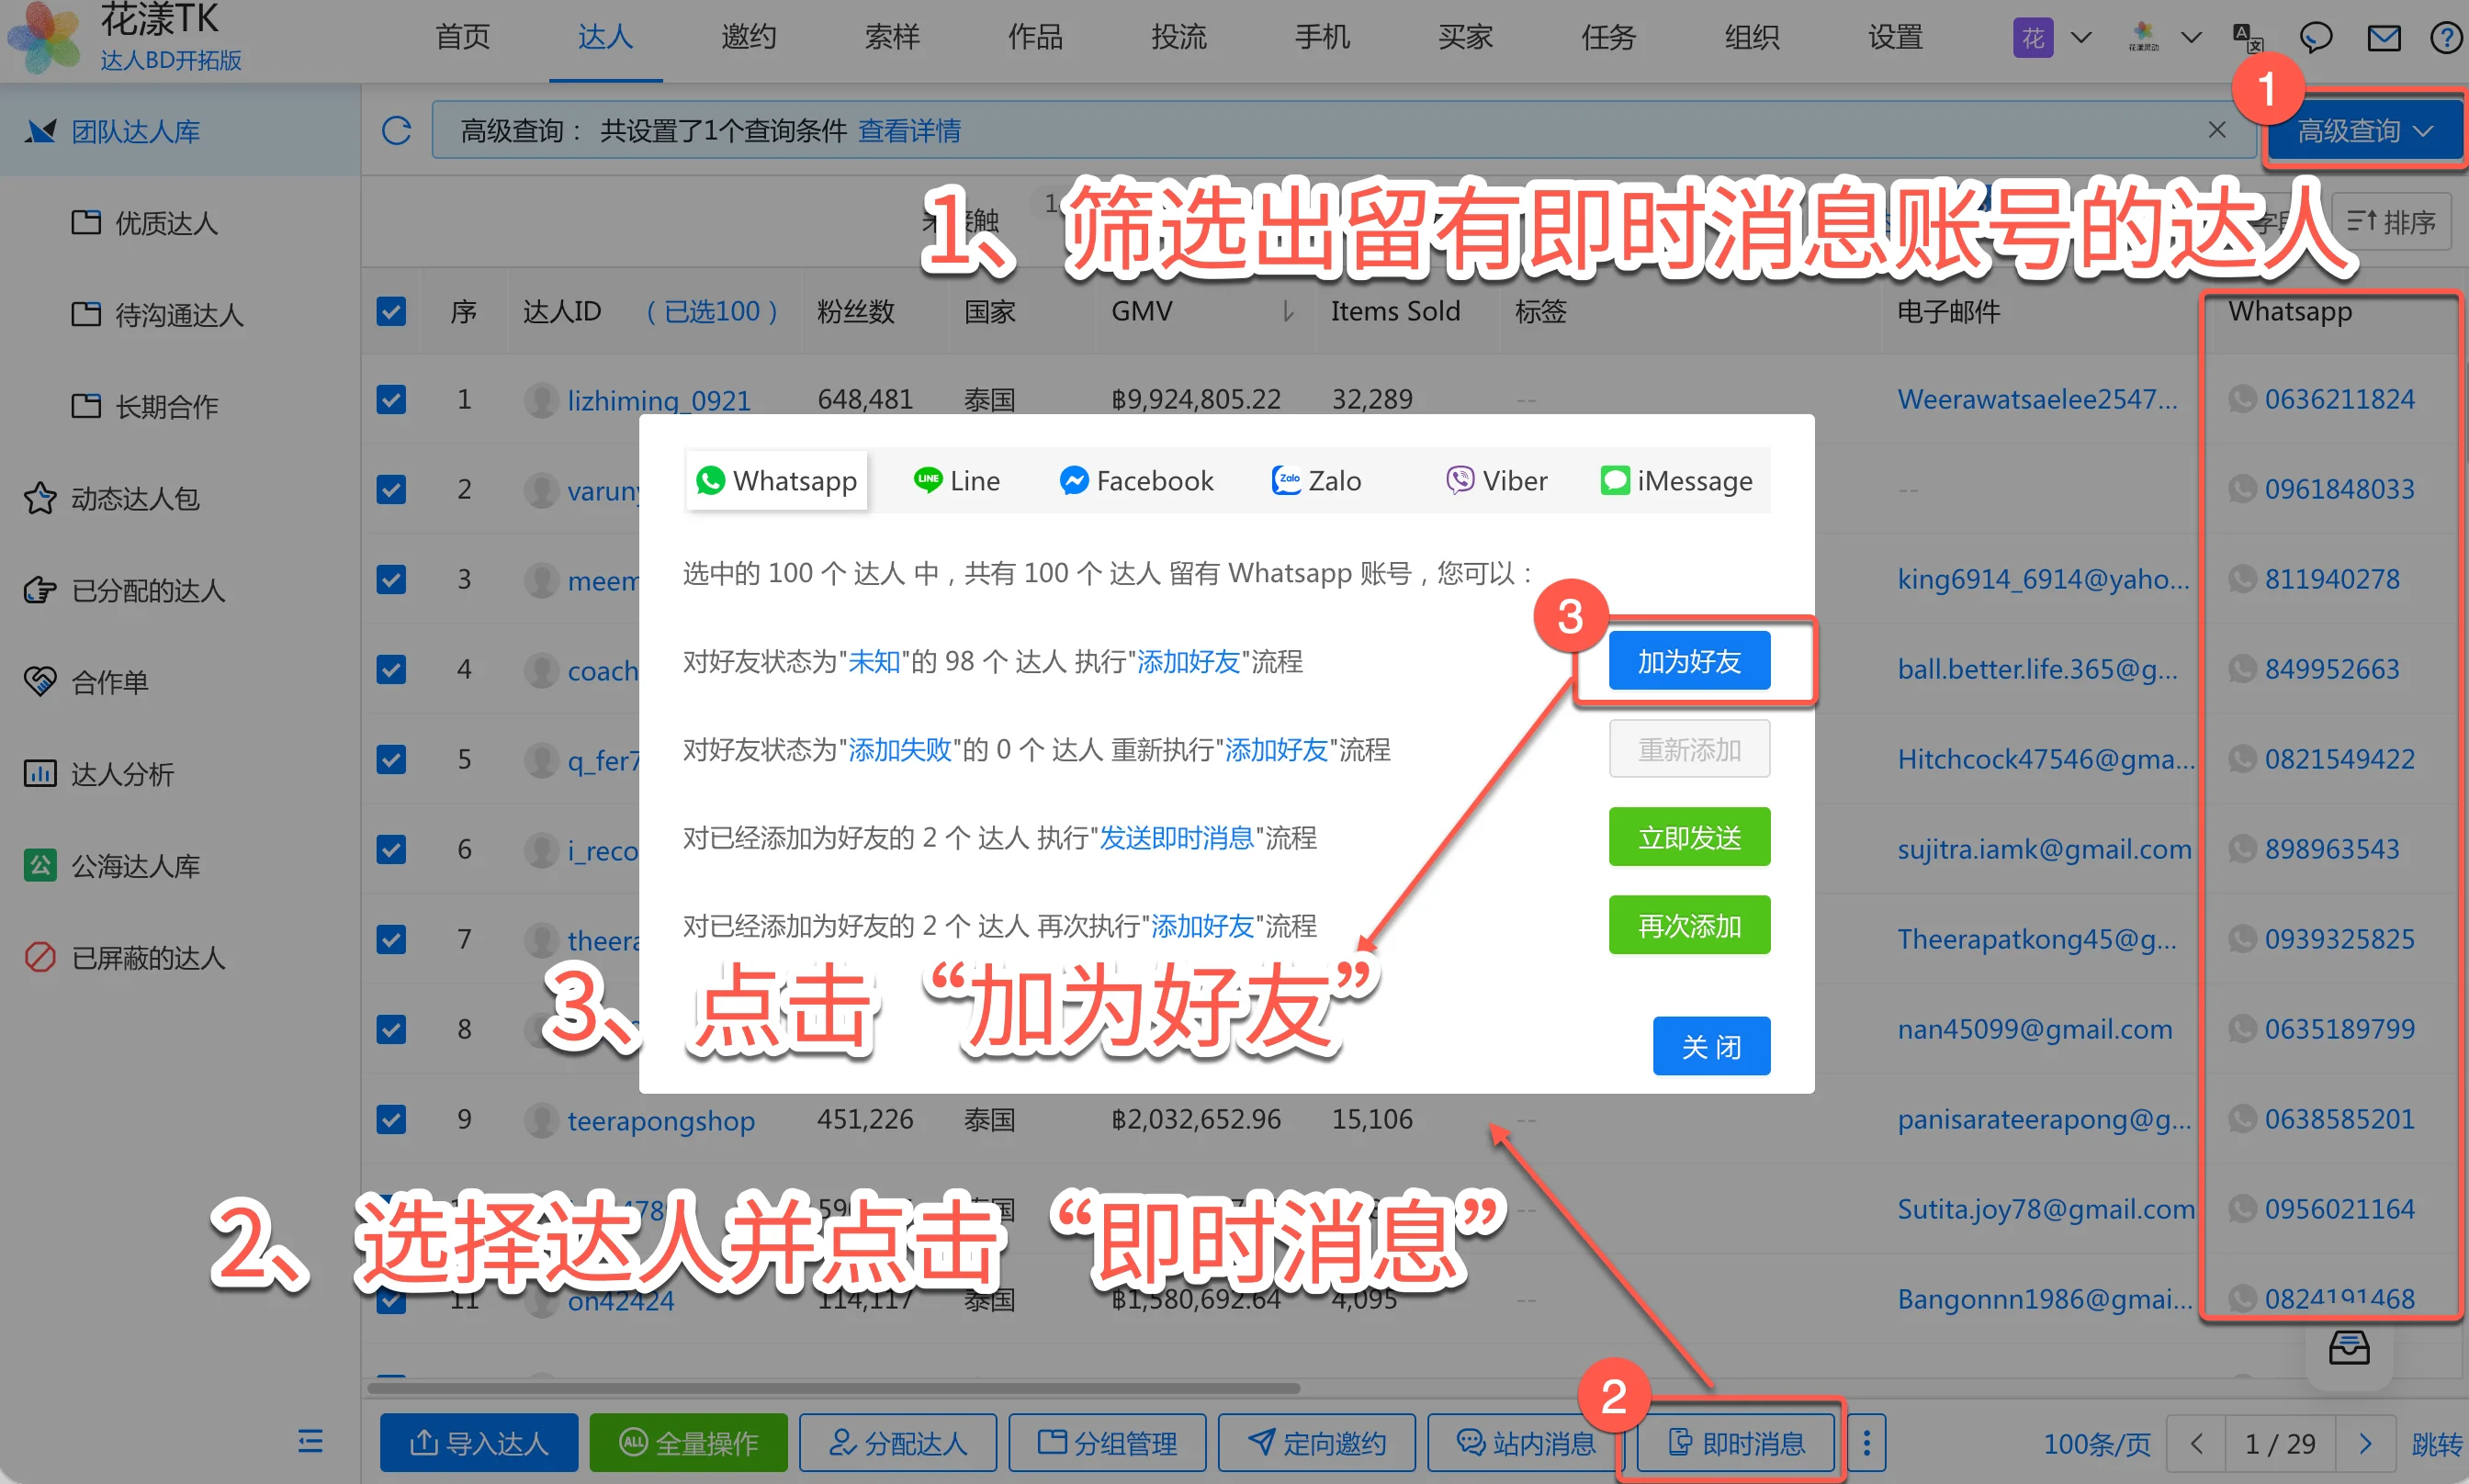
Step 3: Add creators as IM contacts
The system automatically adds creators as contacts on WhatsApp, Line, and other IM platforms.
Add creators as IM contacts
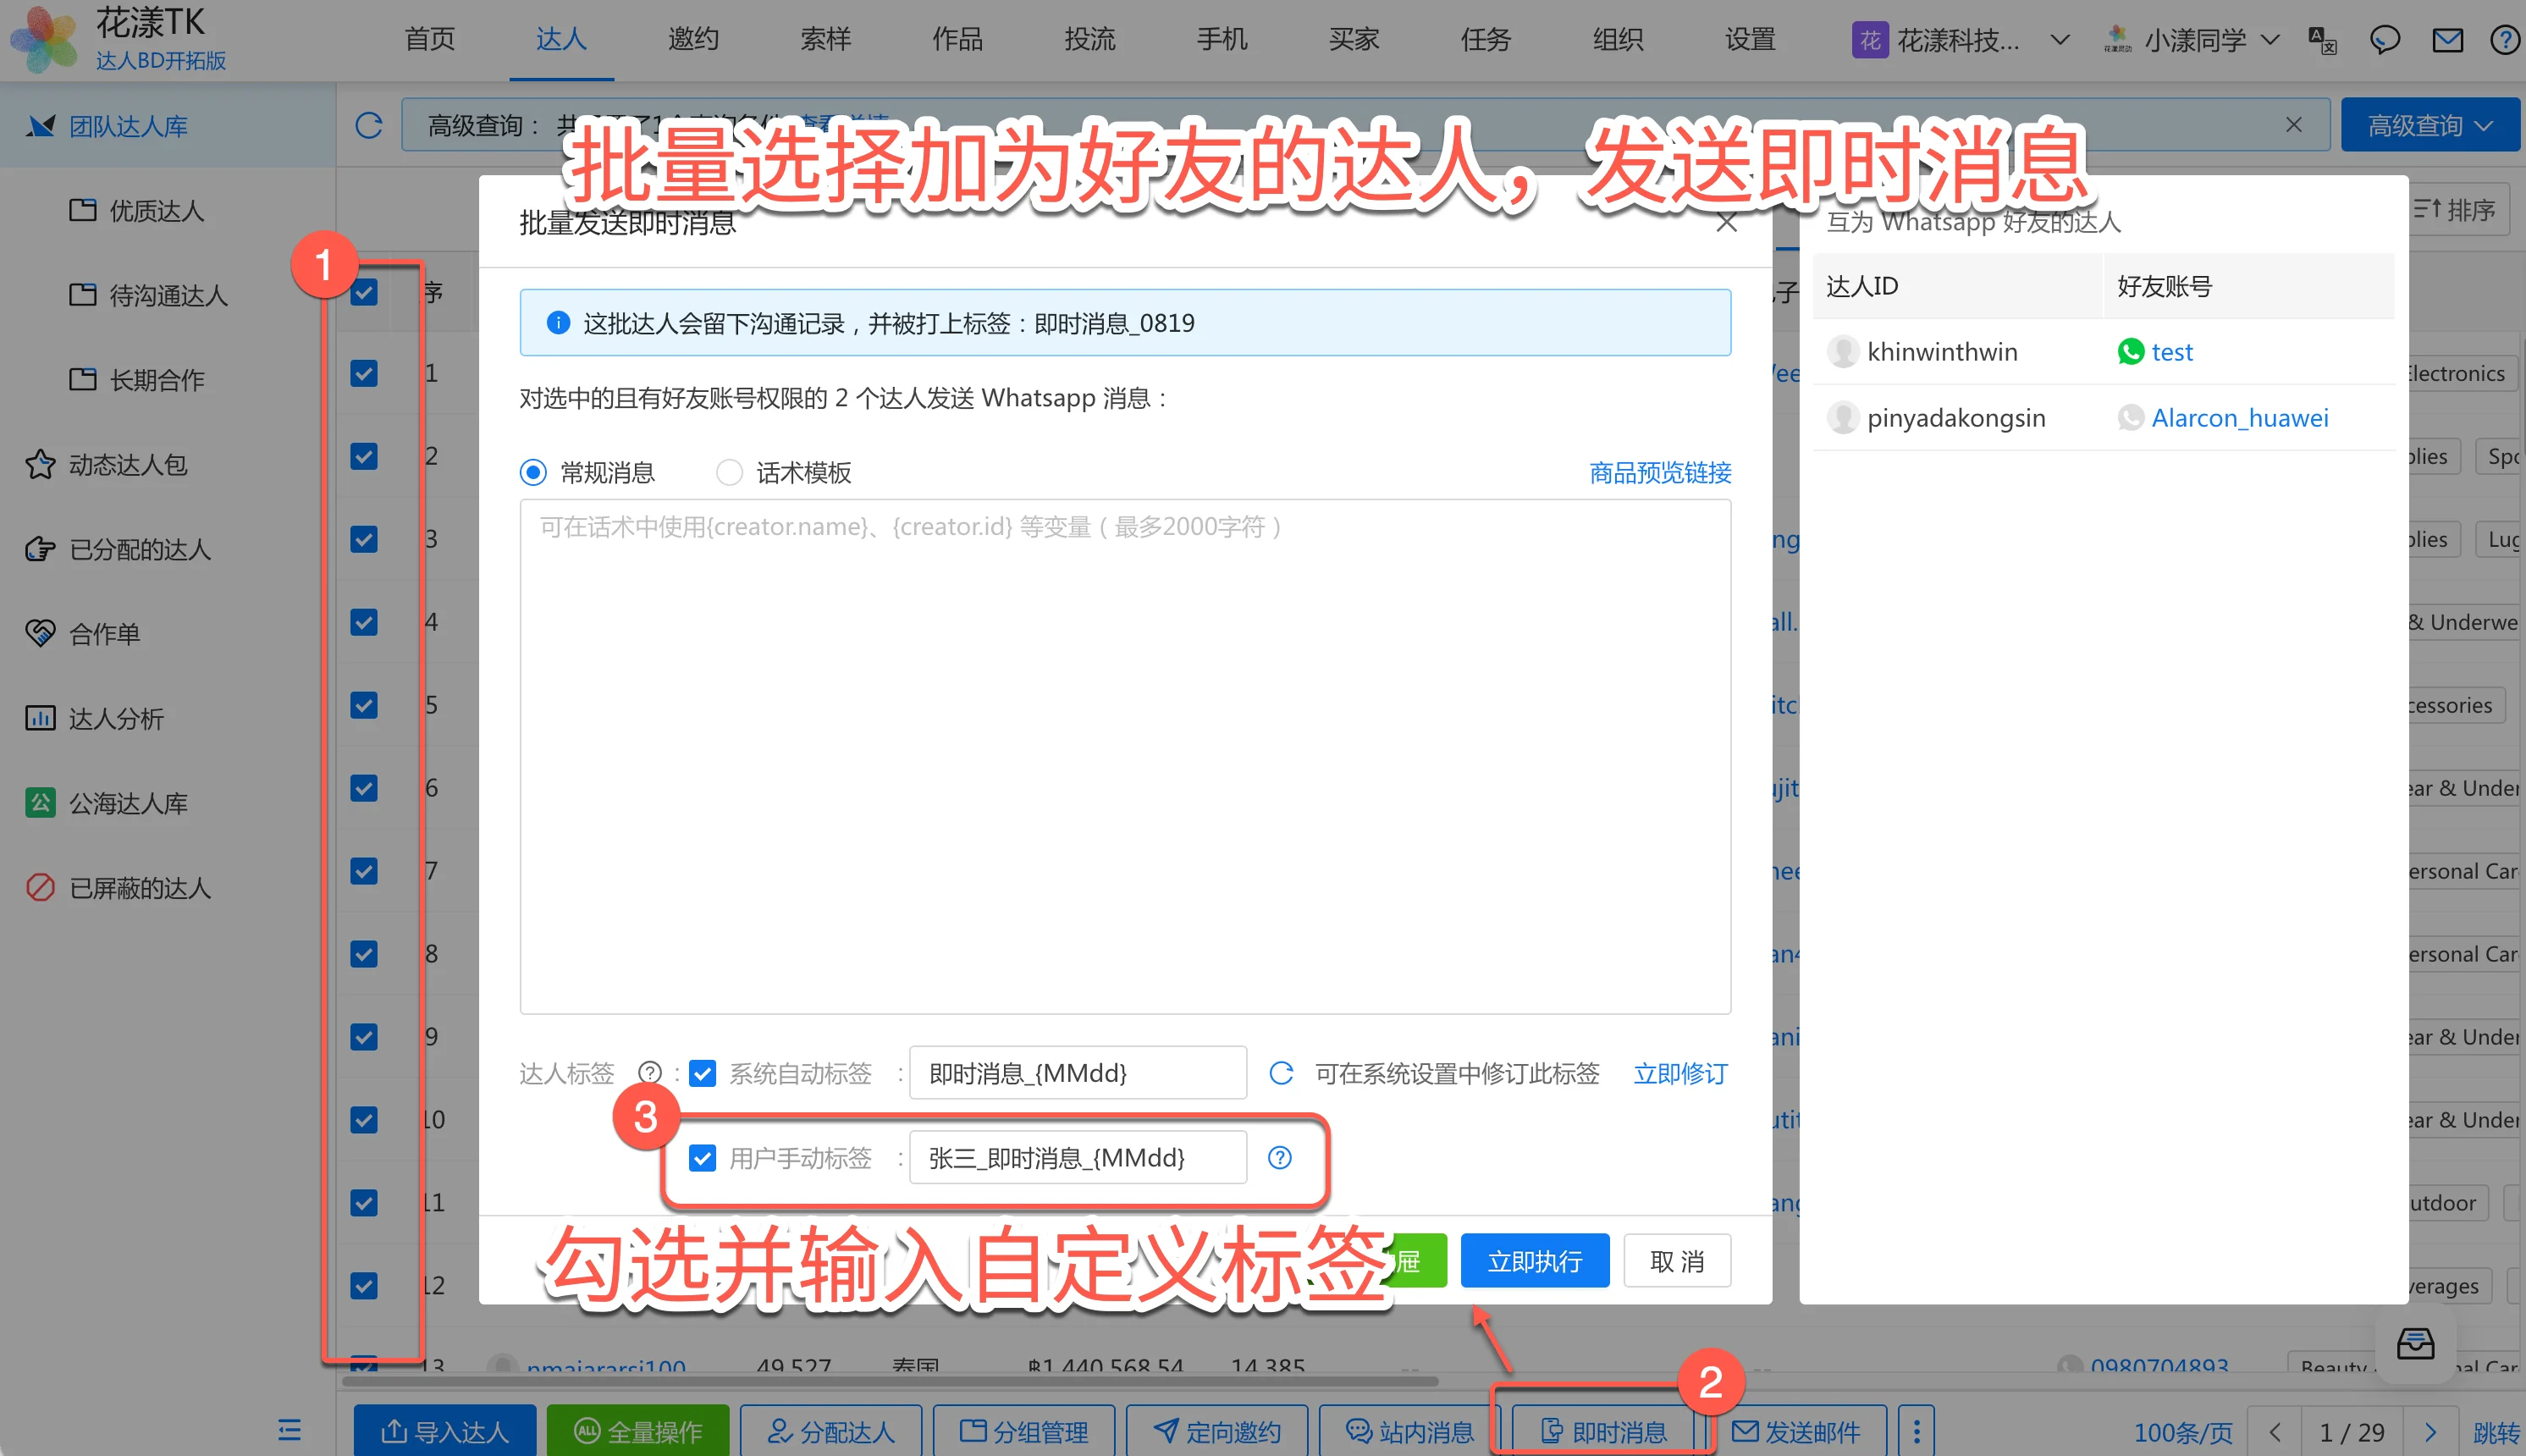
Step 4: Send IM messages in bulk
In the HuaYoung TK portal, select target creators, choose the “Send instant messages to creators” flow, set the message content, and the system automatically sends the messages via the connected phones.
Bulk-select creators and send IM messages
System bulk-adding IM contactsSystem bulk-sending IM messages
Off-platform outreach requires connecting phones to use the phone group-control feature;
The off-platform outreach feature requires an upgrade to the Private Domain Edition;
Once you have a creator’s IM account and outreach is established, we strongly recommend communicating via the phone IM app — it greatly improves the creator’s response rate.
3.
Sample Requests and Fulfillment
Sample request handling and fulfillment is the core of day-to-day operations after a creator is invited.
After you successfully invite a creator to promote your products, the creator will often request a sample (i.e., a sample request). You need to review and track their sample requests, and manage shipping, delivery and fulfillment progress.
3.1
Sample Request Approval
Compared with operating directly in the TikTok Shop backend, HuaYoung surfaces the creator’s follower count, GMV, whether they have already produced orders for you, and their sample request history on other stores — all in one view — to help you decide quickly.
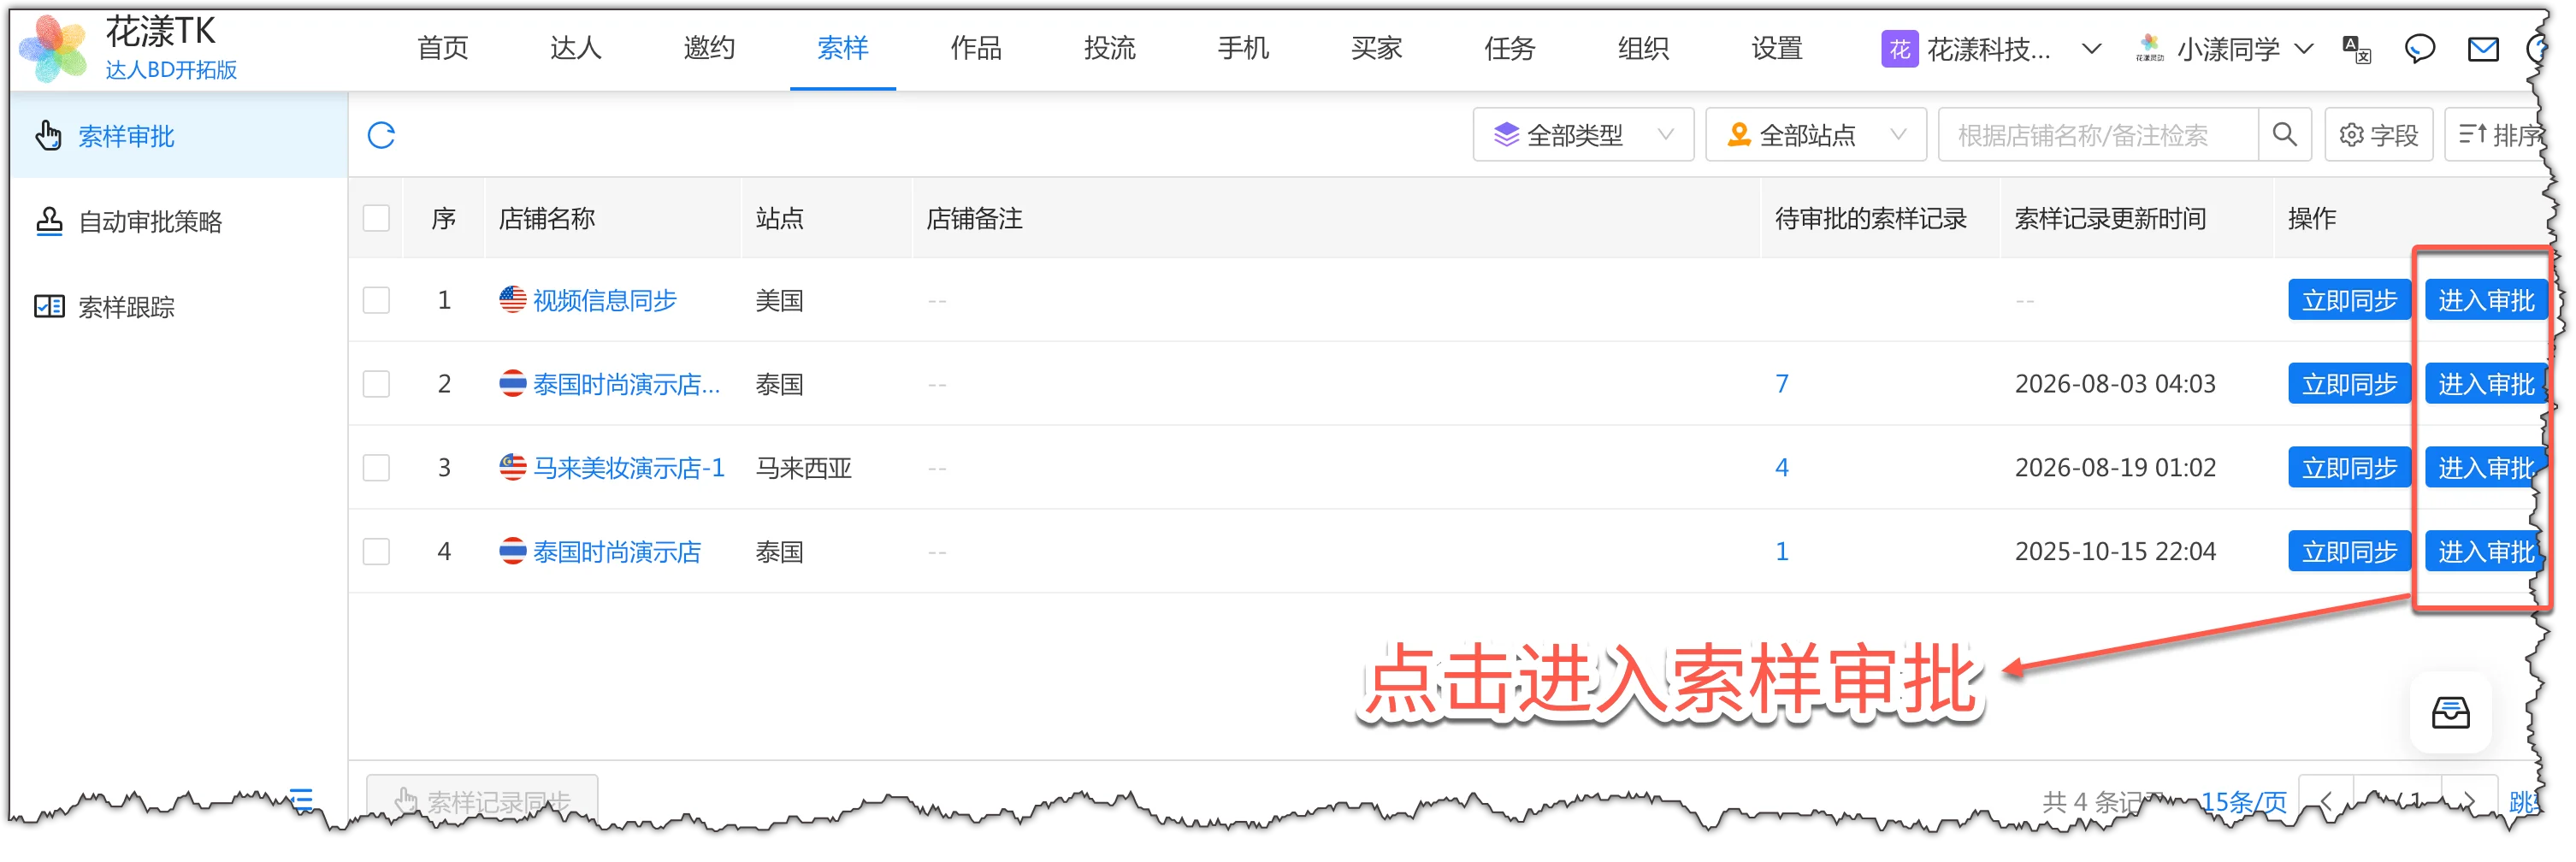
Step 1: Enter the store you need to approve for
On the “Samples – Sample Approval” page, click “Enter Approval” on the right of a store.
Enter sample approval
Notes:
The sample information shown here is the snapshot captured during the most recent shop data sync. If the last sync was a while ago, run a fresh “Shop Data Sync” to pull the latest sample requests.
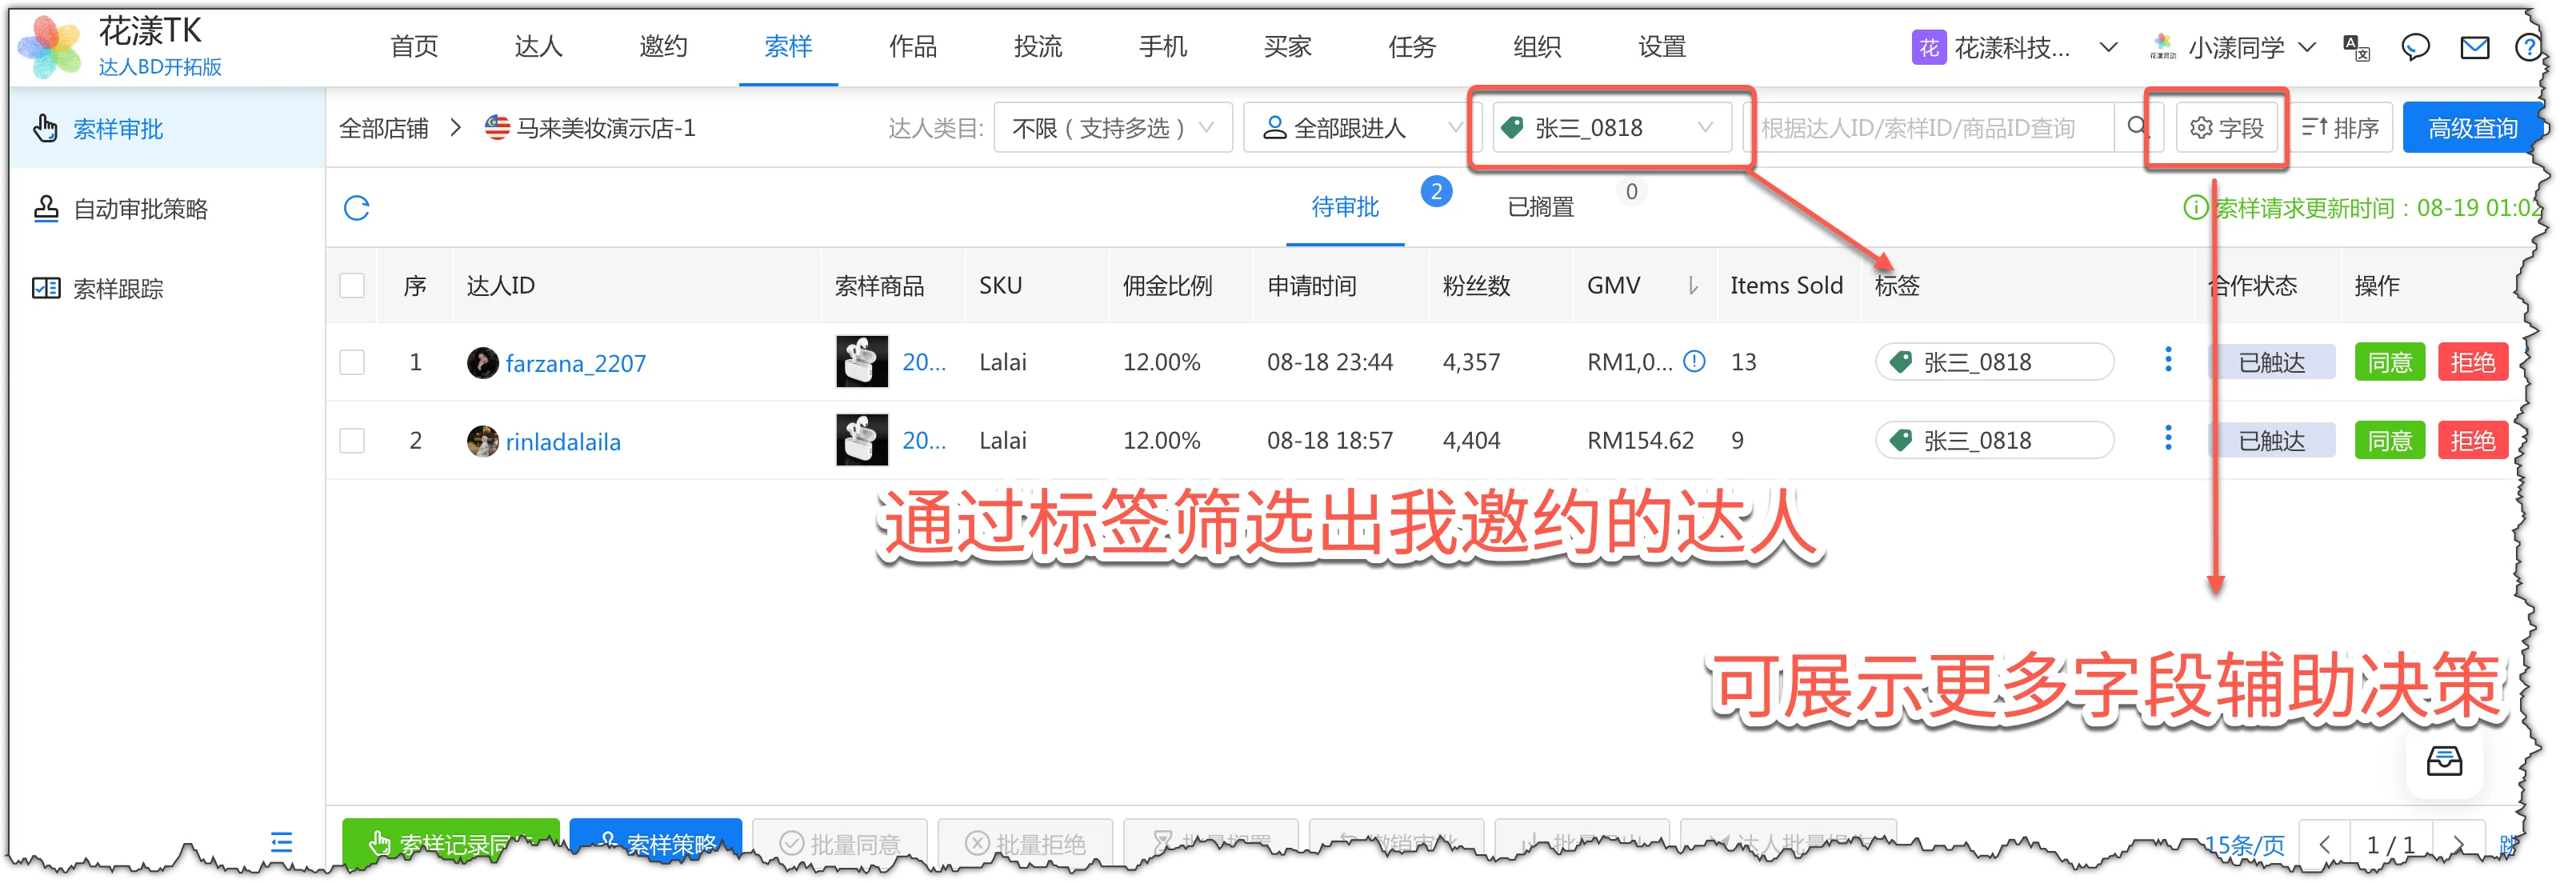
Step 2: Filter the sample requests to handle
You can see the details of each sample request, then use the “Tag” filter to list the sample requests from creators you invited.
Filter the sample requests to handle
Tips:
Click the “Fields” button in the top-right corner to surface the columns most useful for your decisions (e.g., GMV, follower count, and others).
Click the “Advanced Query” button in the top-right corner to filter sample requests across multiple dimensions.
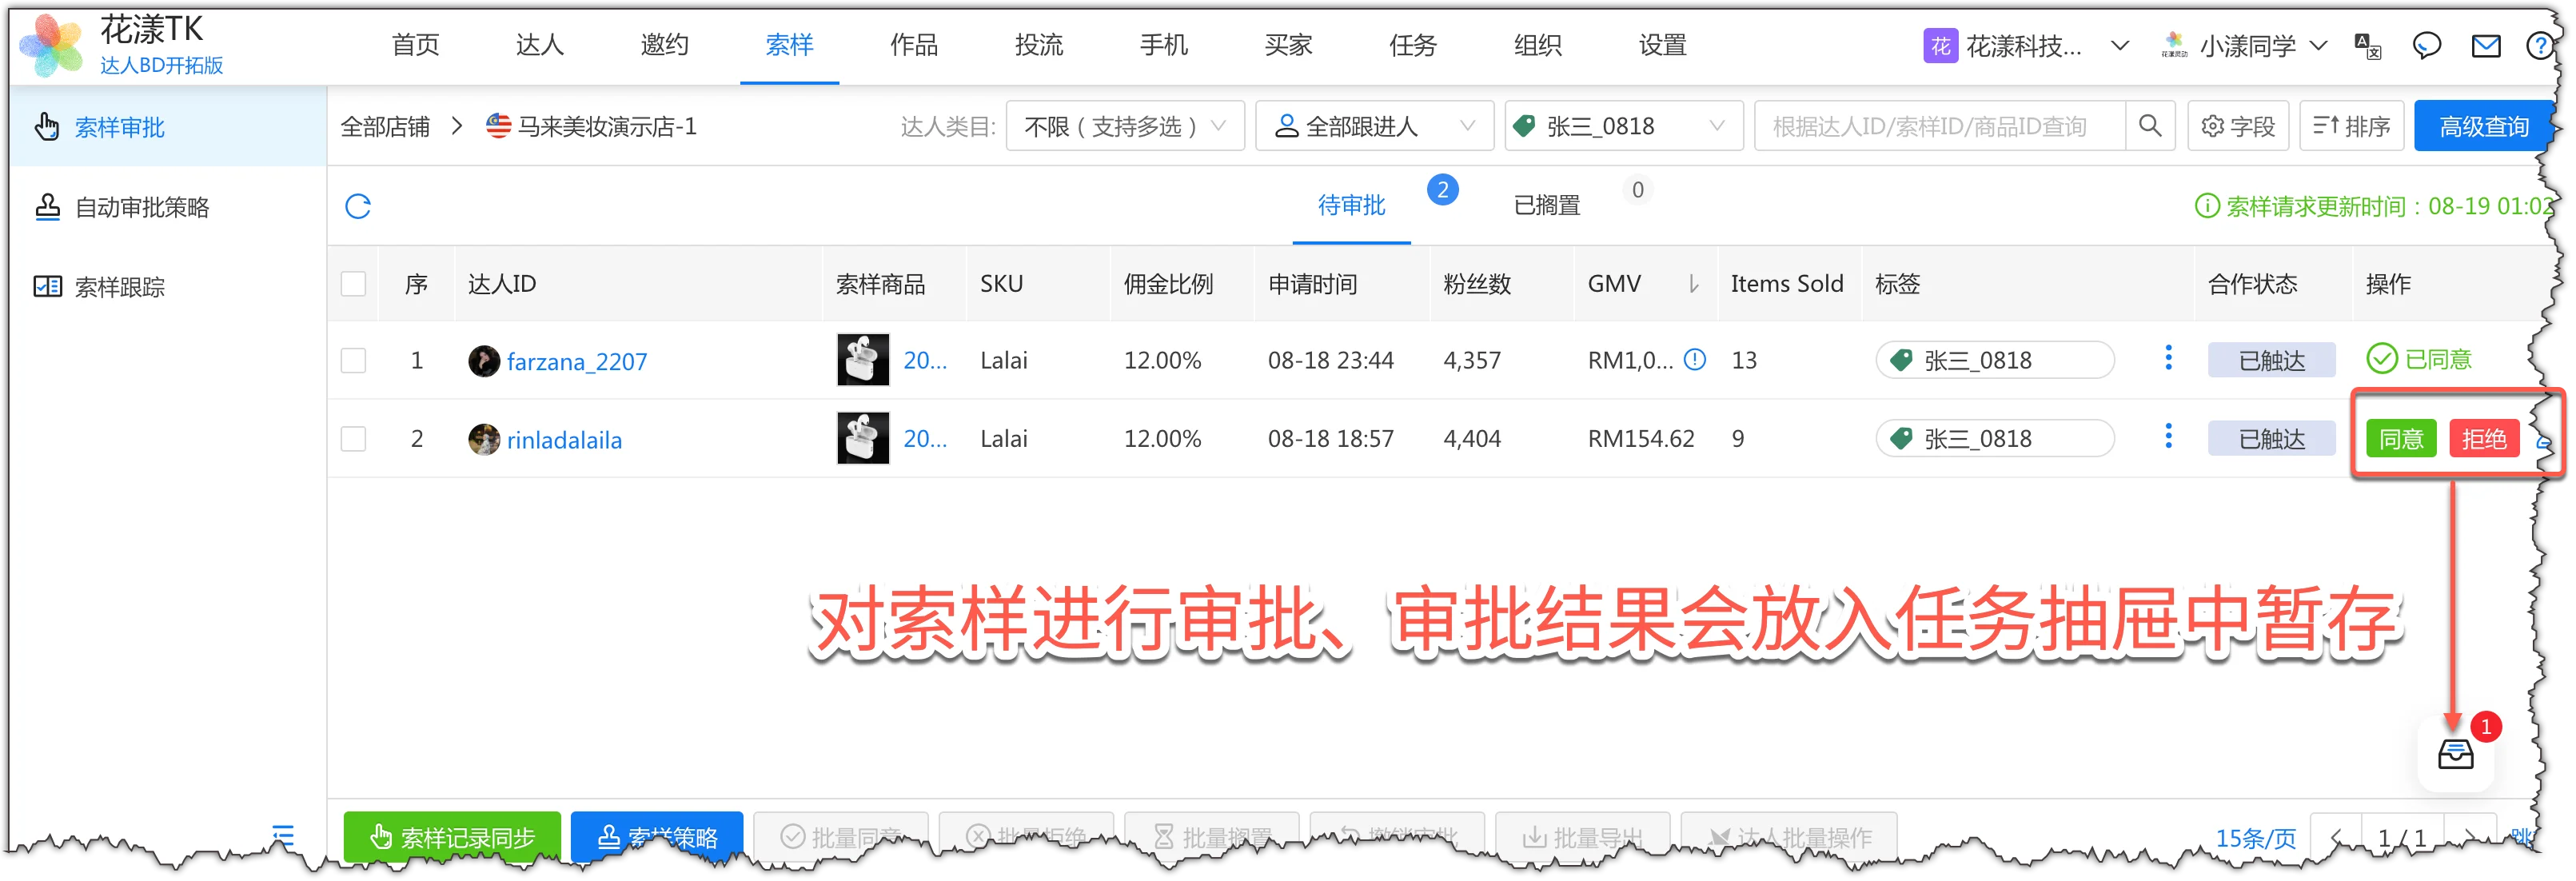
Step 3: Approve the sample requests
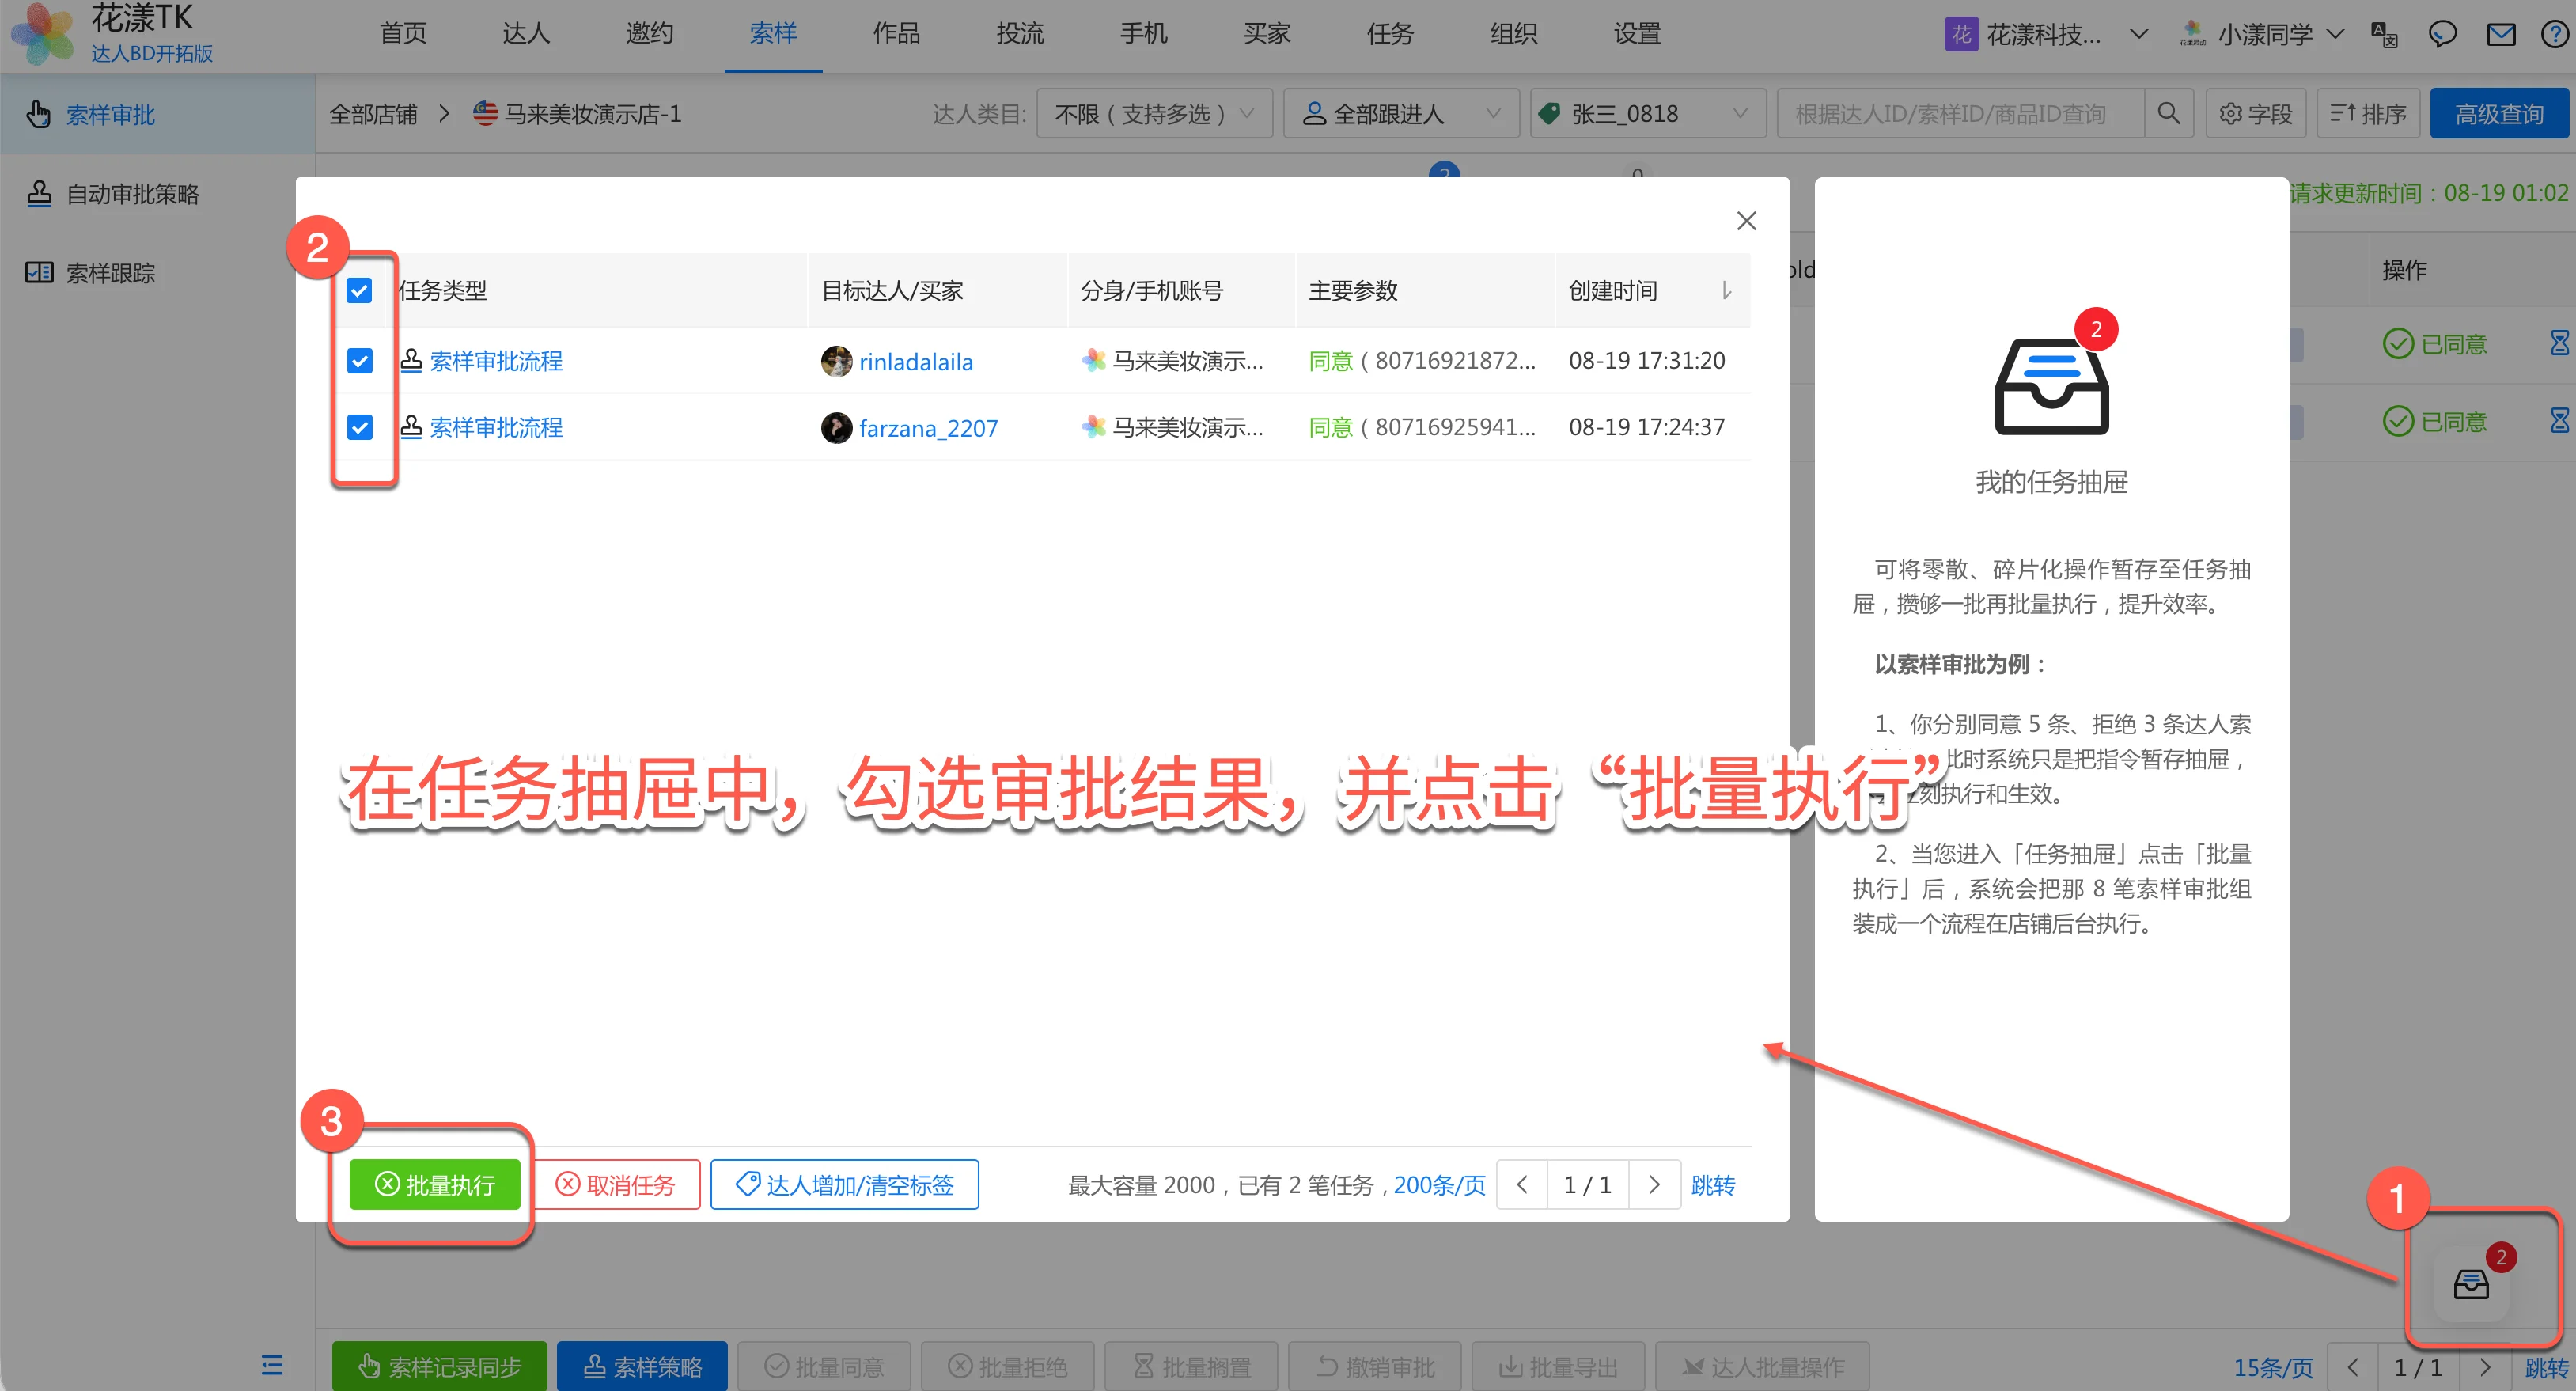
Now take an action on each sample request — “Approve”, “Reject”, or “Hold”. These become a batch of tasks held in the Task Drawer at the bottom-right. If you change your mind, you can open the “Task Drawer” and cancel an approval to revert it to its pre-approval state.
Approve sample requests
Tips:
For sample requests you don’t want to fulfill, prefer “Hold” over “Reject” — once the expiry passes, the request simply goes away.
Step 4: Execute the flow
Click the “Task Drawer” in the bottom-right, select the approval tasks you just created, and click “Bulk Execute” — the system will then actually run the flow and complete the approvals.
Bulk-execute the approval flow
3.2
Sample Tracking
After a sample request is approved, you need to track the sample’s approval, shipping, delivery, content production, and whether it generates orders for you — to keep fulfillment smooth and avoid the collaboration getting stuck on the shipping step.
Your main work in Sample Tracking includes:
Step 1: Filter and query
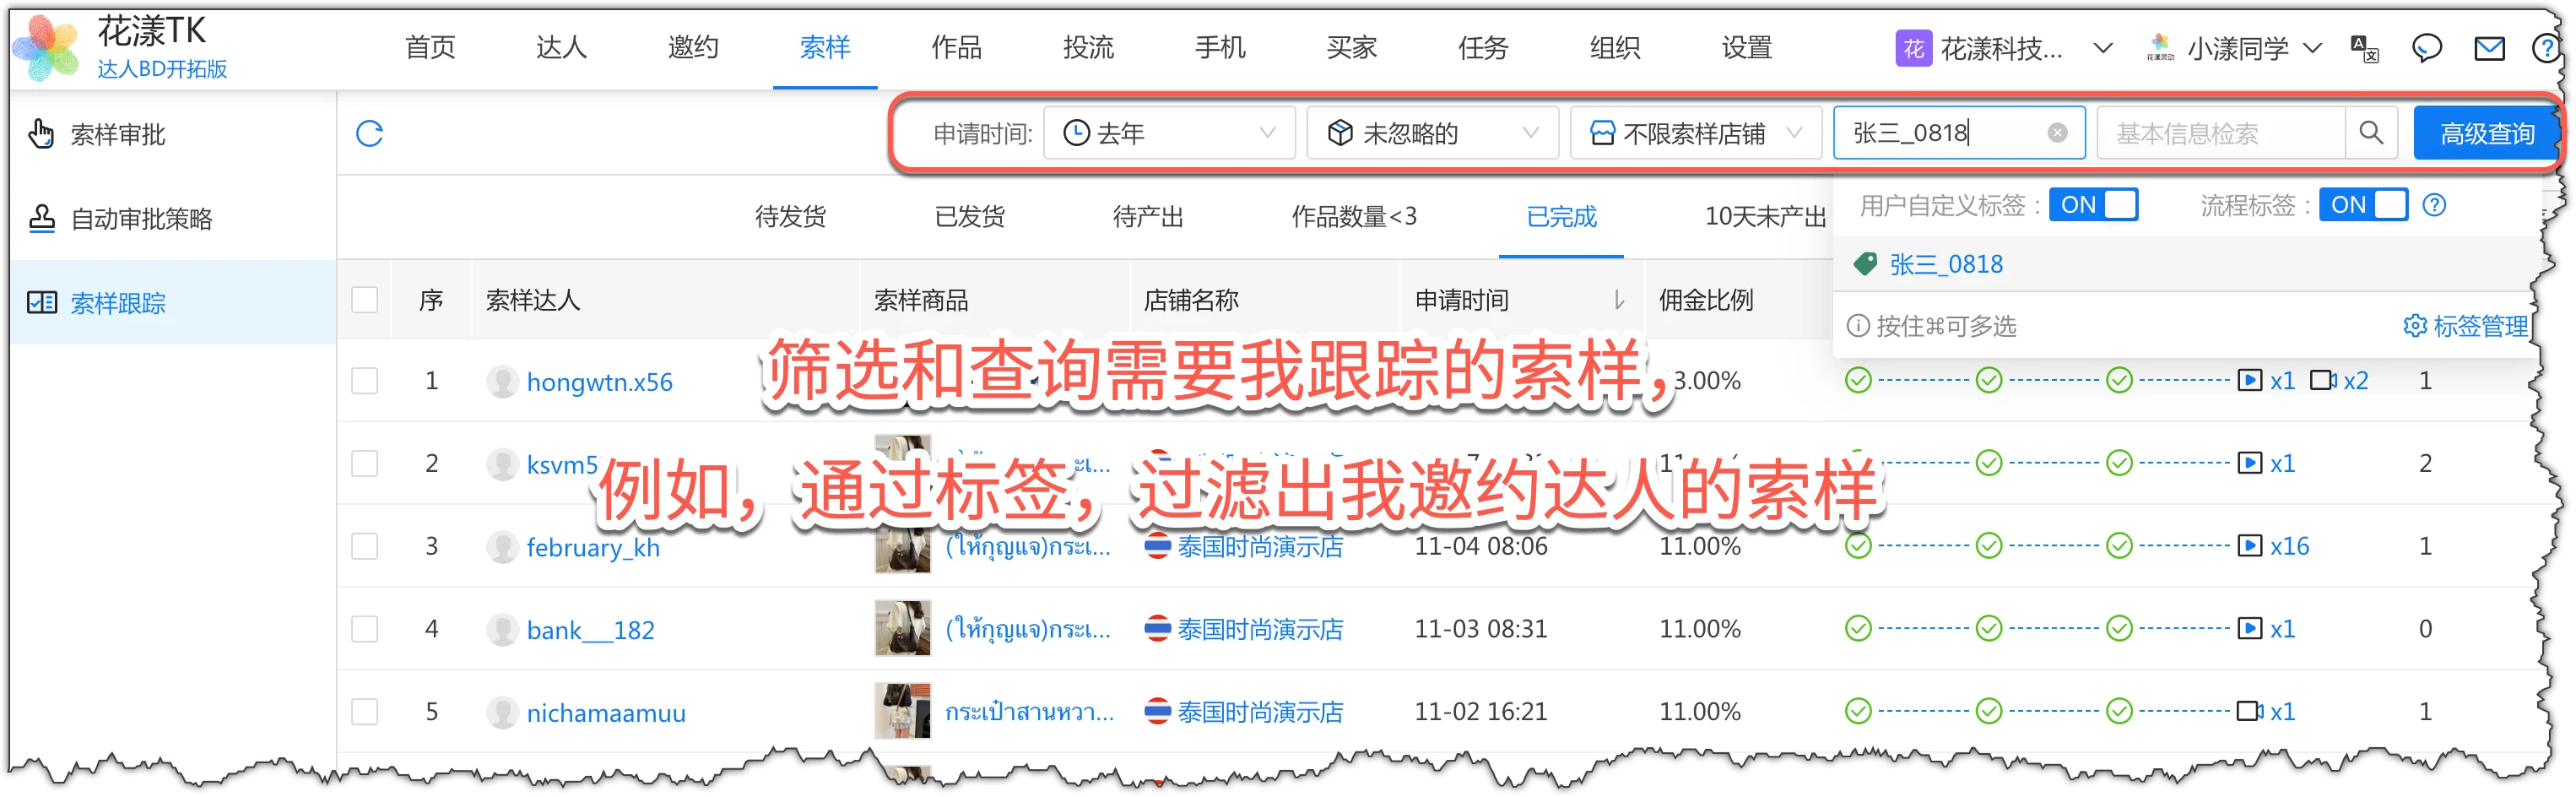
Use the filters at the top of the page (request time, status, store, creator tag, etc.) to quickly locate the sample records you care about — a common task is filtering for sample requests from creators I invited.
Filter and query the sample requests I need to track
Step 2: Track sample status
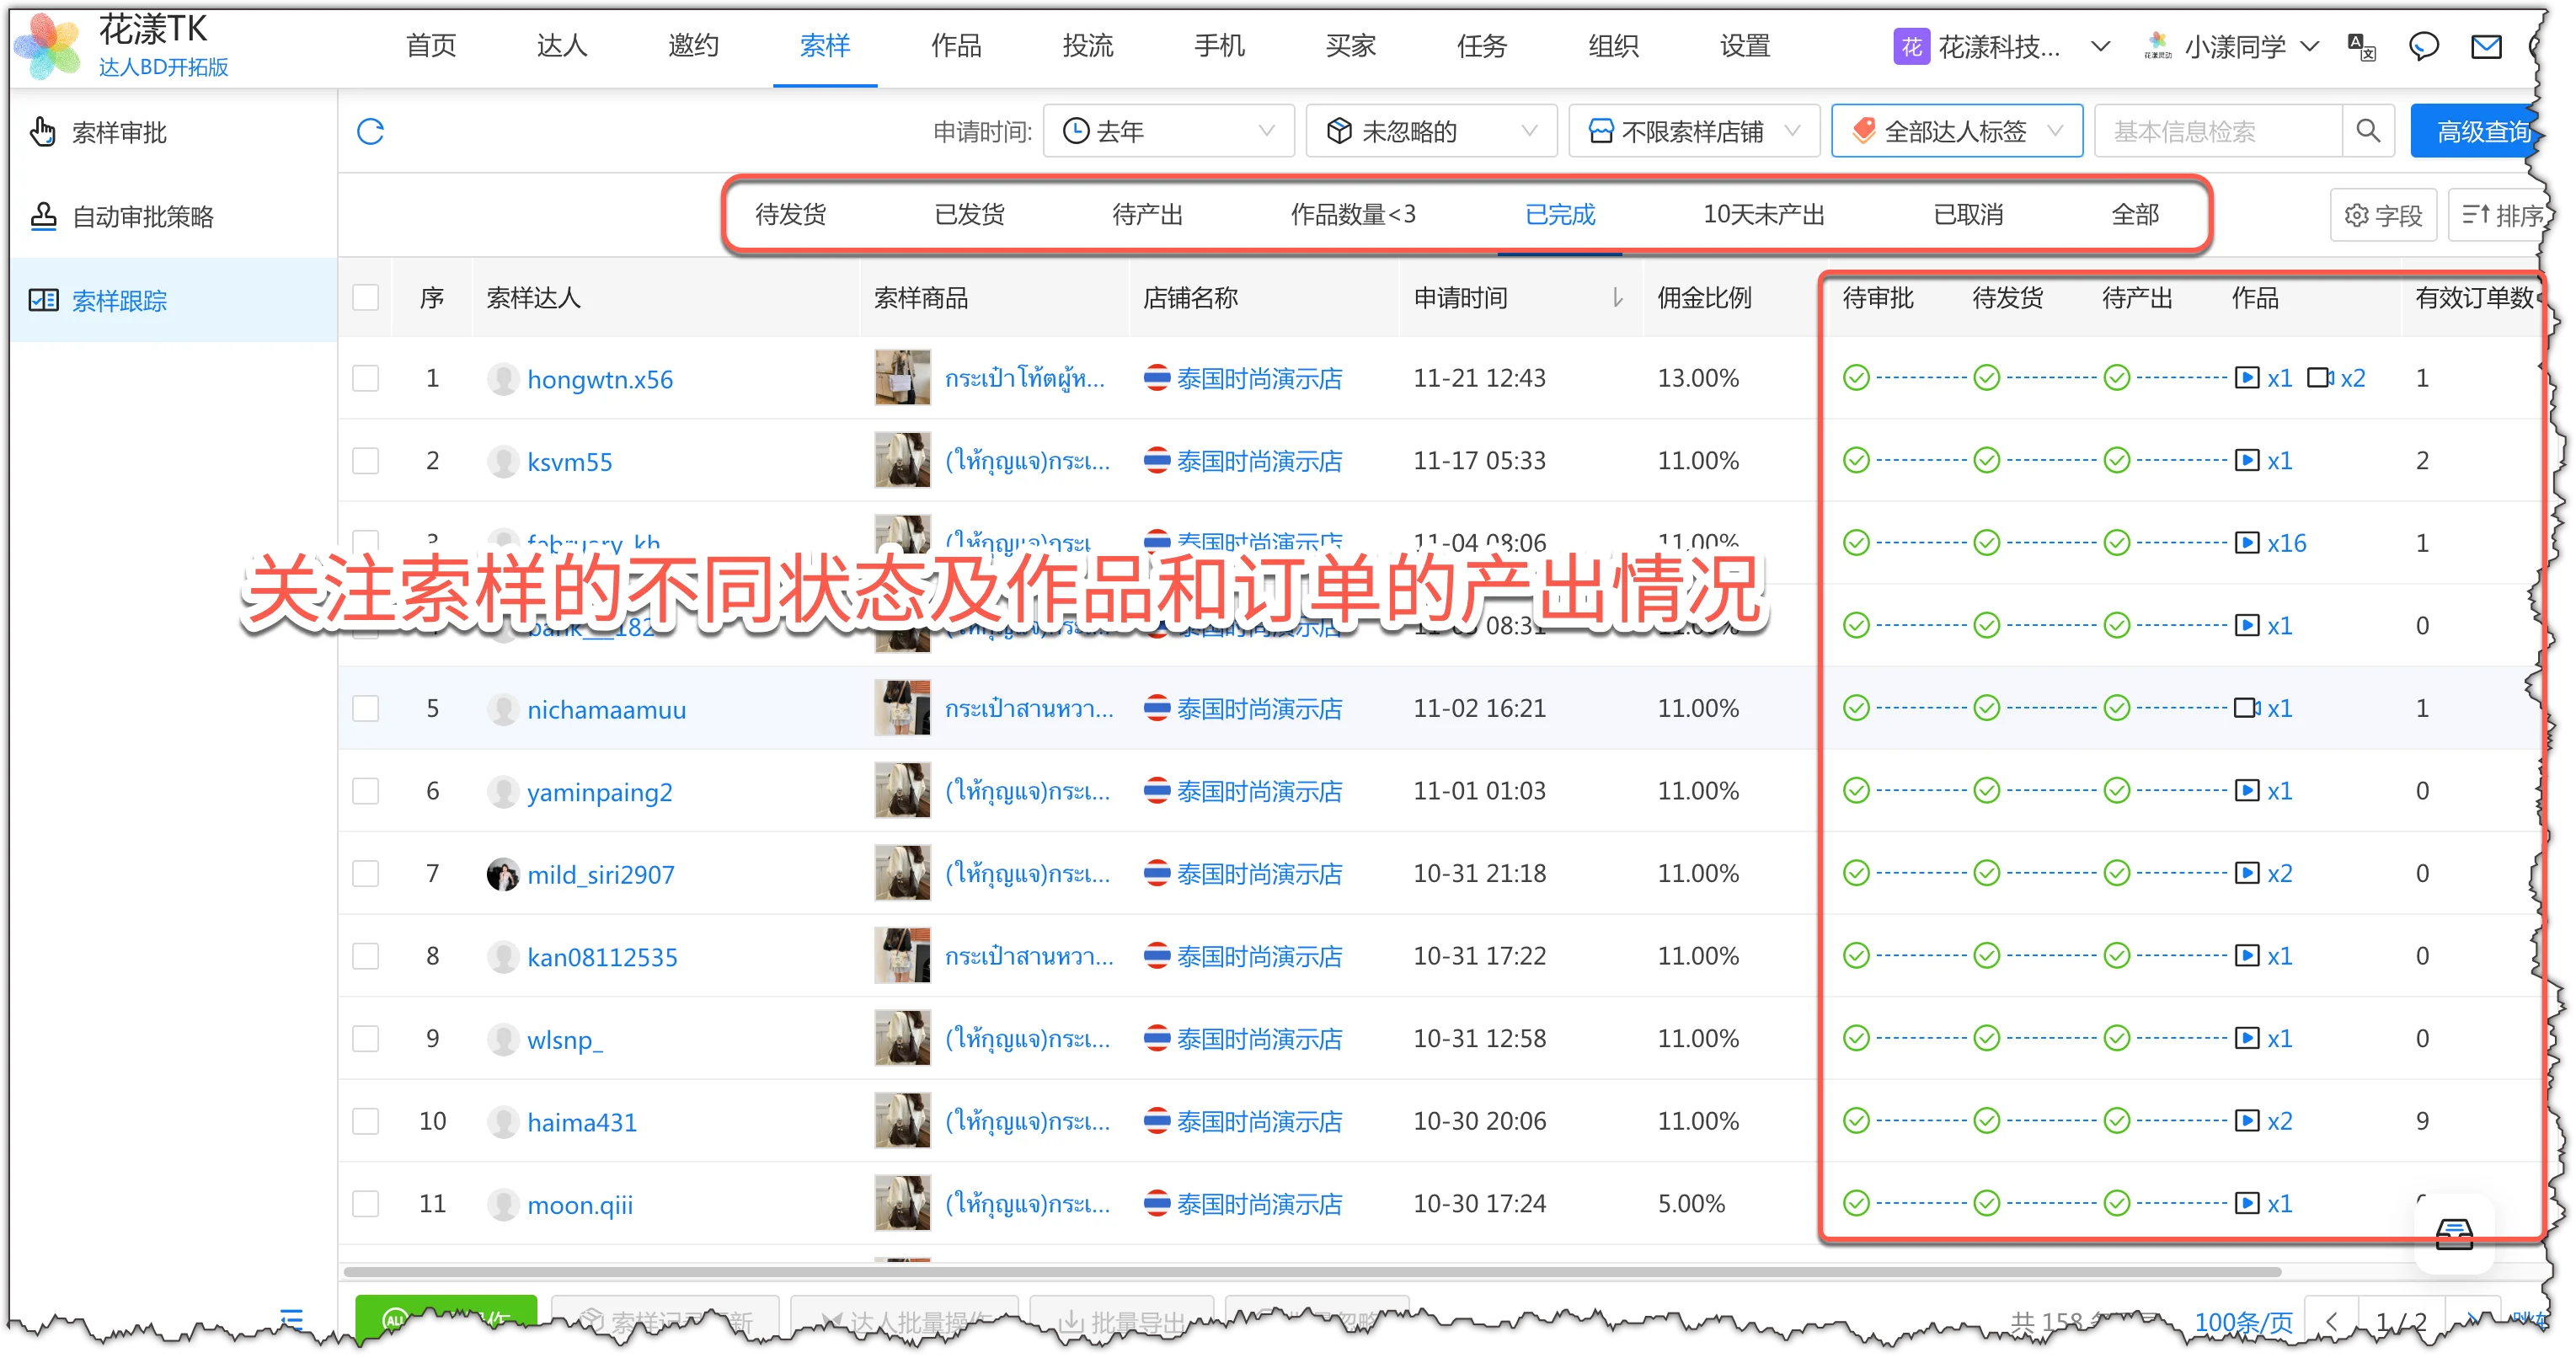
Use the status tabs on the page to quickly lock onto sample records at different stages, and watch their status at each stage.
Watch the different sample statuses and content/order production
Suggested focus for each stage:
Status
Watch level
Description
Pending shipment
✅ Top priority
Sample approved but not yet shipped. Arrange the shipment and log the tracking number promptly so the creator isn’t kept waiting.
Shipped
✅ Watch
The sample has been shipped. Track the logistics to make sure delivery is on track.
Pending content
✅ Top priority
Sample received by the creator, but no affiliate video or live has been produced yet. This is the key stage of fulfillment — push the creator to produce.
Contents <3
✅ Watch
Creator has produced some content but fewer than 3 pieces. There is still room to grow — push for more content.
Completed
⚠️ Routine
This sample request is fully closed out. Periodically review the content performance and order data.
No content in 10 days
🔴 Critical
More than 10 days after delivery with no content produced. This is a fulfillment exception — follow up and find out why.
Cancelled
⚠️ Routine
The sample request was rejected or cancelled. Check occasionally for any misoperation.
Tips:
Use the “Fields” button in the top-right corner to surface more columns relevant to your focus.
Step 3: Bulk operations
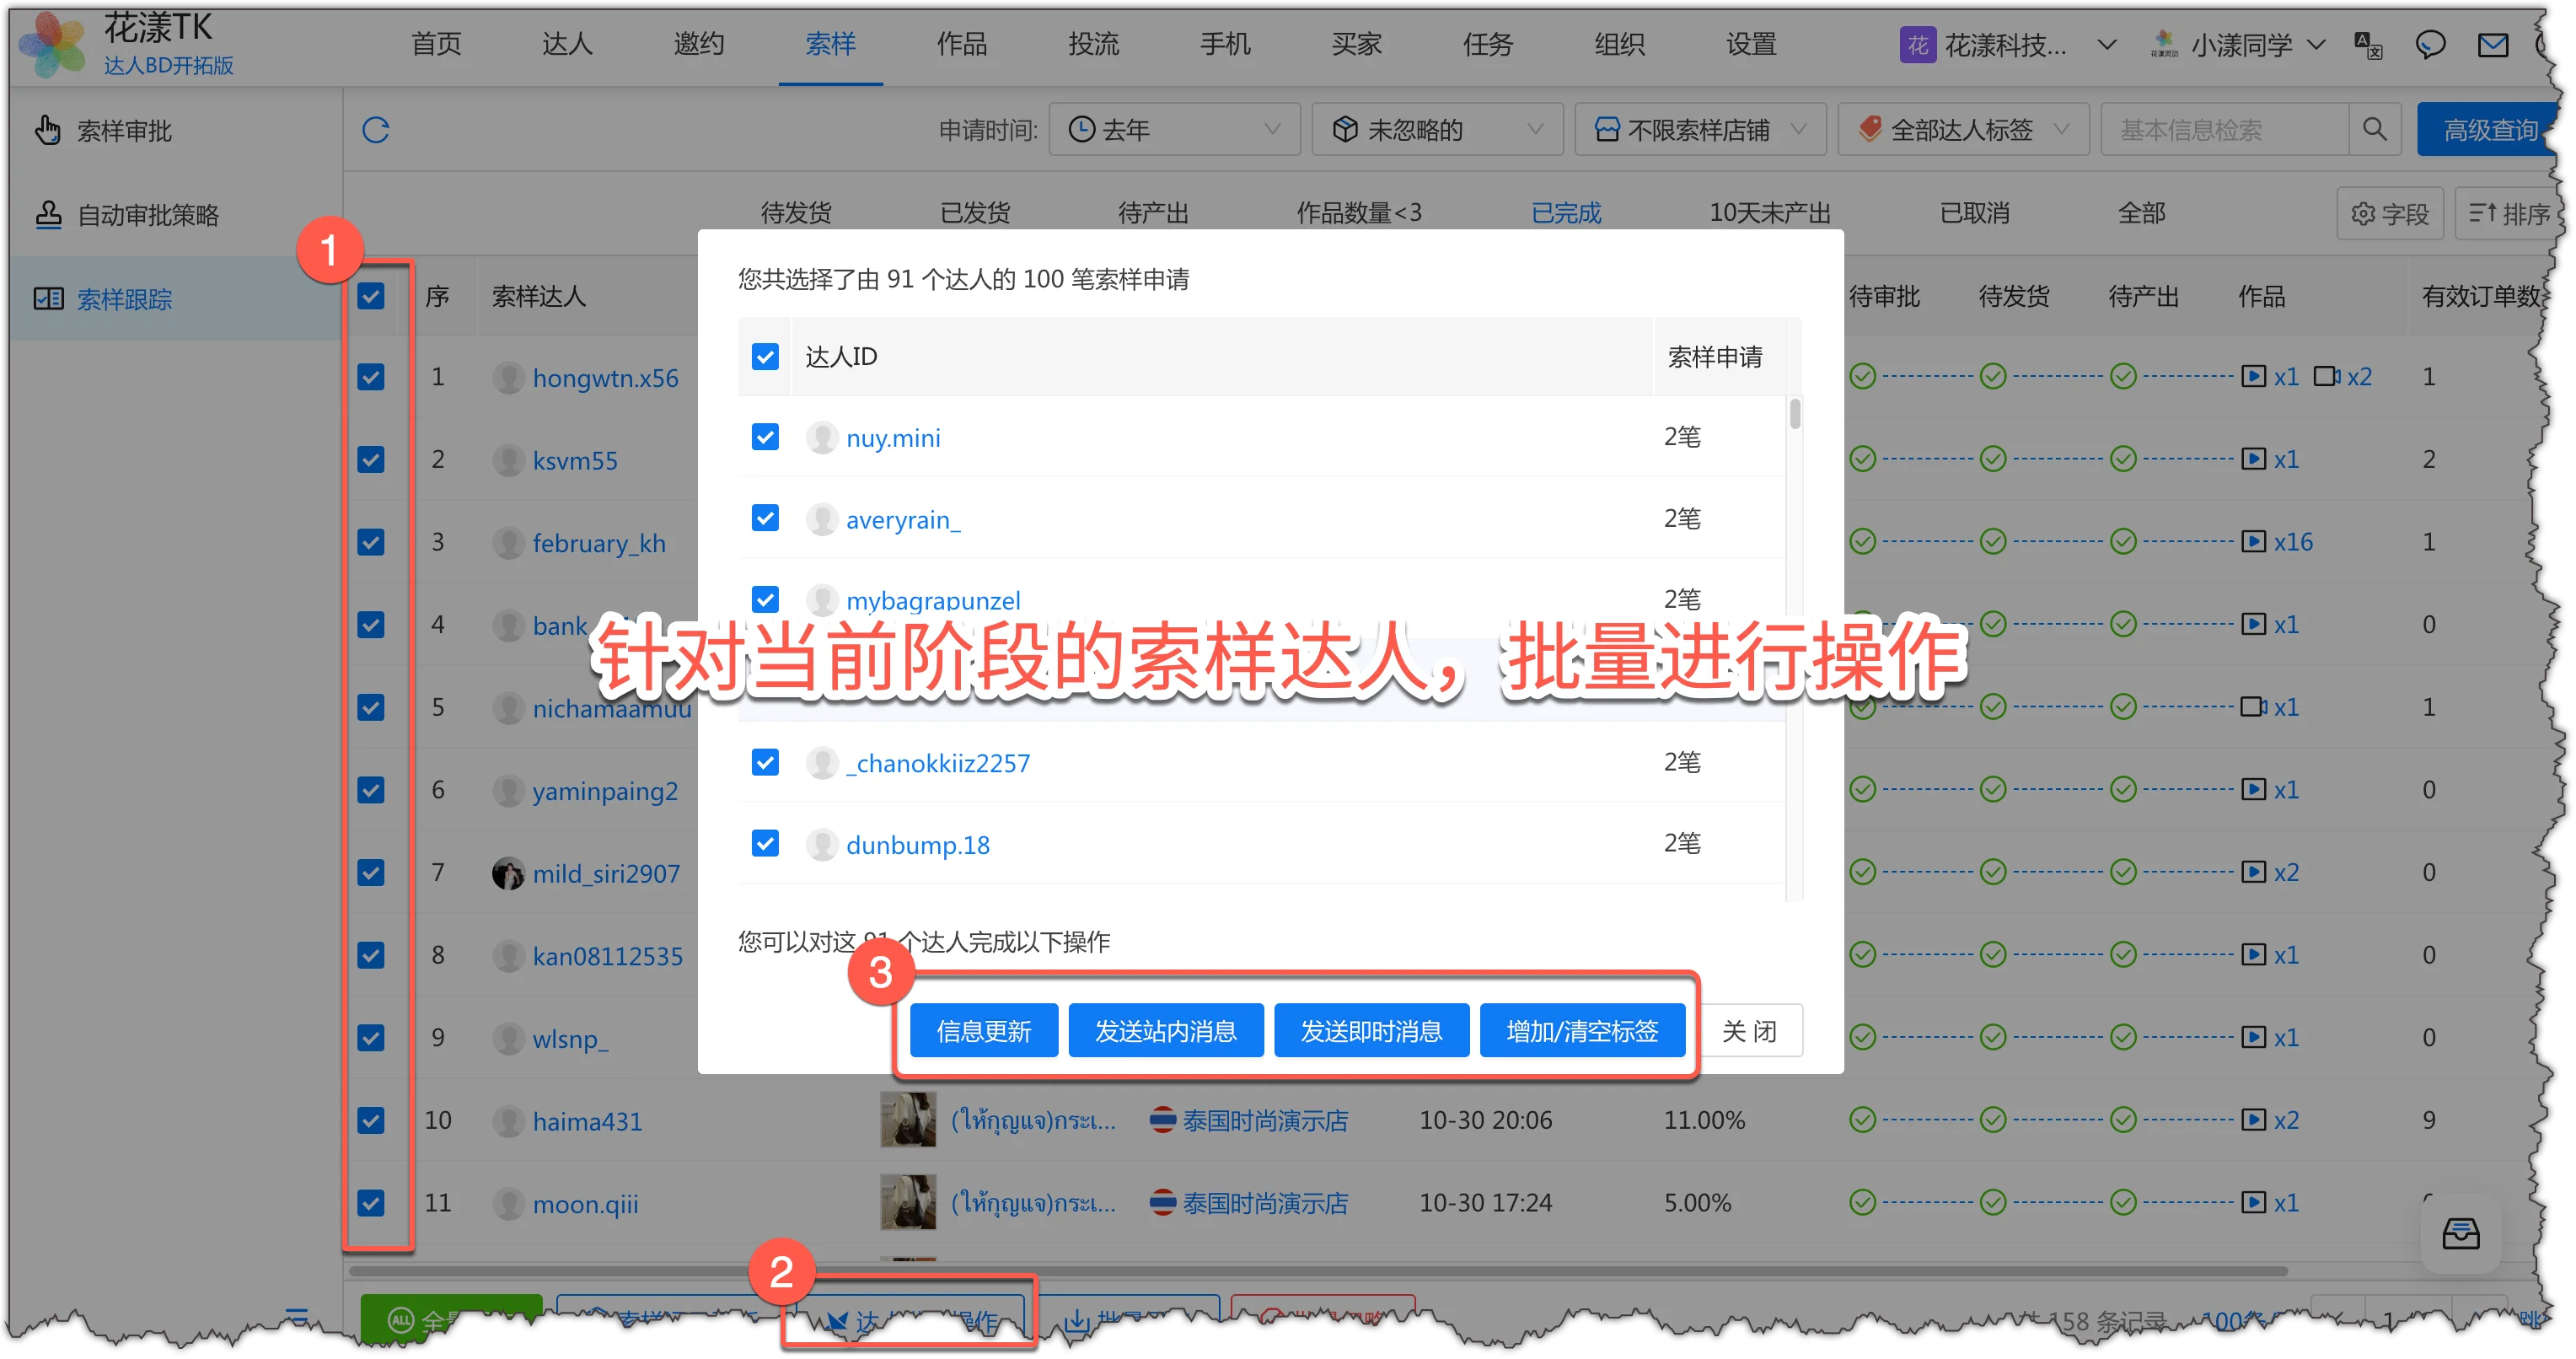
Run bulk operations such as inbox or IM messages on creators at a given stage.
For example, for creators with no content in 10 days, bulk-select them, click “Bulk Creator Operations”, and send them an inbox or IM message.
Run bulk operations on creators at the current stage
Monitor views, likes, and conversions of creator affiliate videos and lives, and track content authorization status.
4.1
Creator Affiliate Videos
When you run the “Shop Data Sync” flow, the system pulls the affiliate videos creators produced for you into HuaYoung TK, where you can see view data, authorization status, affiliate performance, and more.
Your day-to-day work on “Creator Affiliate Videos” should focus on the following dimensions:
Dimension
Focus
Description
Authorization status
Authorized / Pending / Unknown
Authorization status decides whether the video can be used for ad campaigns. Authorized videos can be promoted directly; pending videos require a boost code from the creator.
Authorization type
Bulk affiliate authorization / Unknown
Different types grant different usage rights. Bulk affiliate authorization usually means the video is already authorized at the platform level.
Views
Video view data
A basic signal of content quality — more views usually mean more popular content.
Valid orders
Orders produced by this video
A core indicator of the video’s affiliate-conversion ability.
Orders per 1,000 views
Orders per 1,000 views
A more precise conversion metric — the higher, the more worth boosting.
Publish time
Video publish date
Combine with views to gauge growth. New videos with rapidly growing views may have viral potential.
Step 1: Filter and query
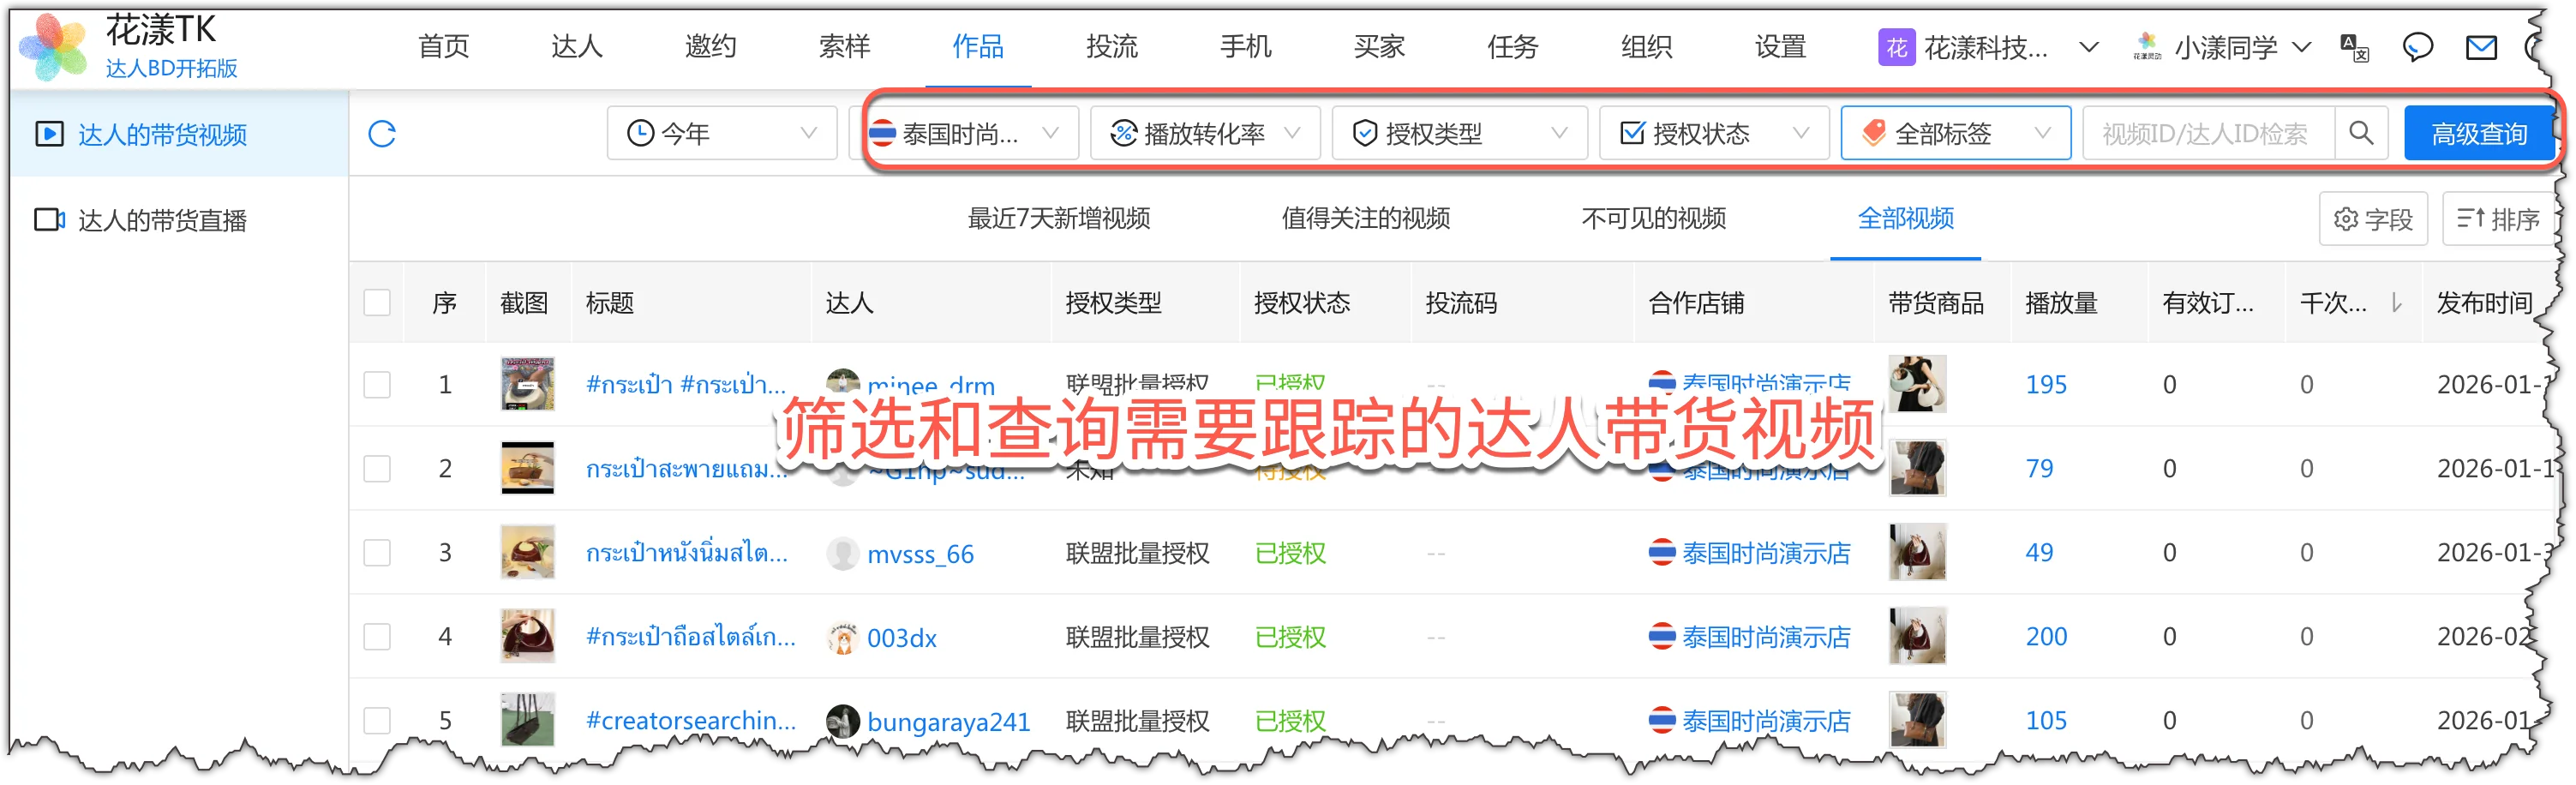
Use the filters at the top of the page to quickly find and filter creator affiliate videos.
Filter and query the creator affiliate videos to track
Step 2: Update video data (views, likes, etc.)
Views and likes change dynamically, so you need to refresh them regularly to be ready for follow-up operations.
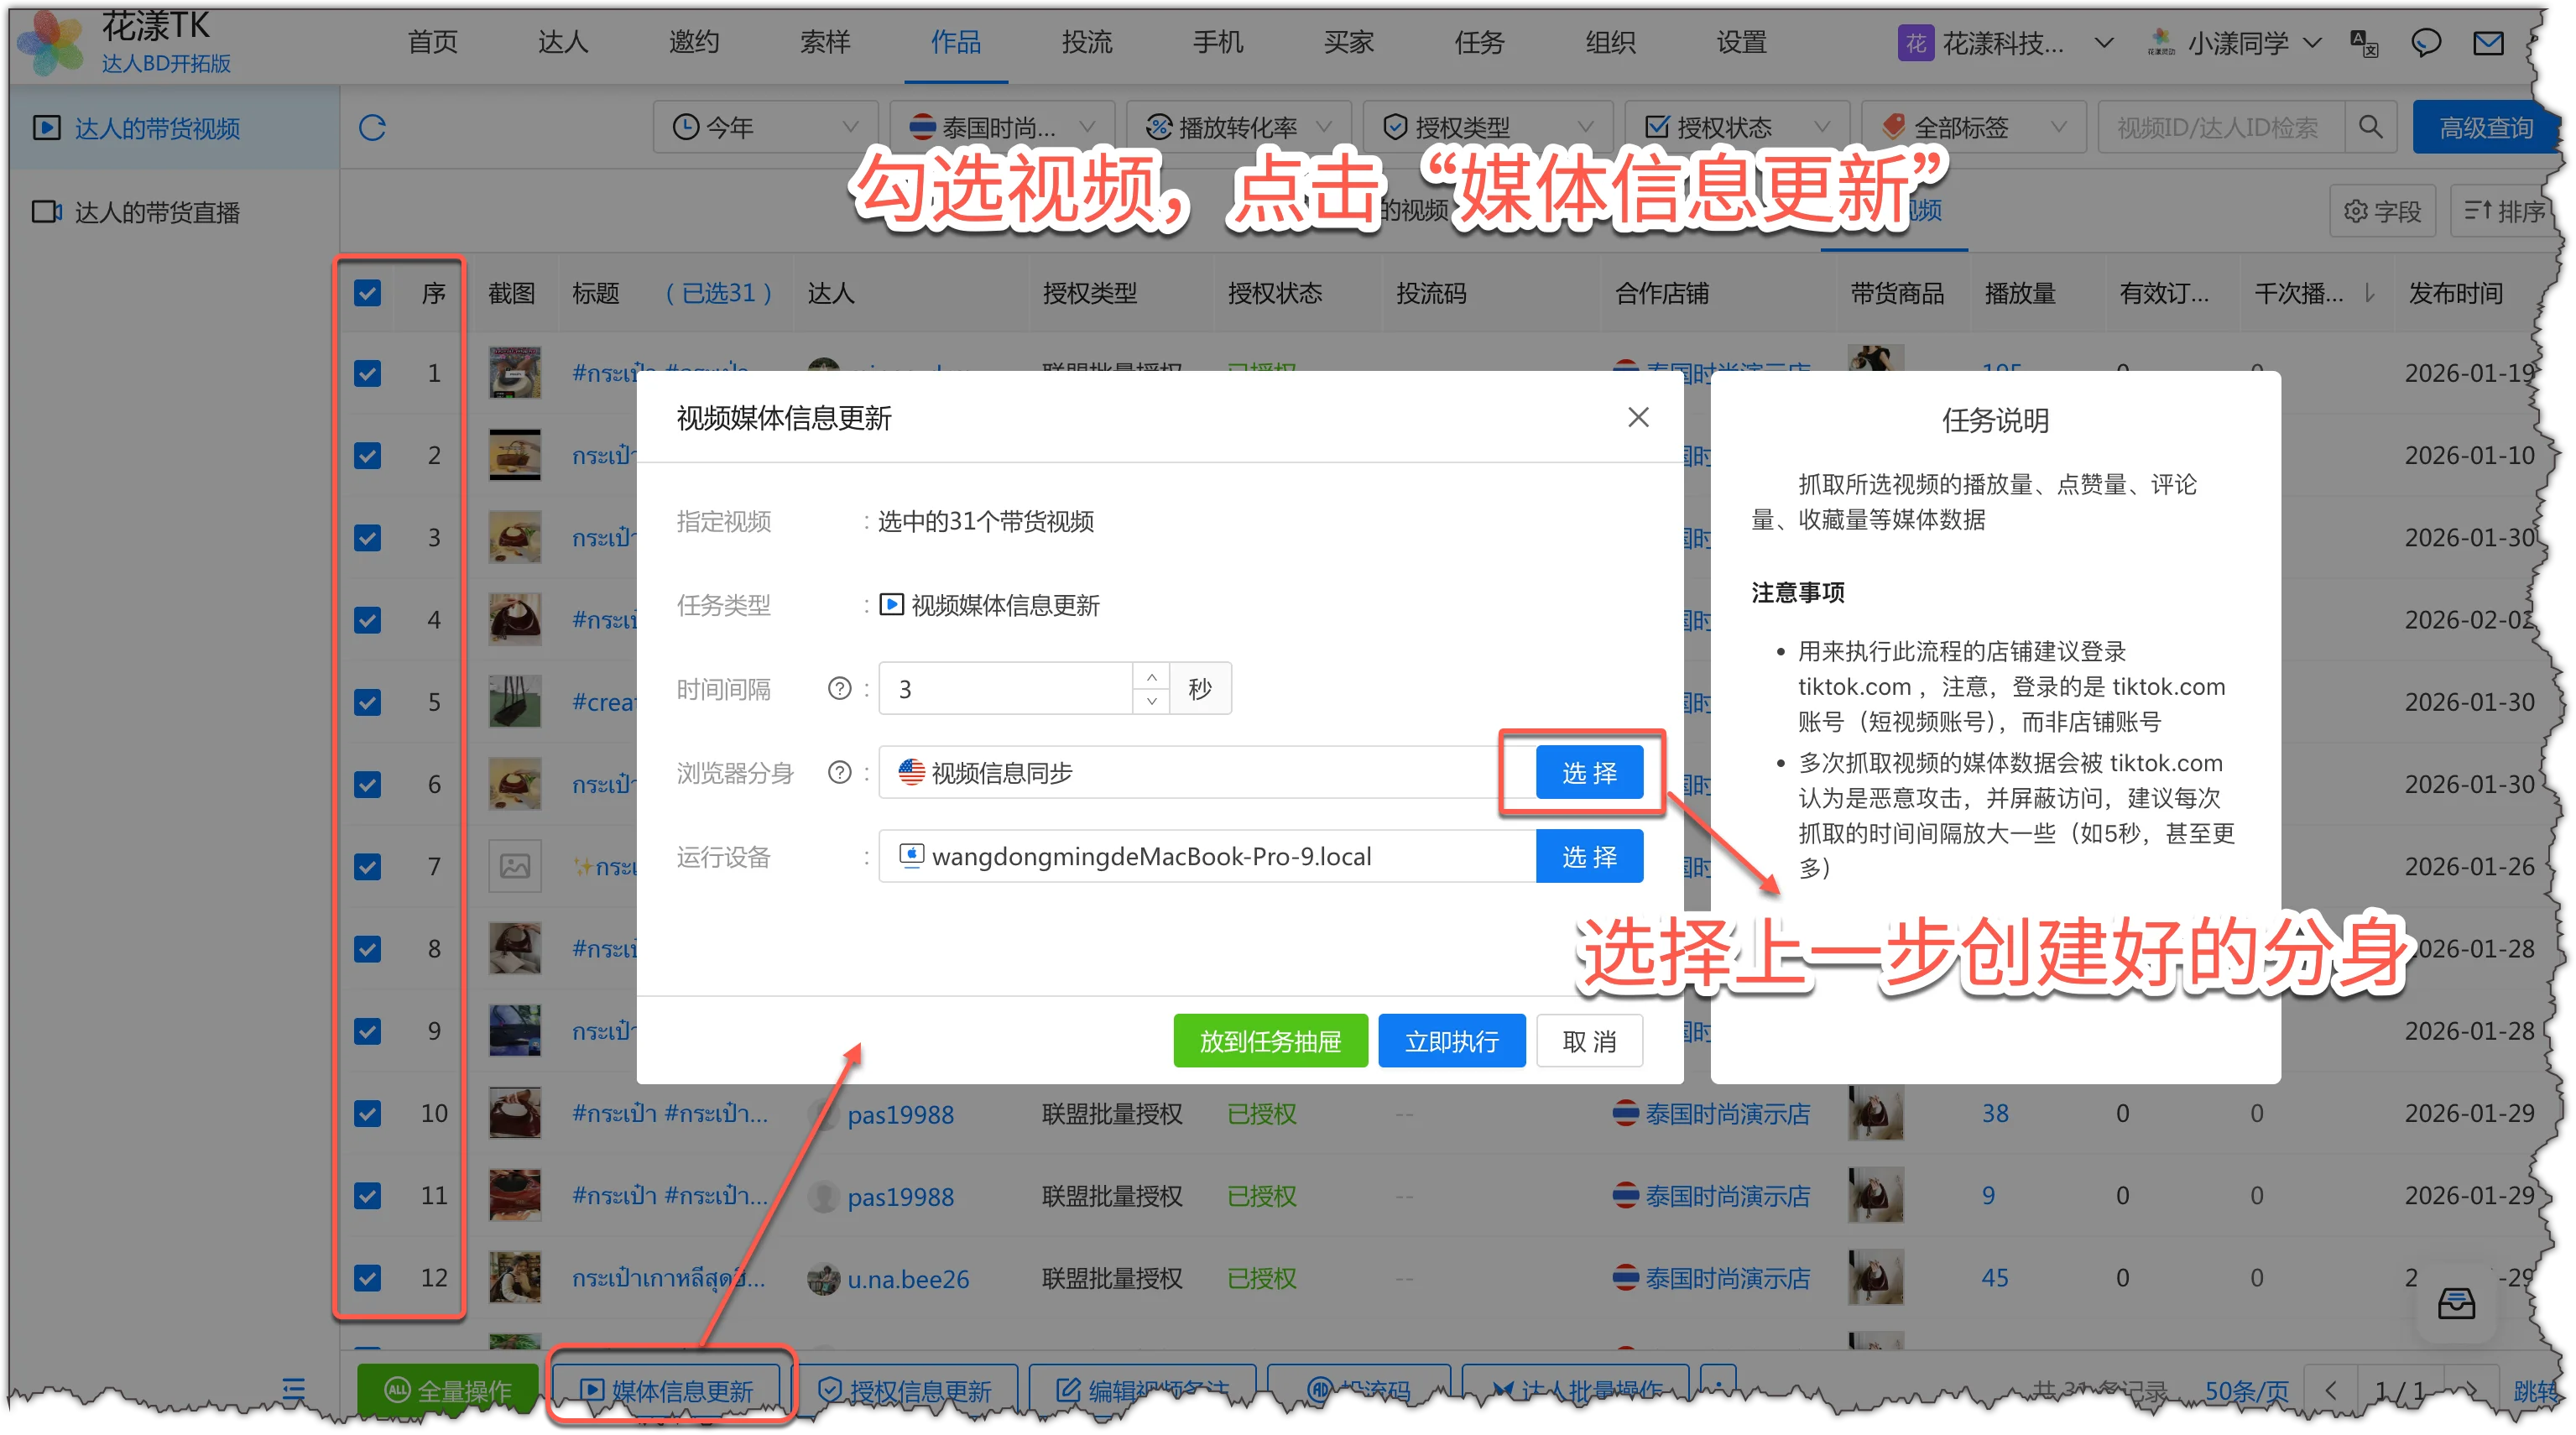
Likes and views are not visible in the TikTok backend and must be queried on www.tiktok.com — which Ziniao, Zhanfu, and similar browsers cannot normally access. So a video data update needs a pre-prepared browser profile dedicated to it; see the reference doc: Update video media information
Bulk-select the videos to update, and click “Media Update” at the bottom.
Select videos and click “Media Update”
Notes:
The browser profile required by the media update flow is the one you prepared earlier.
Step 3: Analyze videos and data
The video list shows each video’s creator, orders, orders per 1,000 views, and the promoted products. Use the “Fields” button in the top-right corner to surface more columns.
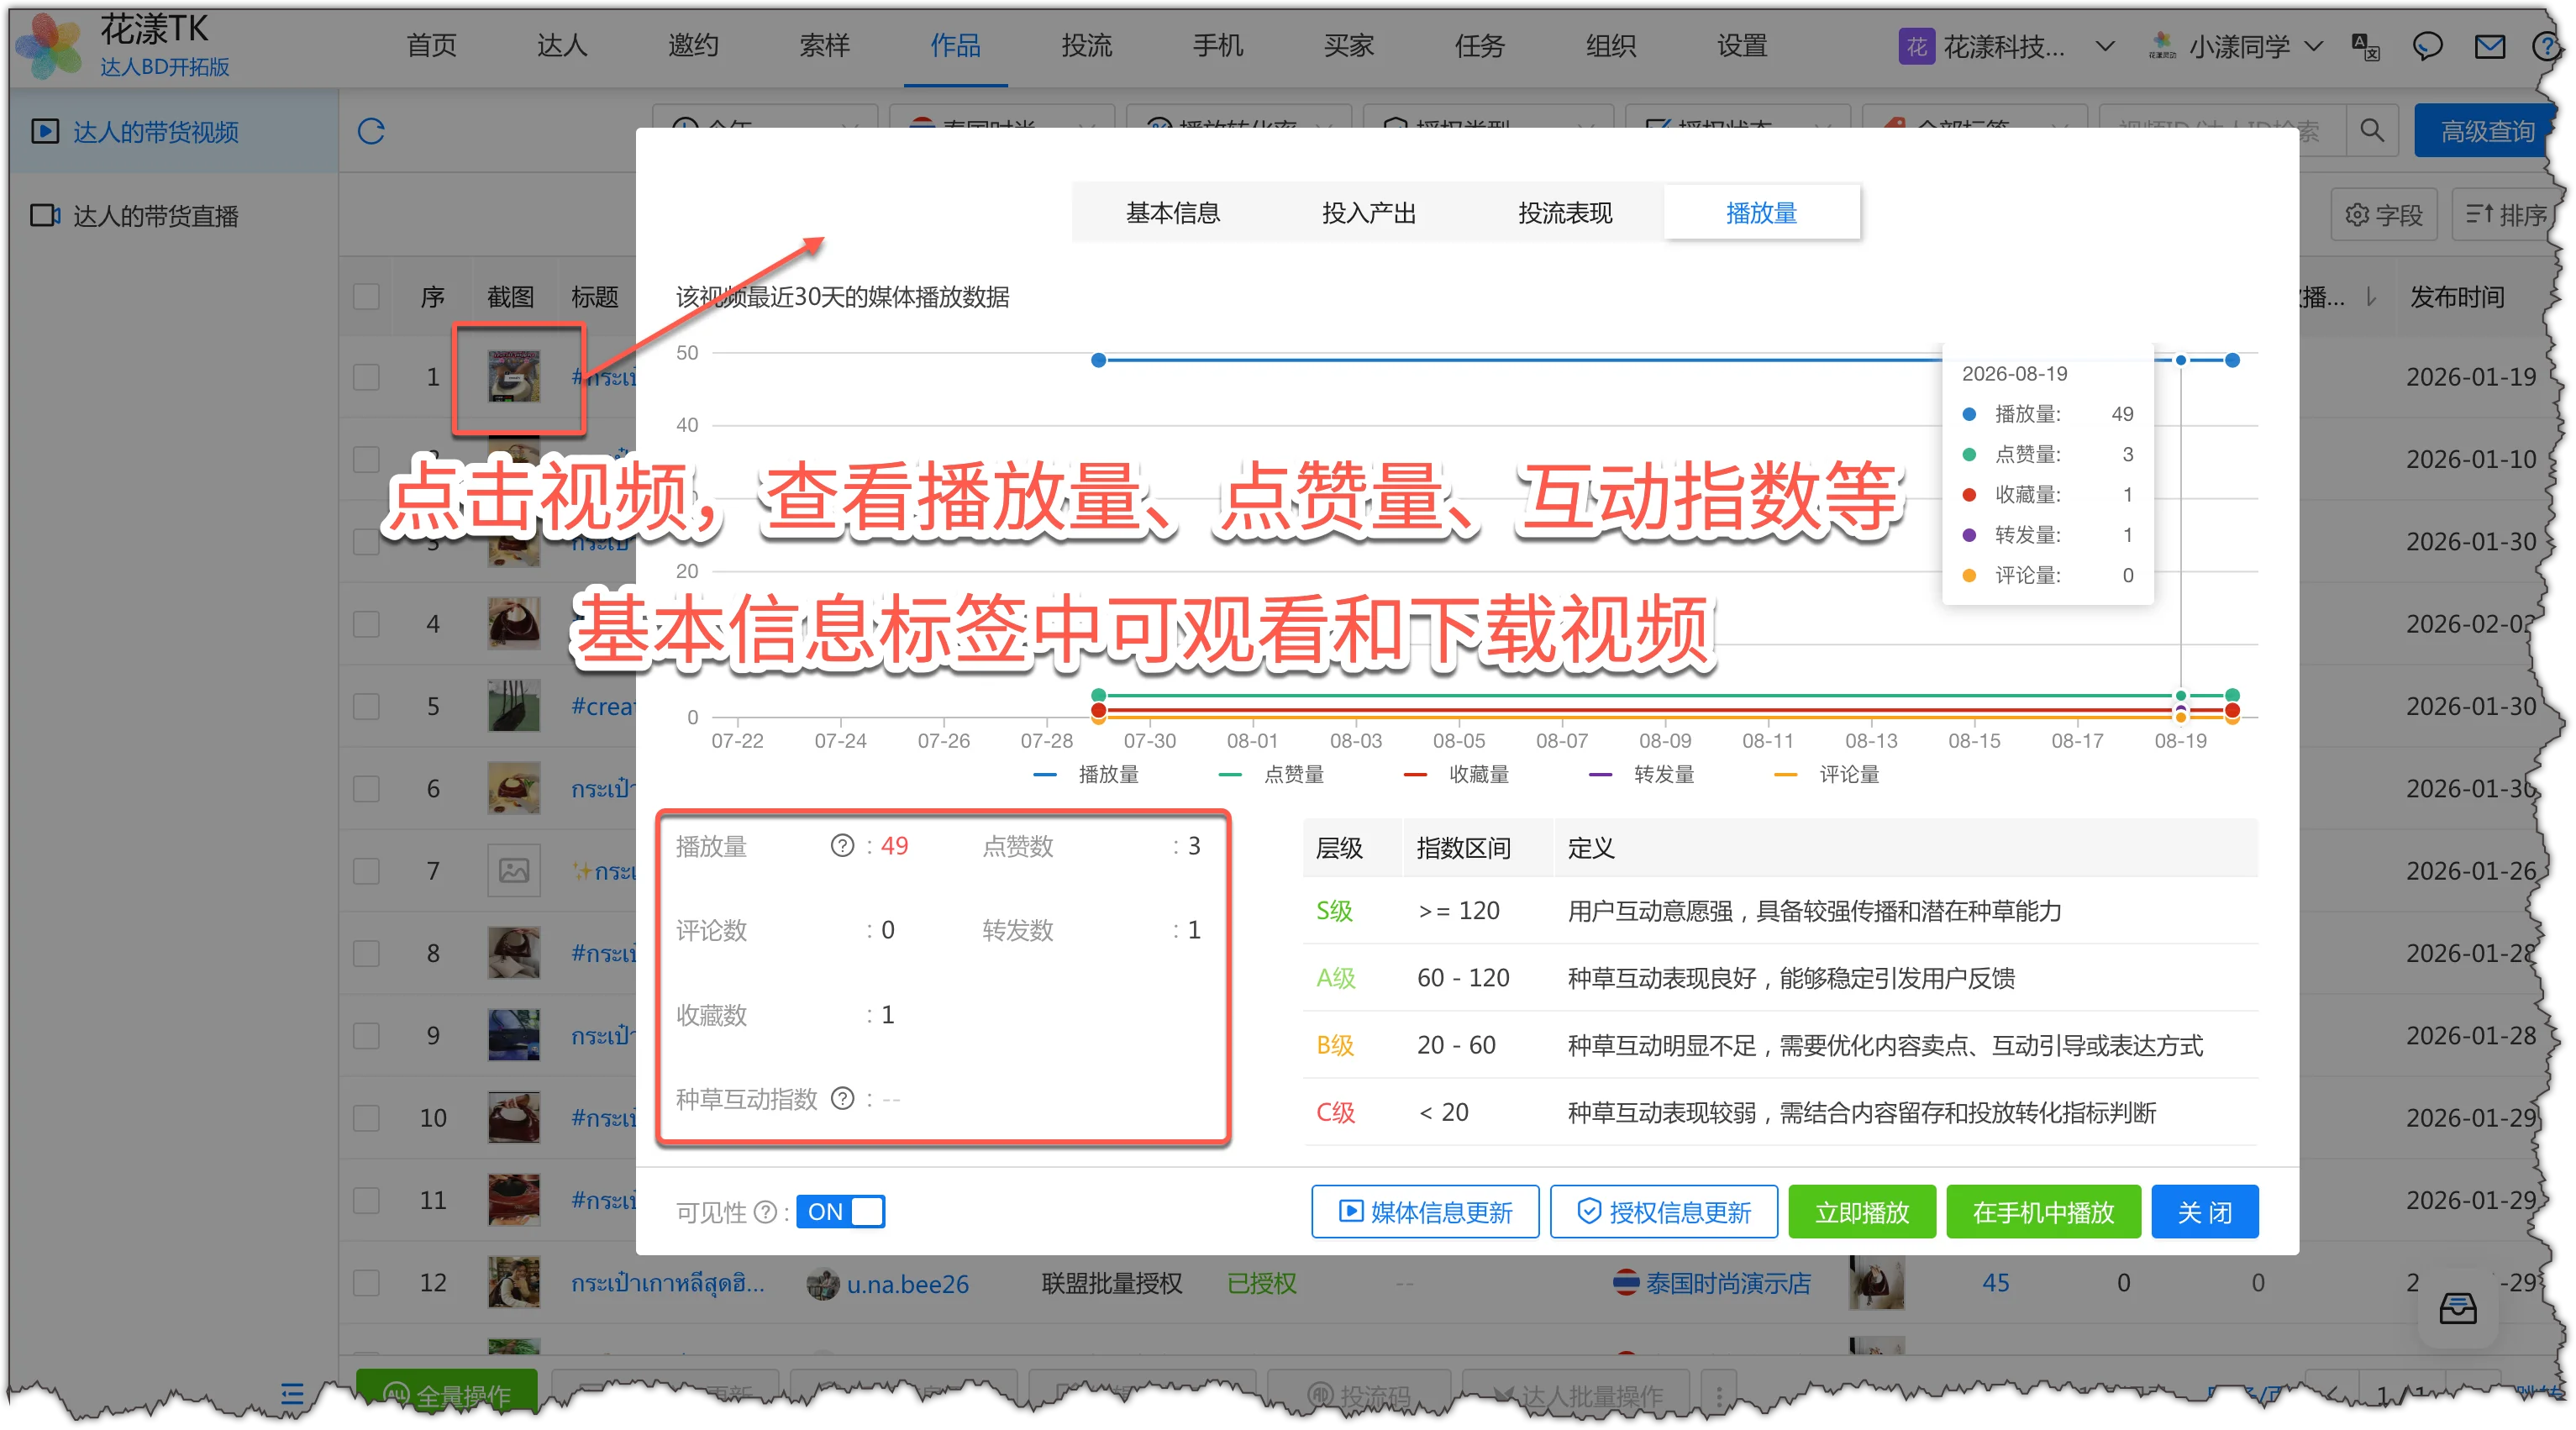
Click the thumbnail or title to see the full video details, including:
The heat-trend chart: view, like, and comment volume trends over the last 30 days
Playback and download: preview the video right in HuaYoung, or download it if needed
Likes, views, and engagement index of videos
Step 4: Check authorization
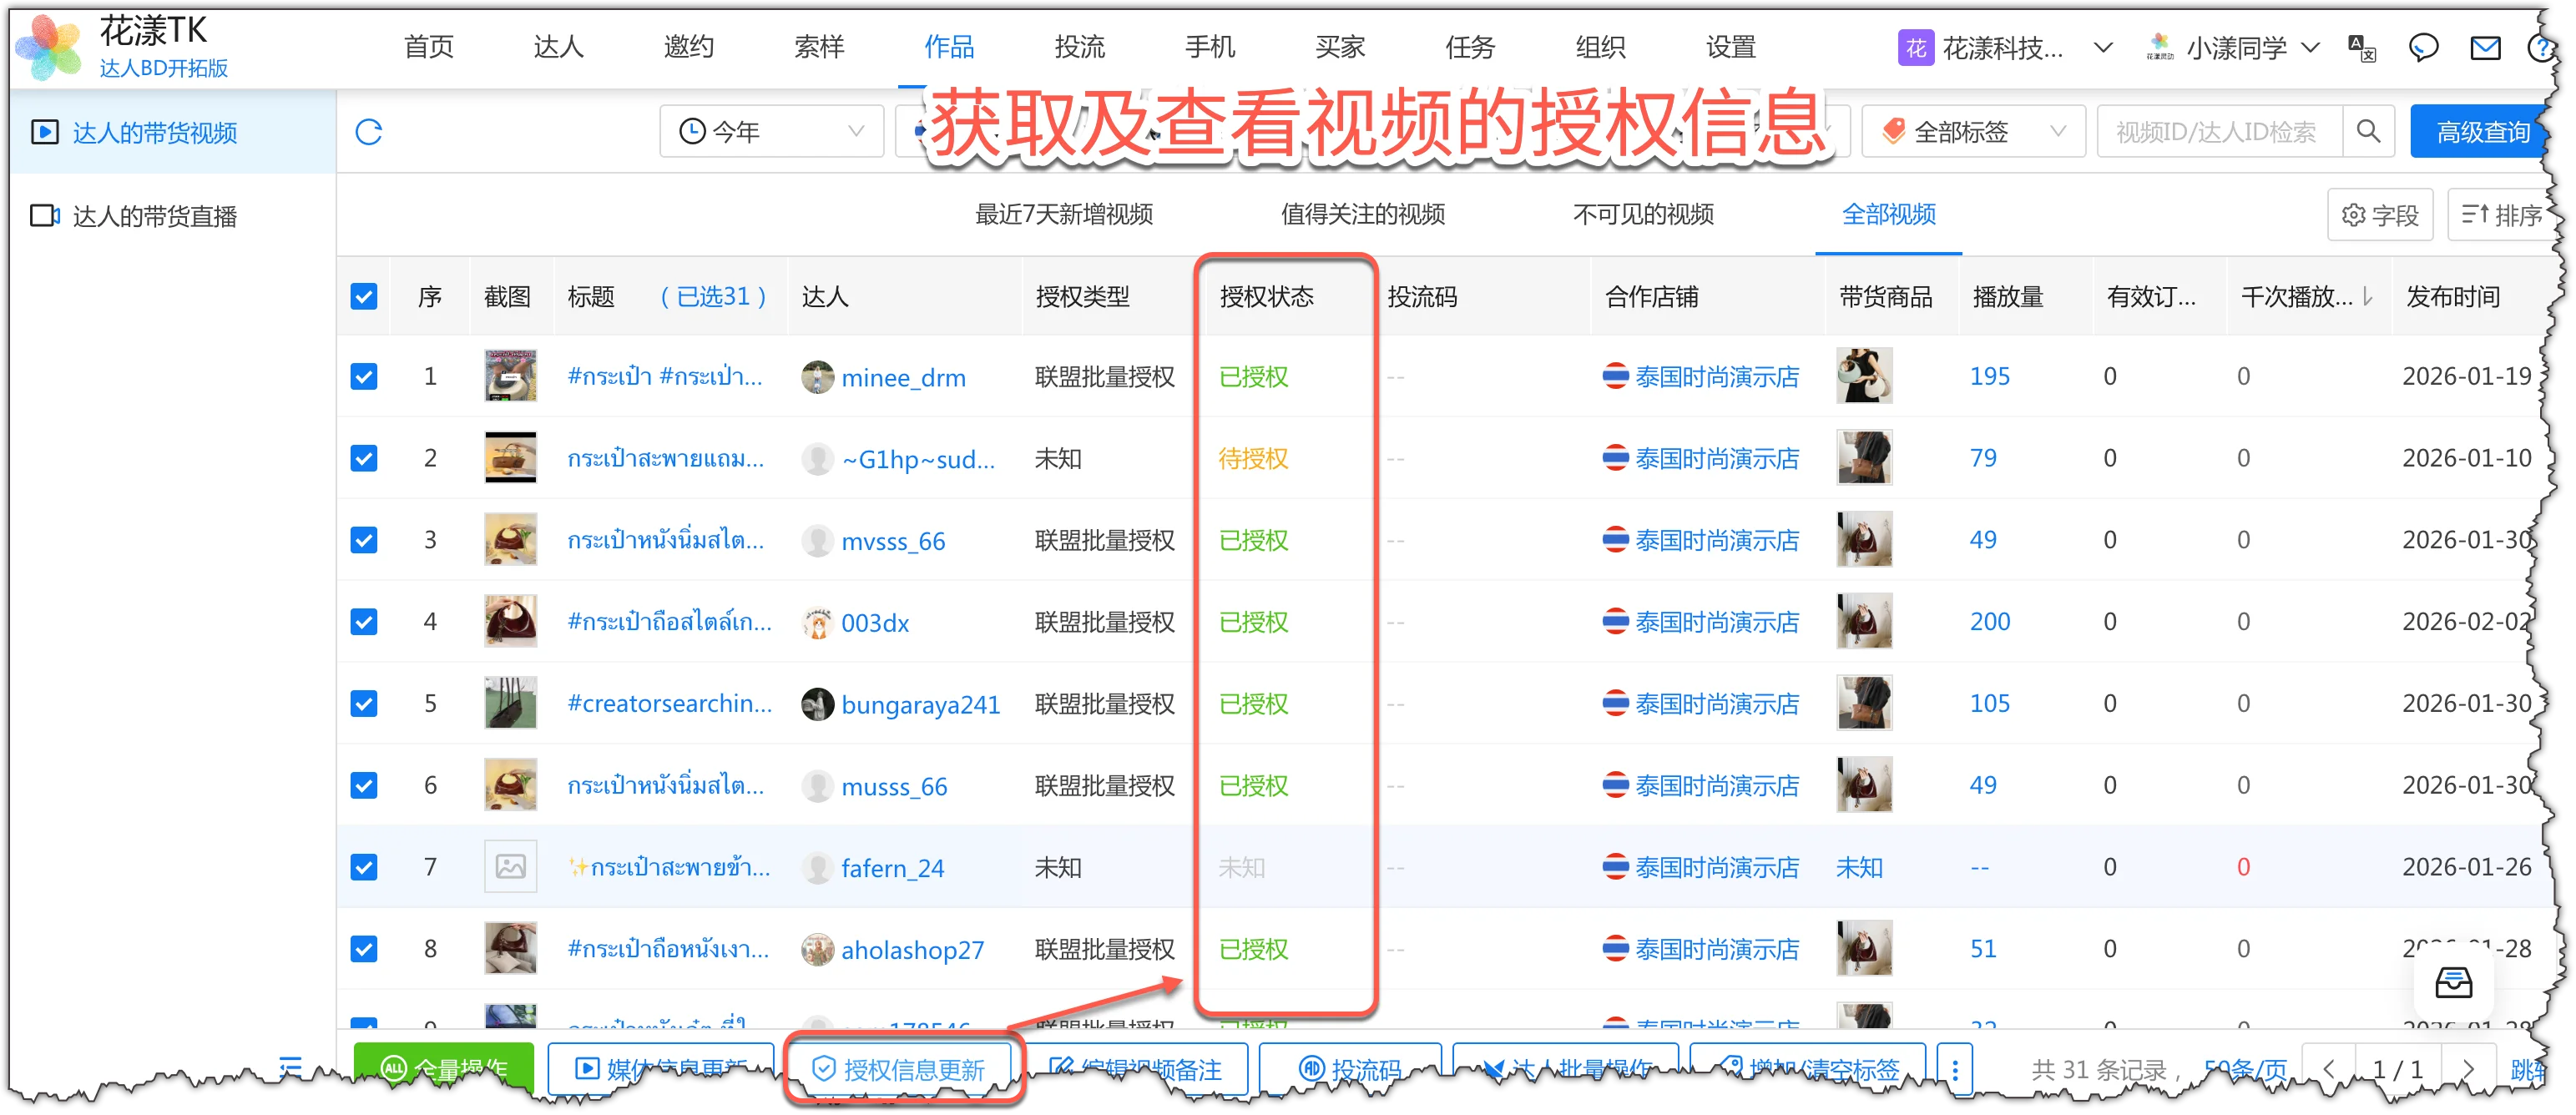
For videos you want to boost, pay attention to their authorization status:
If the status is “Pending” or “Unknown”, select those videos and click “Update Authorization” at the bottom to query the latest status.
For videos whose authorization type is “Boost Code” but status is “Unauthorized”, you must request a boost code from the creator — so that when a video is about to take off, you can launch your campaign immediately without losing the best timing chasing a code.
Workflow orchestration is a core feature of HuaYoung TK. It lets you turn repetitive work — shop data sync, targeted creator invitations, bulk inbox messages, video data updates, anomaly alerts, and more — into scheduled or trigger-based plans, so the automated flow runs on a schedule and you do less manual work, achieving end-to-end automation of shop operations.
5.1
Step 1: Create a New Workflow
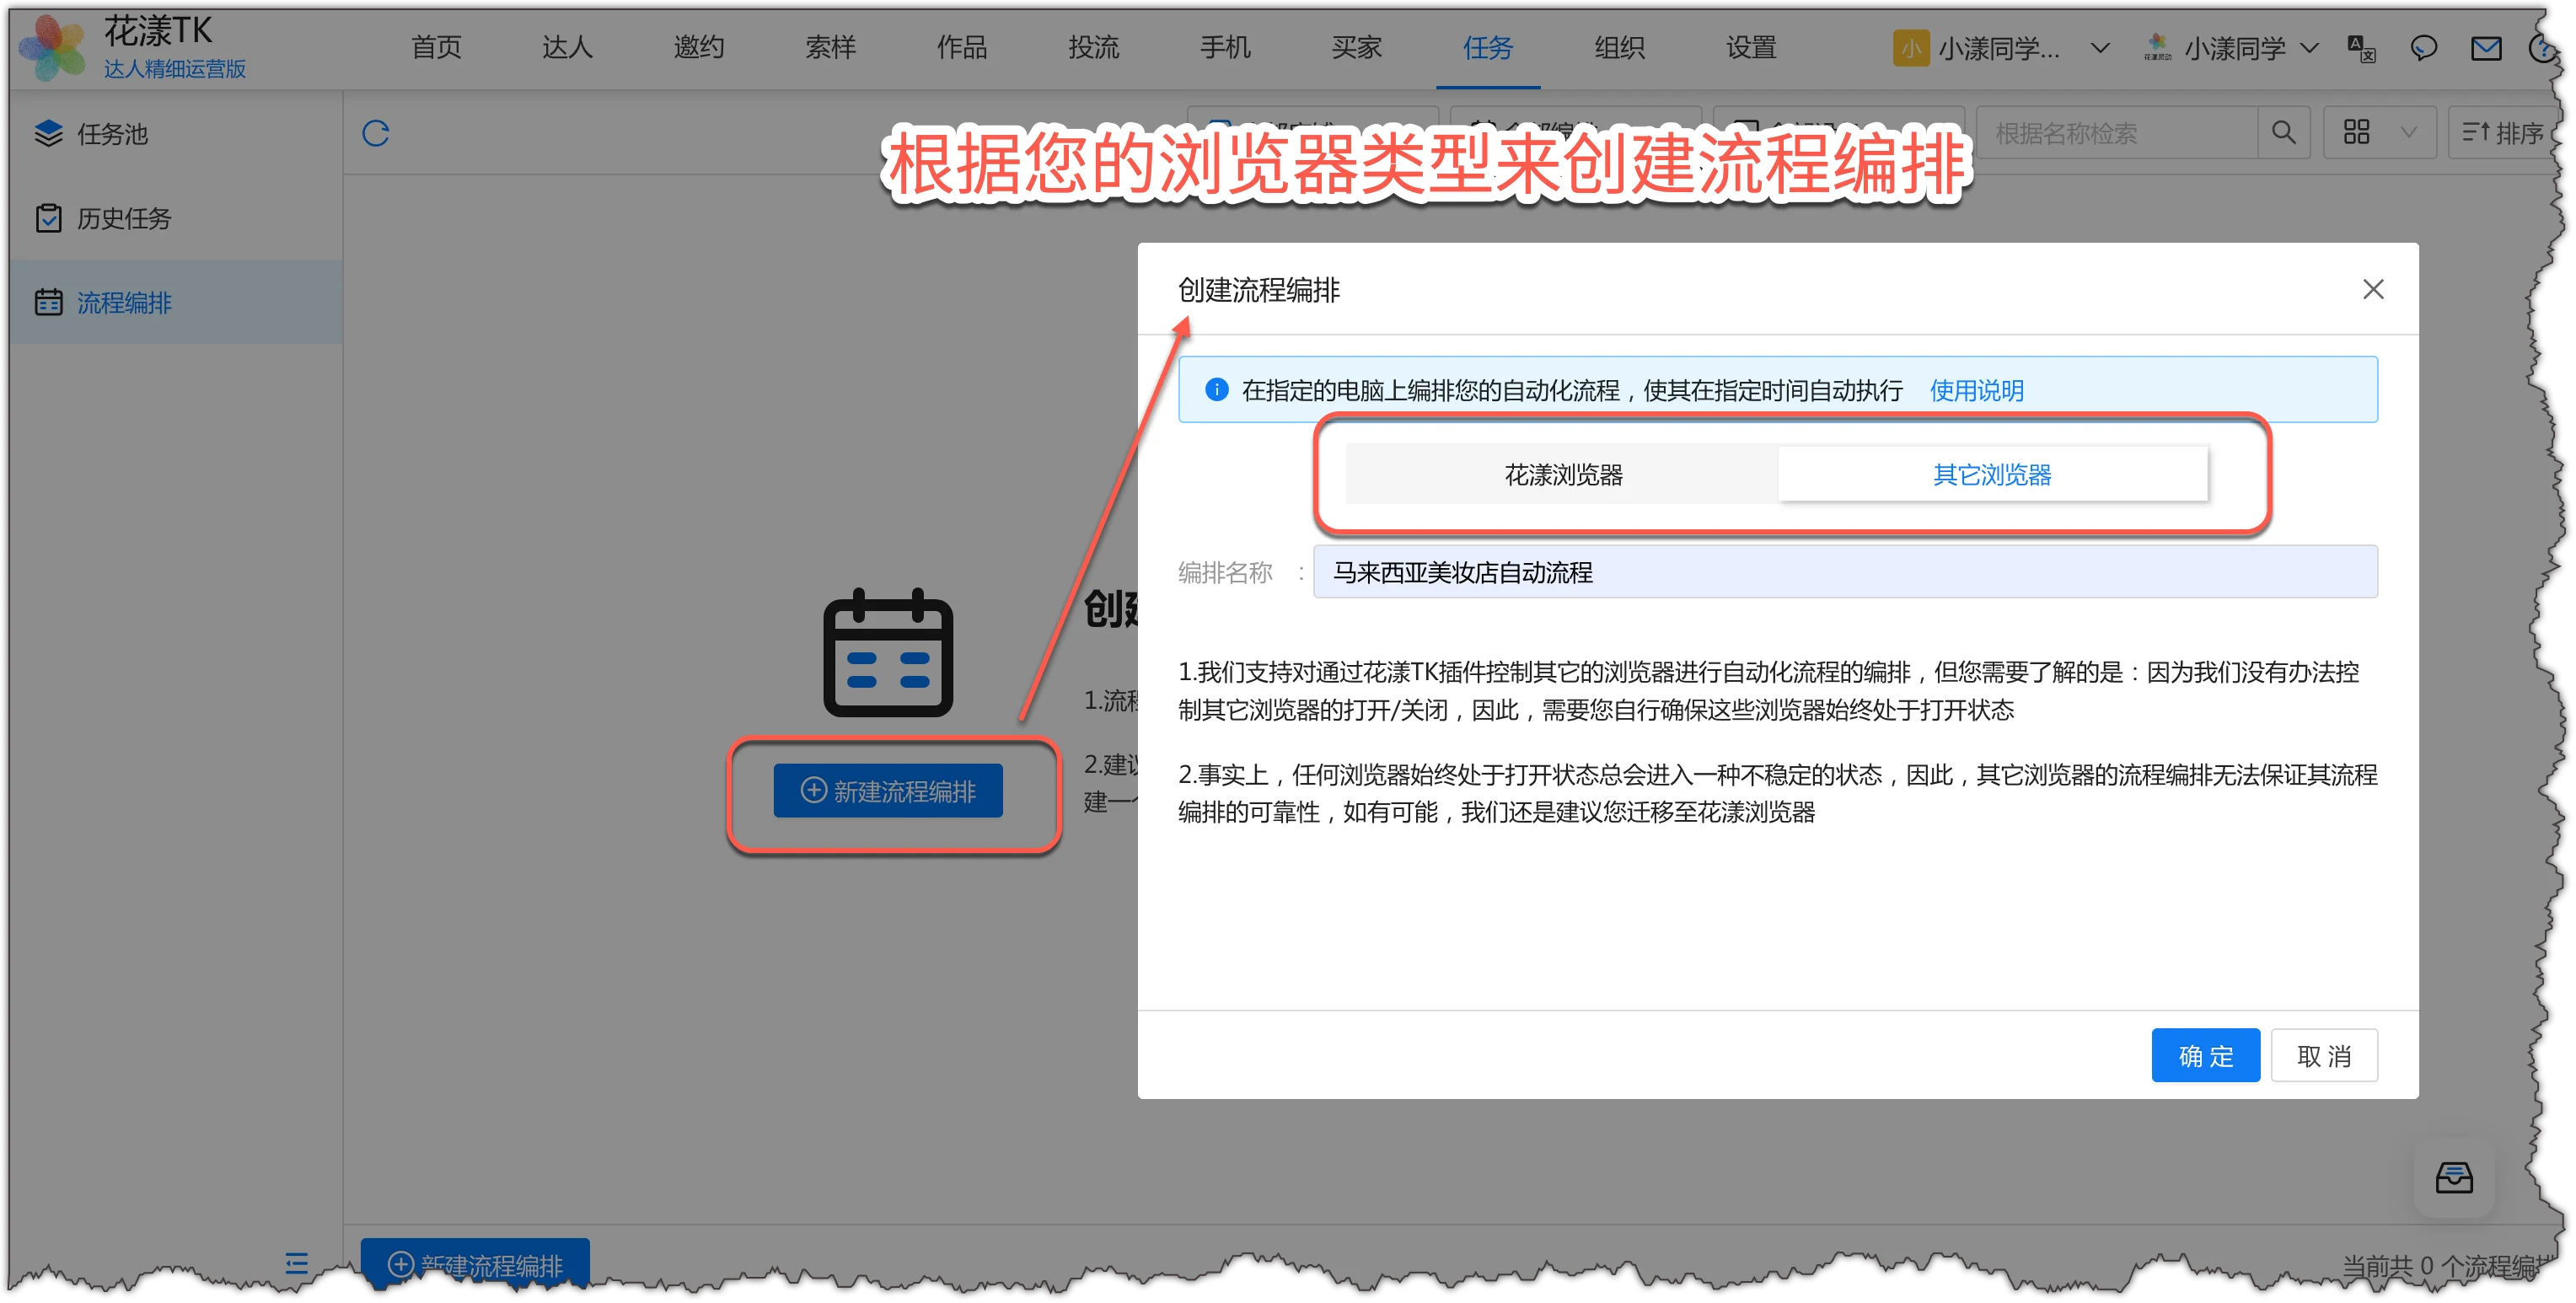
Create a new workflow: Go to “Tasks – Workflows” and click “New Workflow”. If you access the shop through Ziniao, Zhanfu, or another browser that already has the HuaYoung TK extension installed, choose “Other Browser”, and name this workflow.Create a workflow based on your browser type
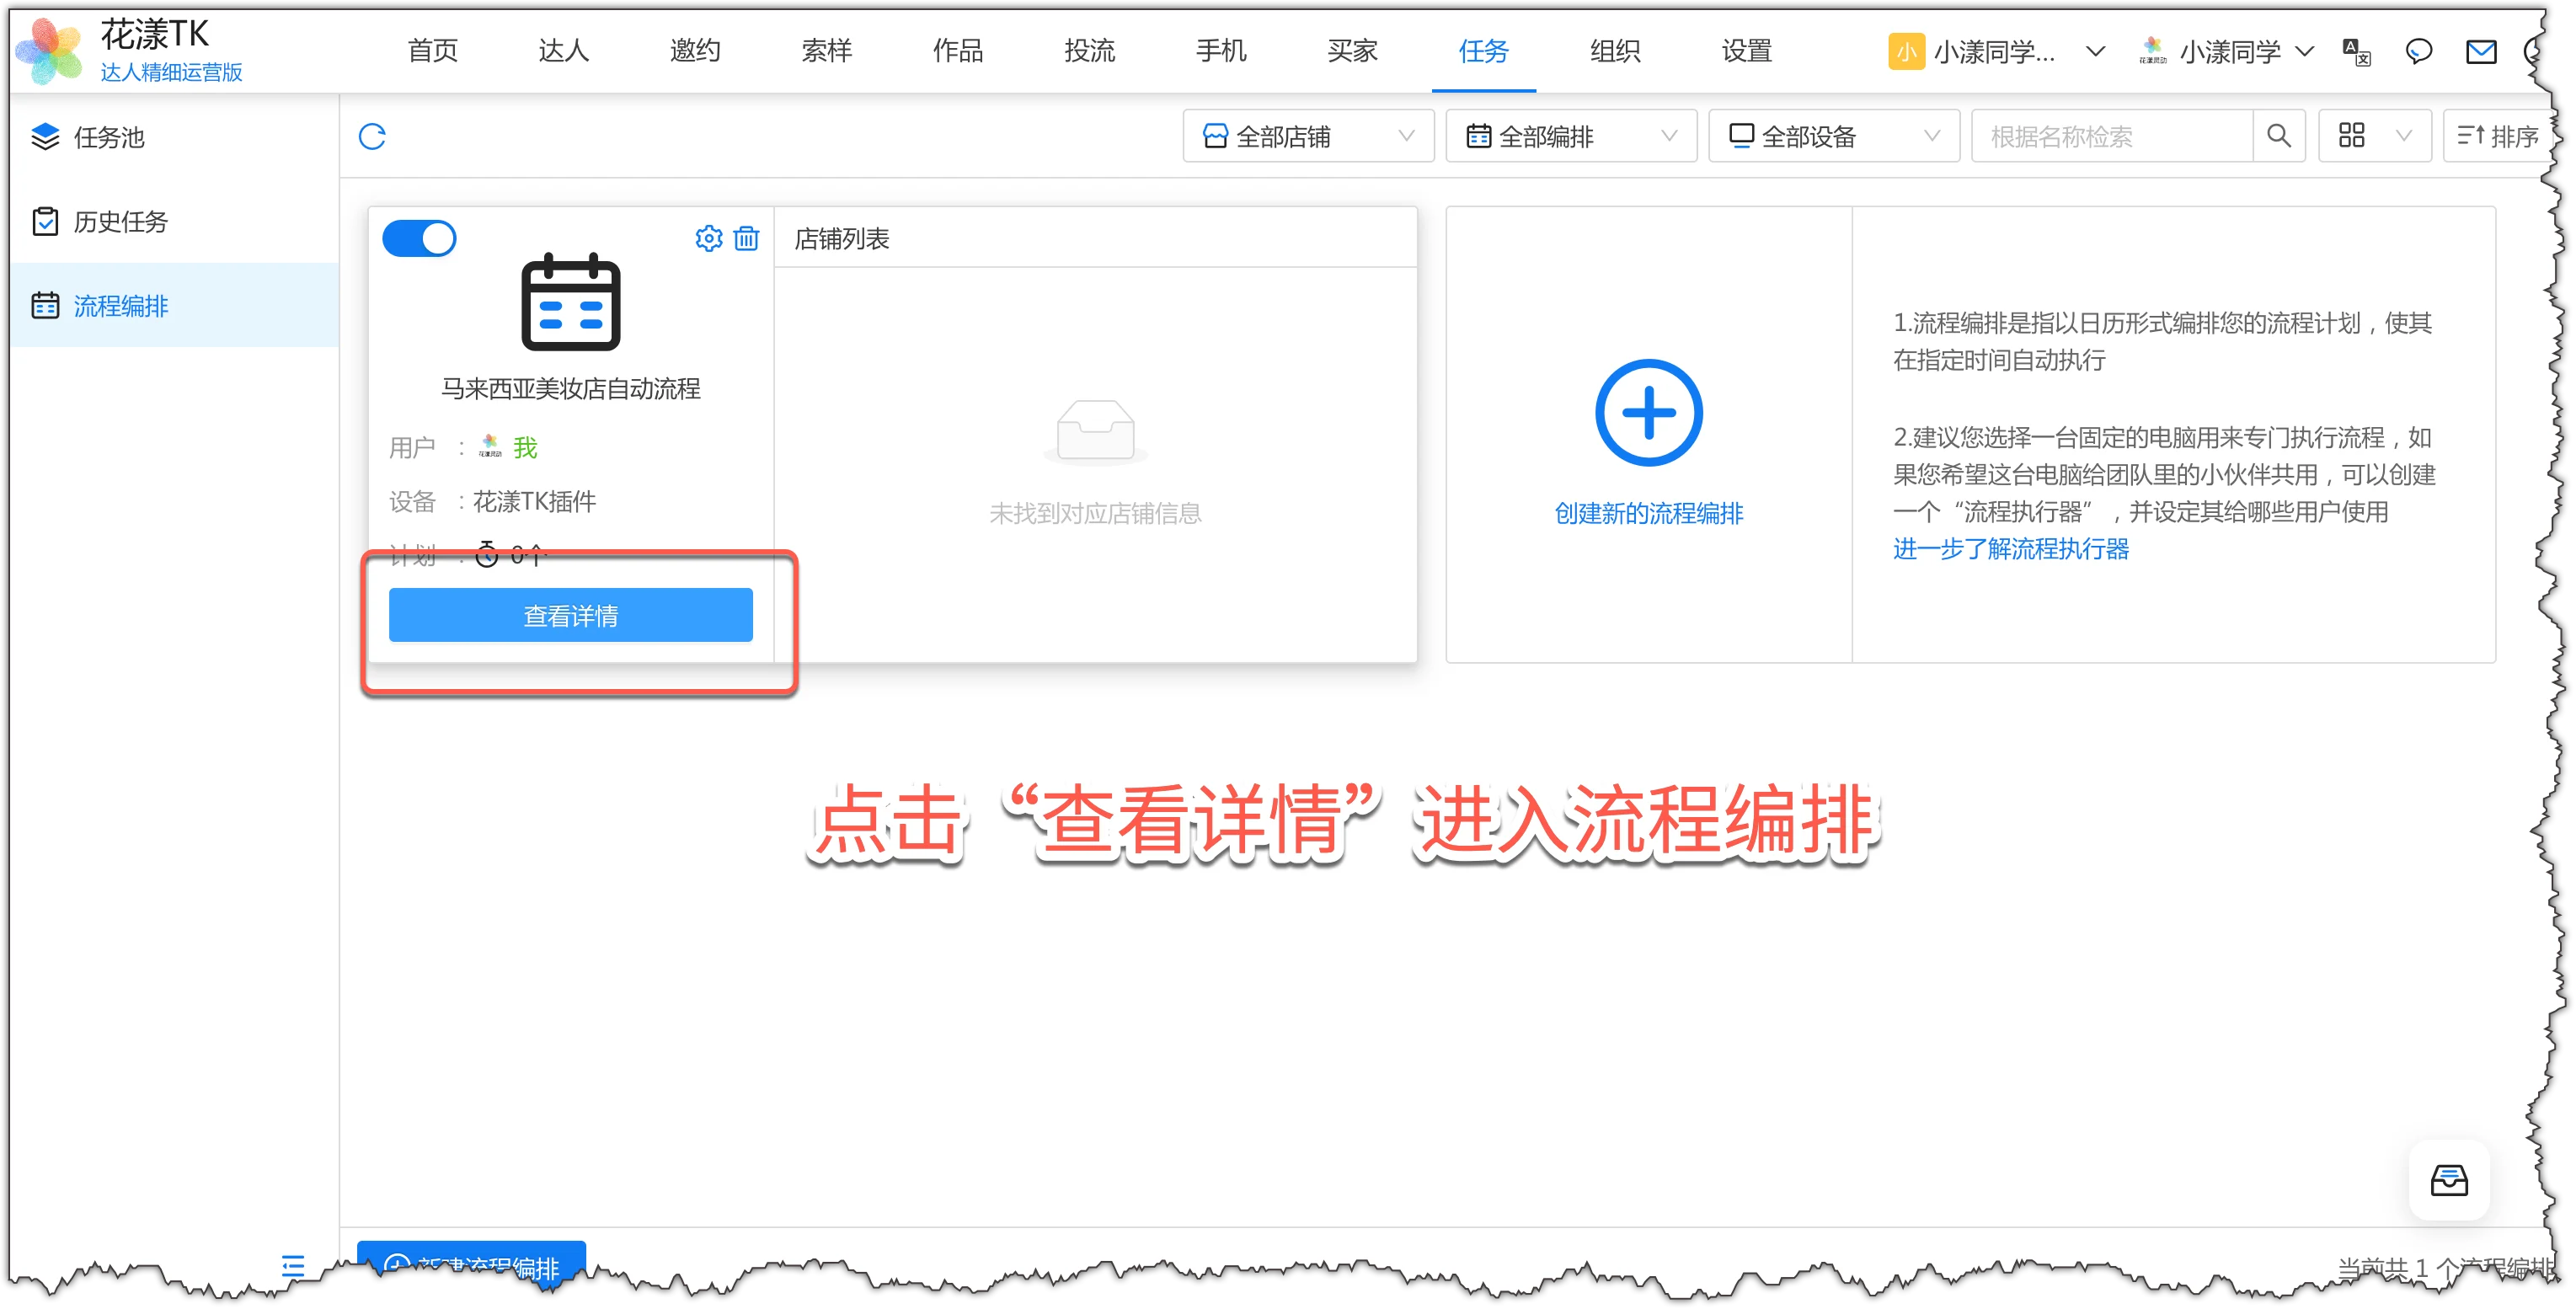
Open the workflow details: After the previous step, a workflow is created. Click “View Details” to enter it.Click “View Details” to open the workflow
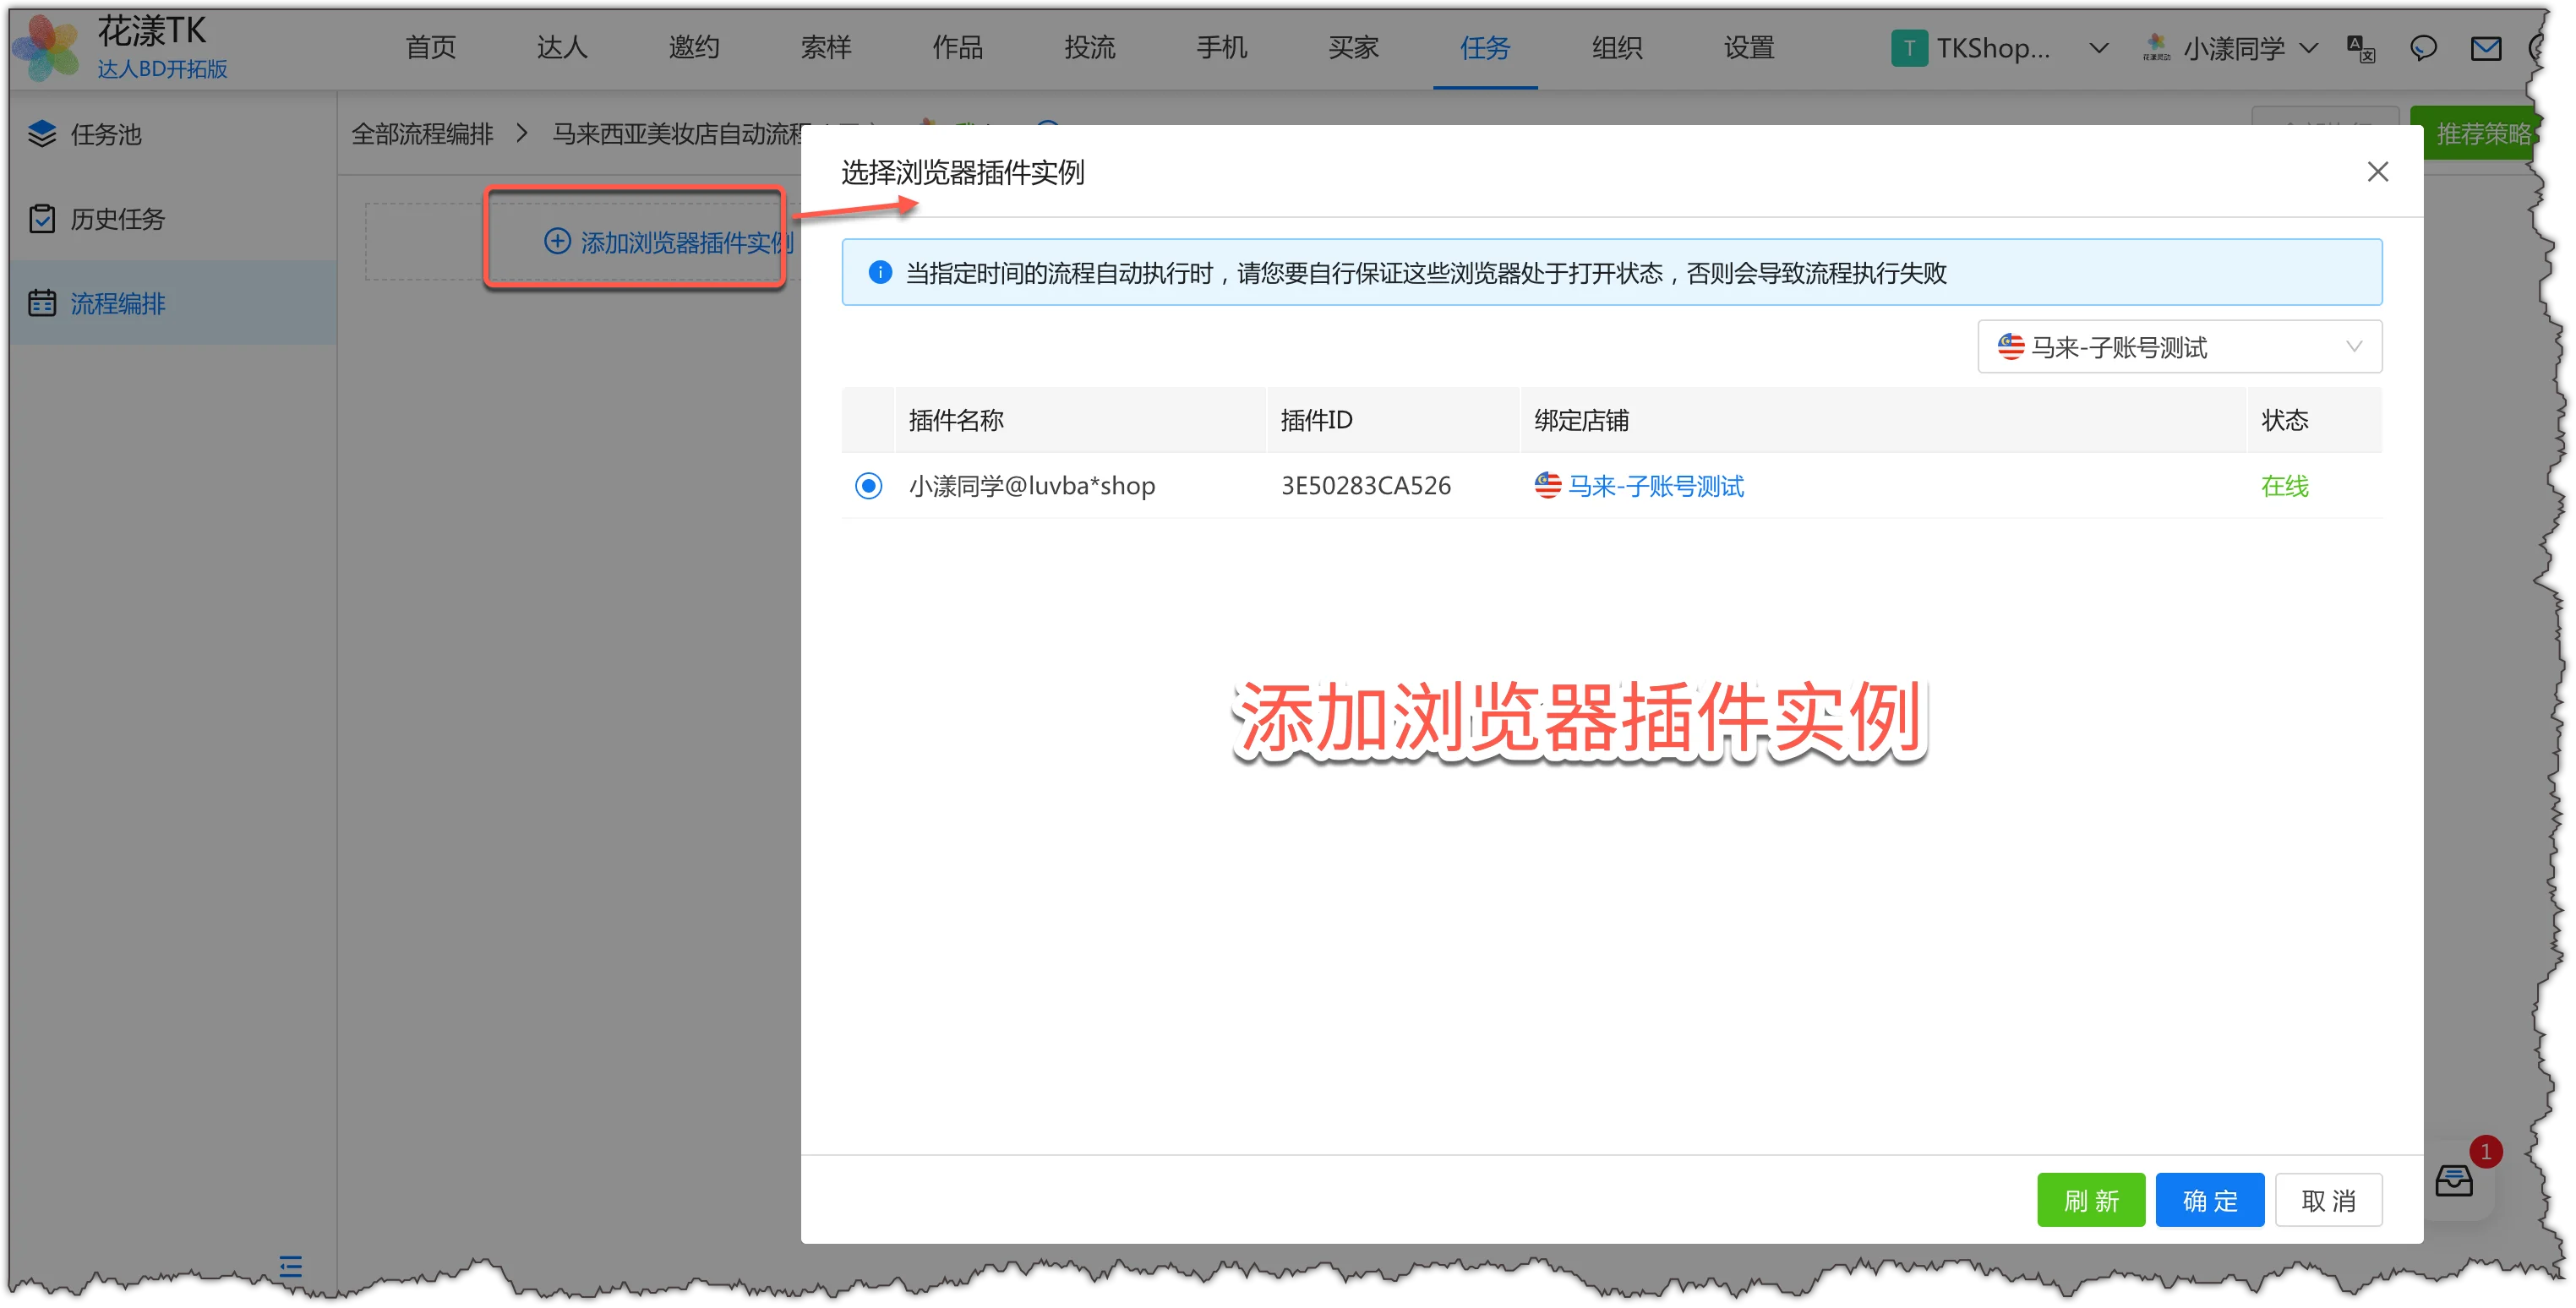
Select a browser instance: Click “Add Browser Extension Instance” and pick the browser instance that has the HuaYoung TK extension installed — later flows will launch this browser to run the schedules and triggers you create below.Add a browser extension instance
5.2
Step 2: Create a Schedule
For example, let’s run shop data sync every morning at 8 AM.
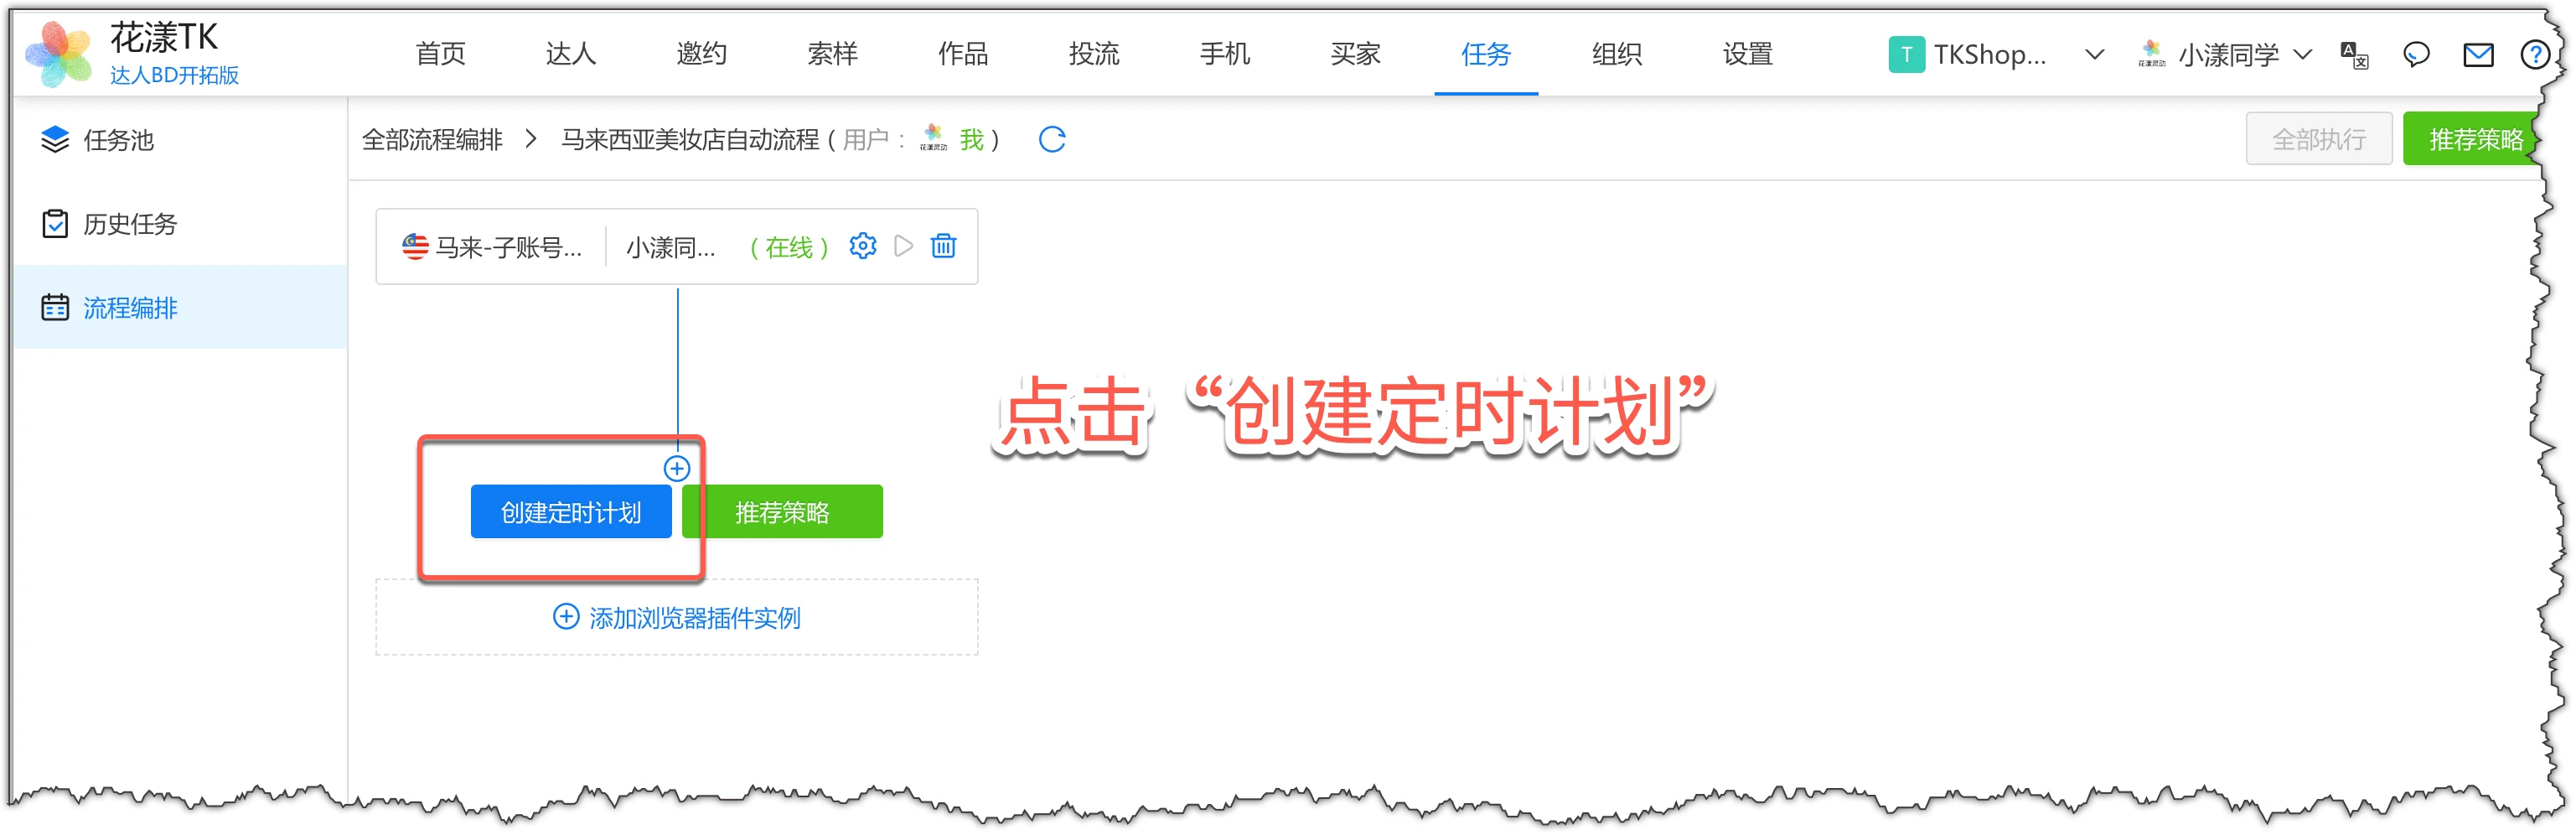
Click “Create Schedule”.Click “Create Schedule”
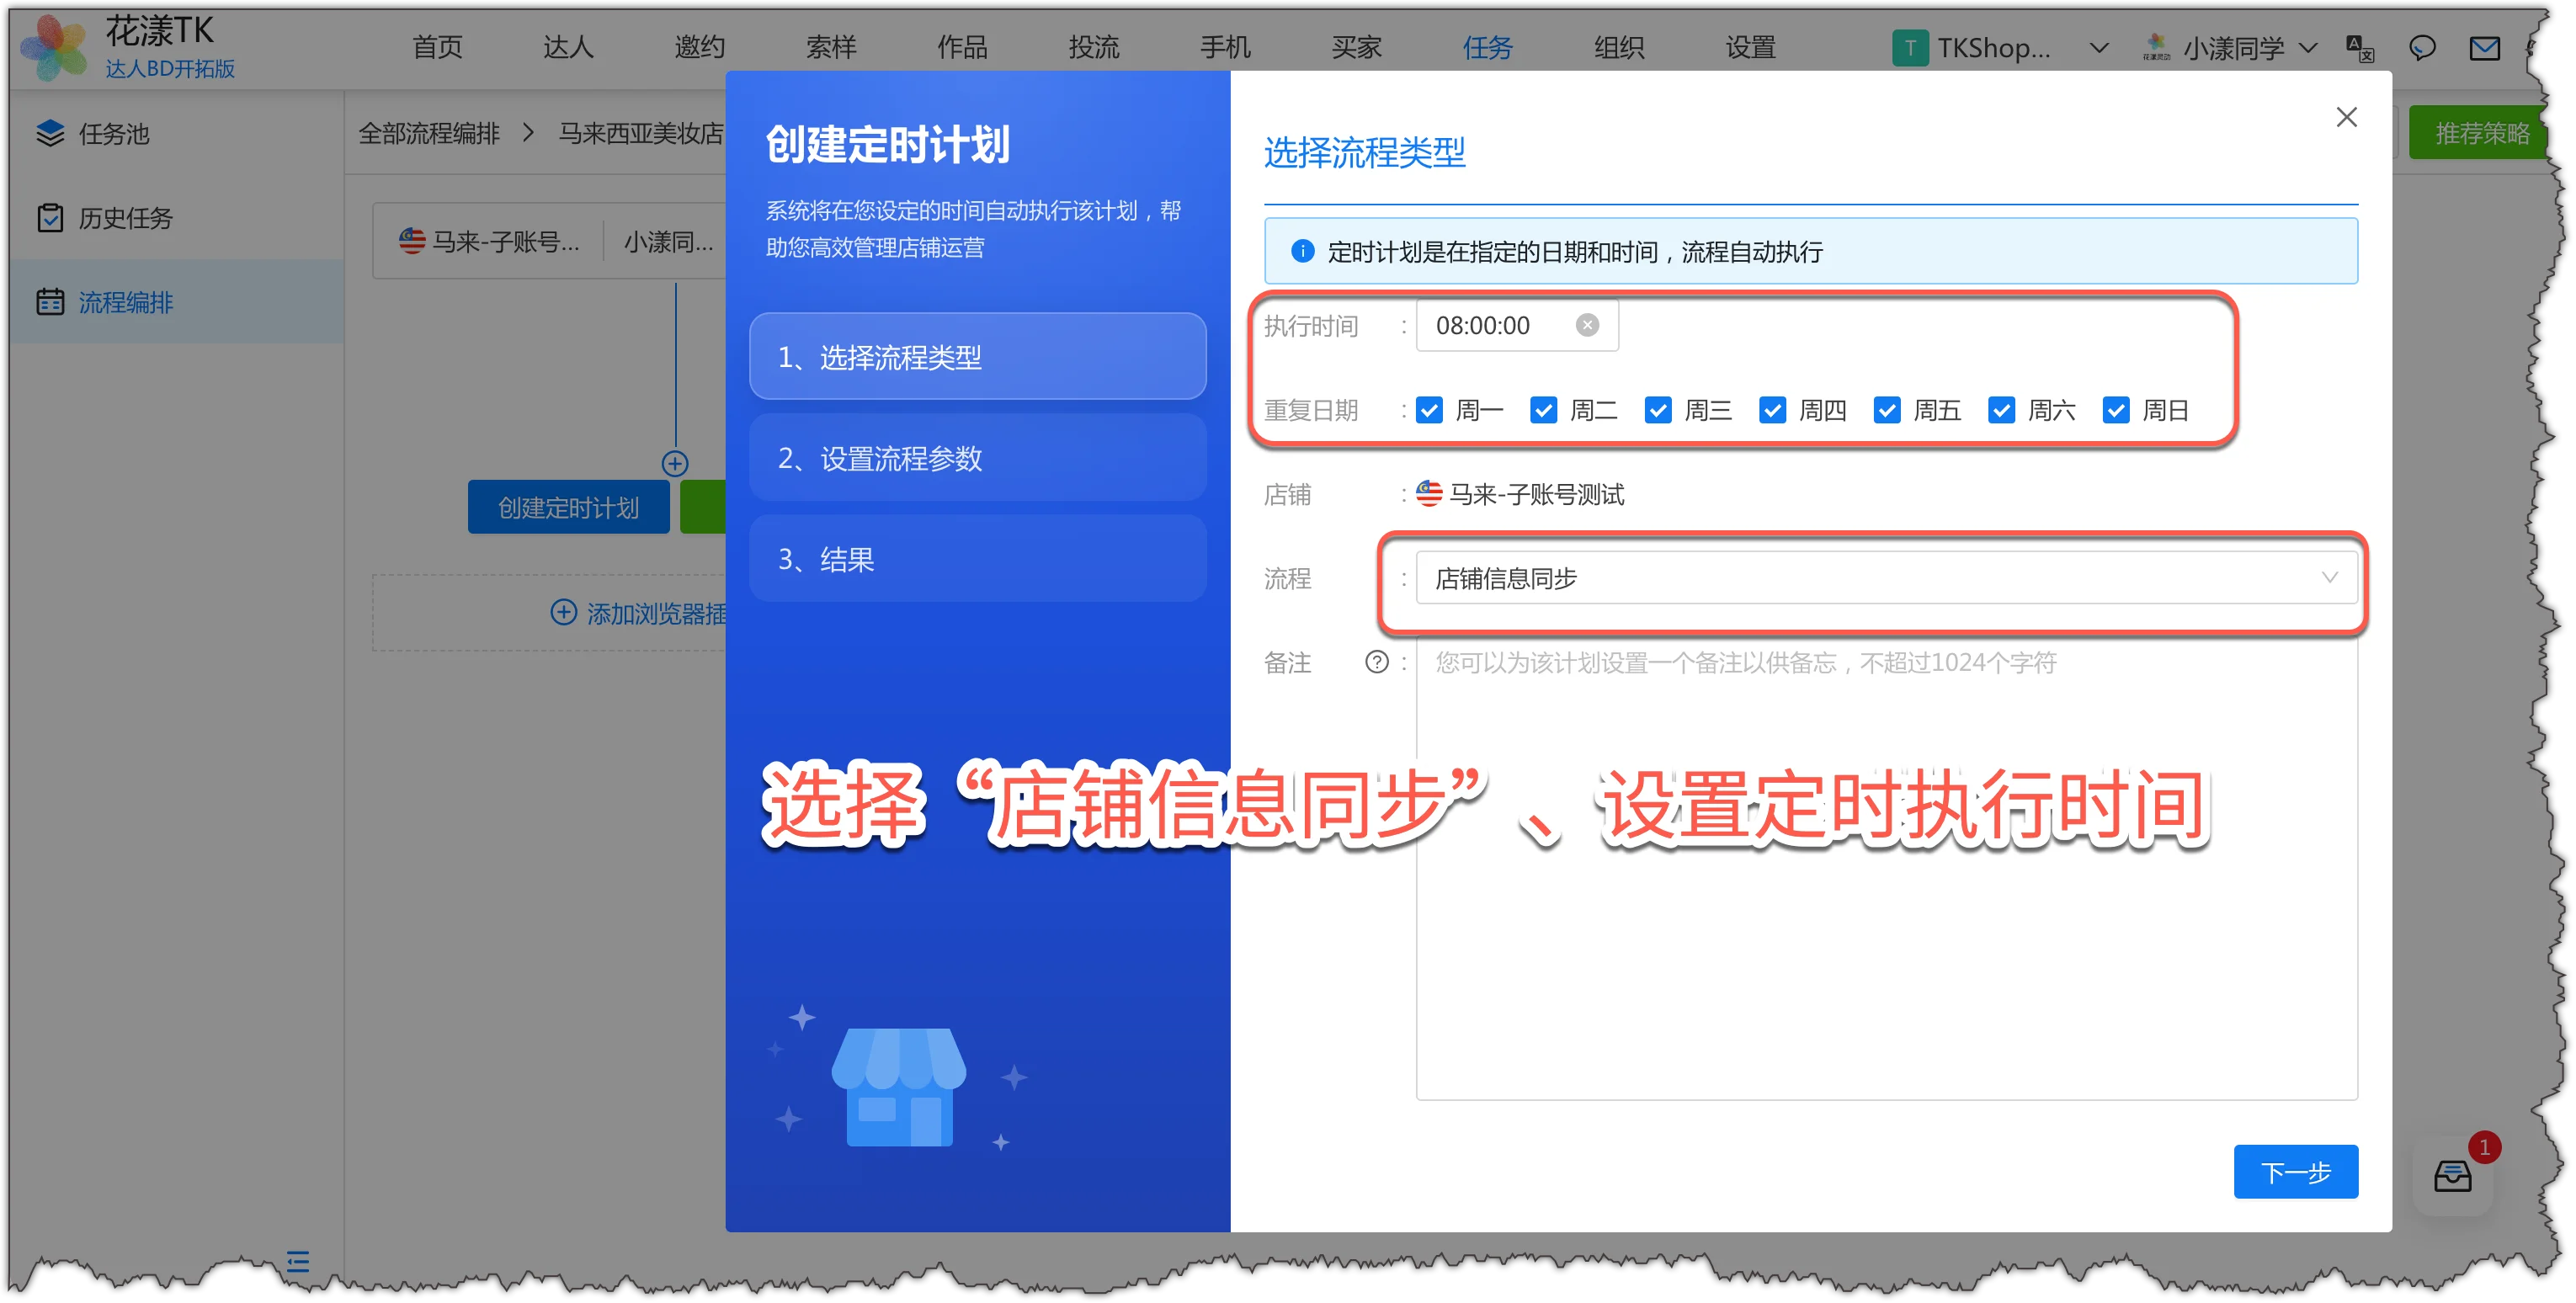
Flow: choose “Shop Data Sync”; Time: set it to 8 AM every day.Create a schedule
Click Next to finish creating the schedule.
5.3
Step 3: Create a Trigger
For example, after the daily morning shop data sync, we want to trigger a creator targeted invitation.
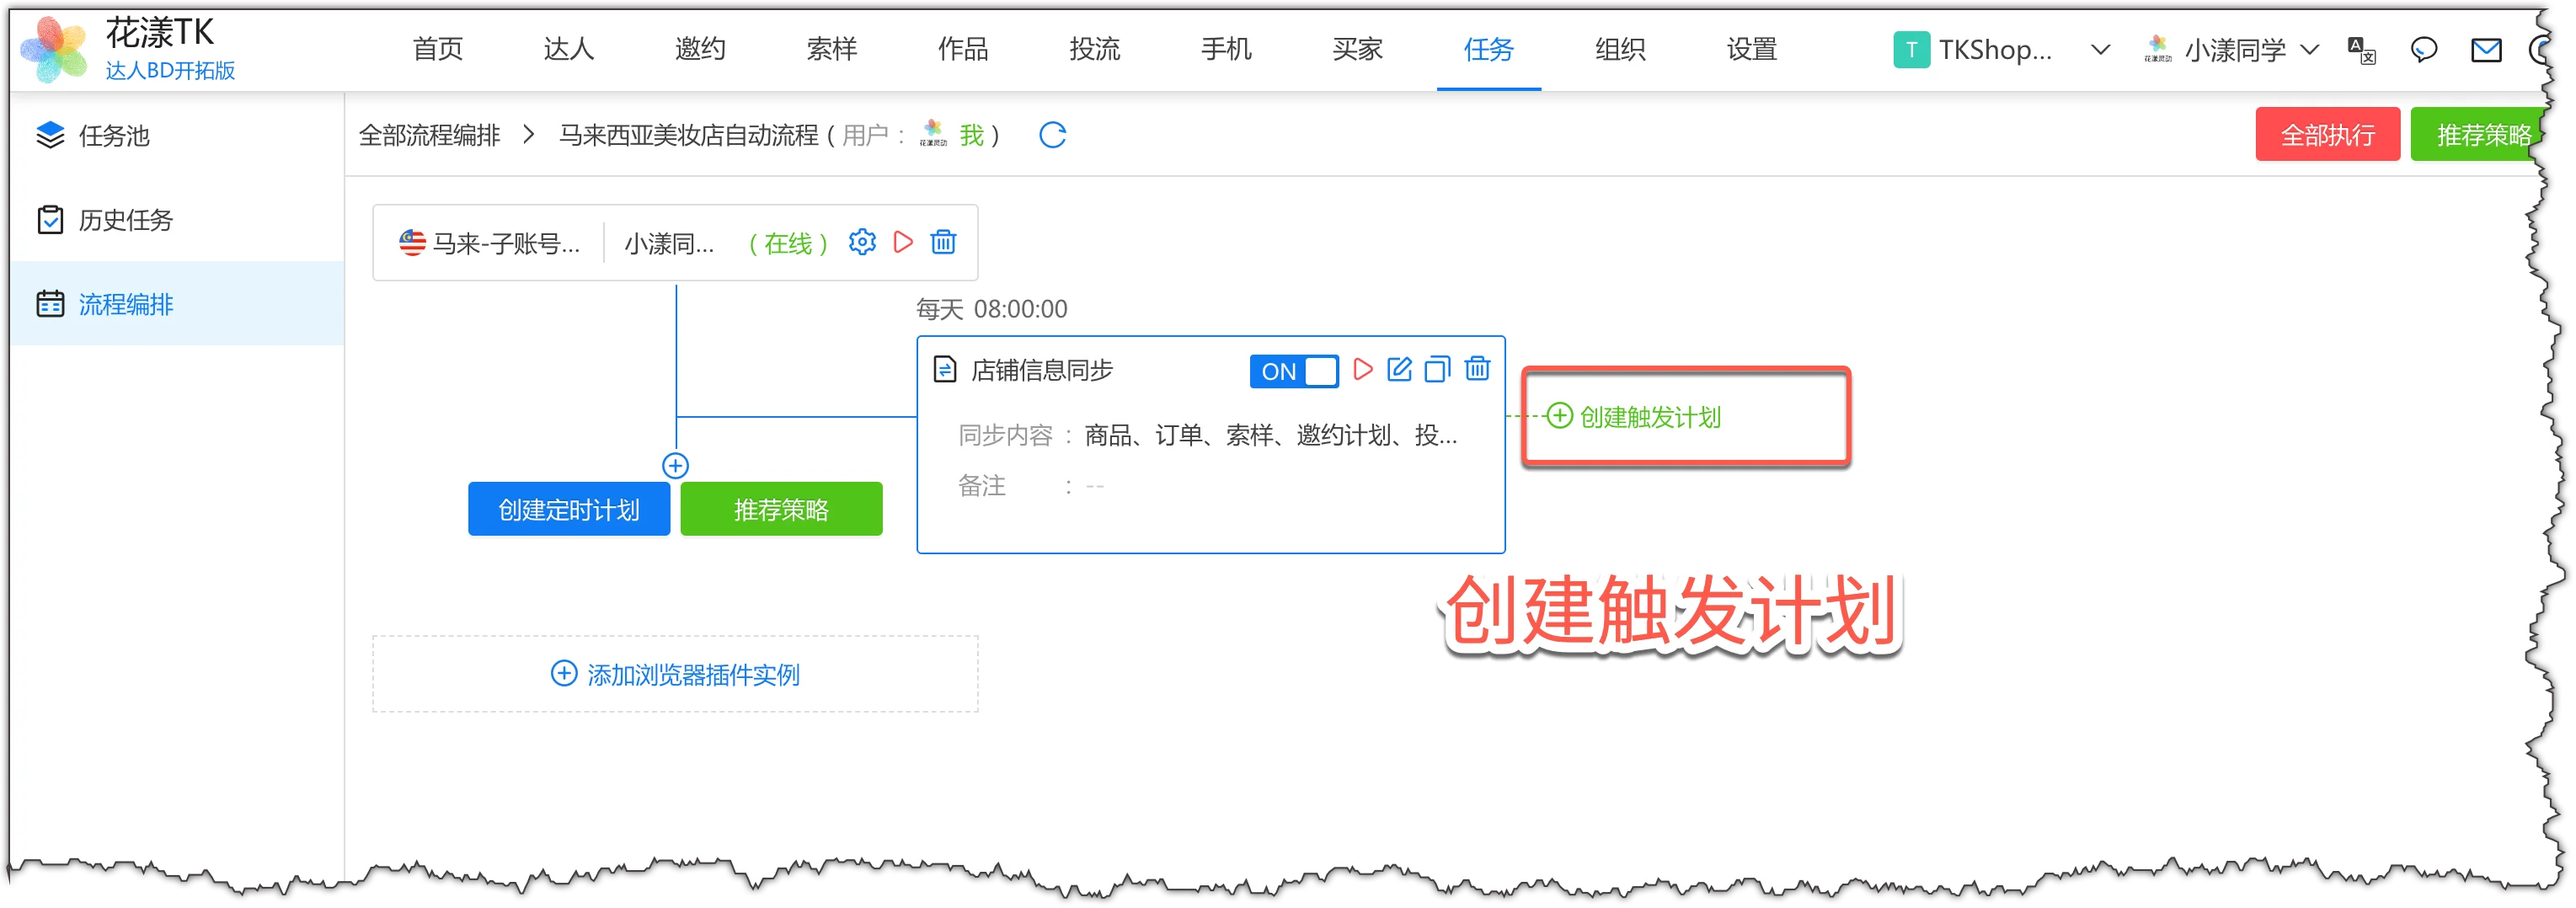
Click “Create Trigger” next to the “Shop Data Sync” plan you just created;Create a trigger
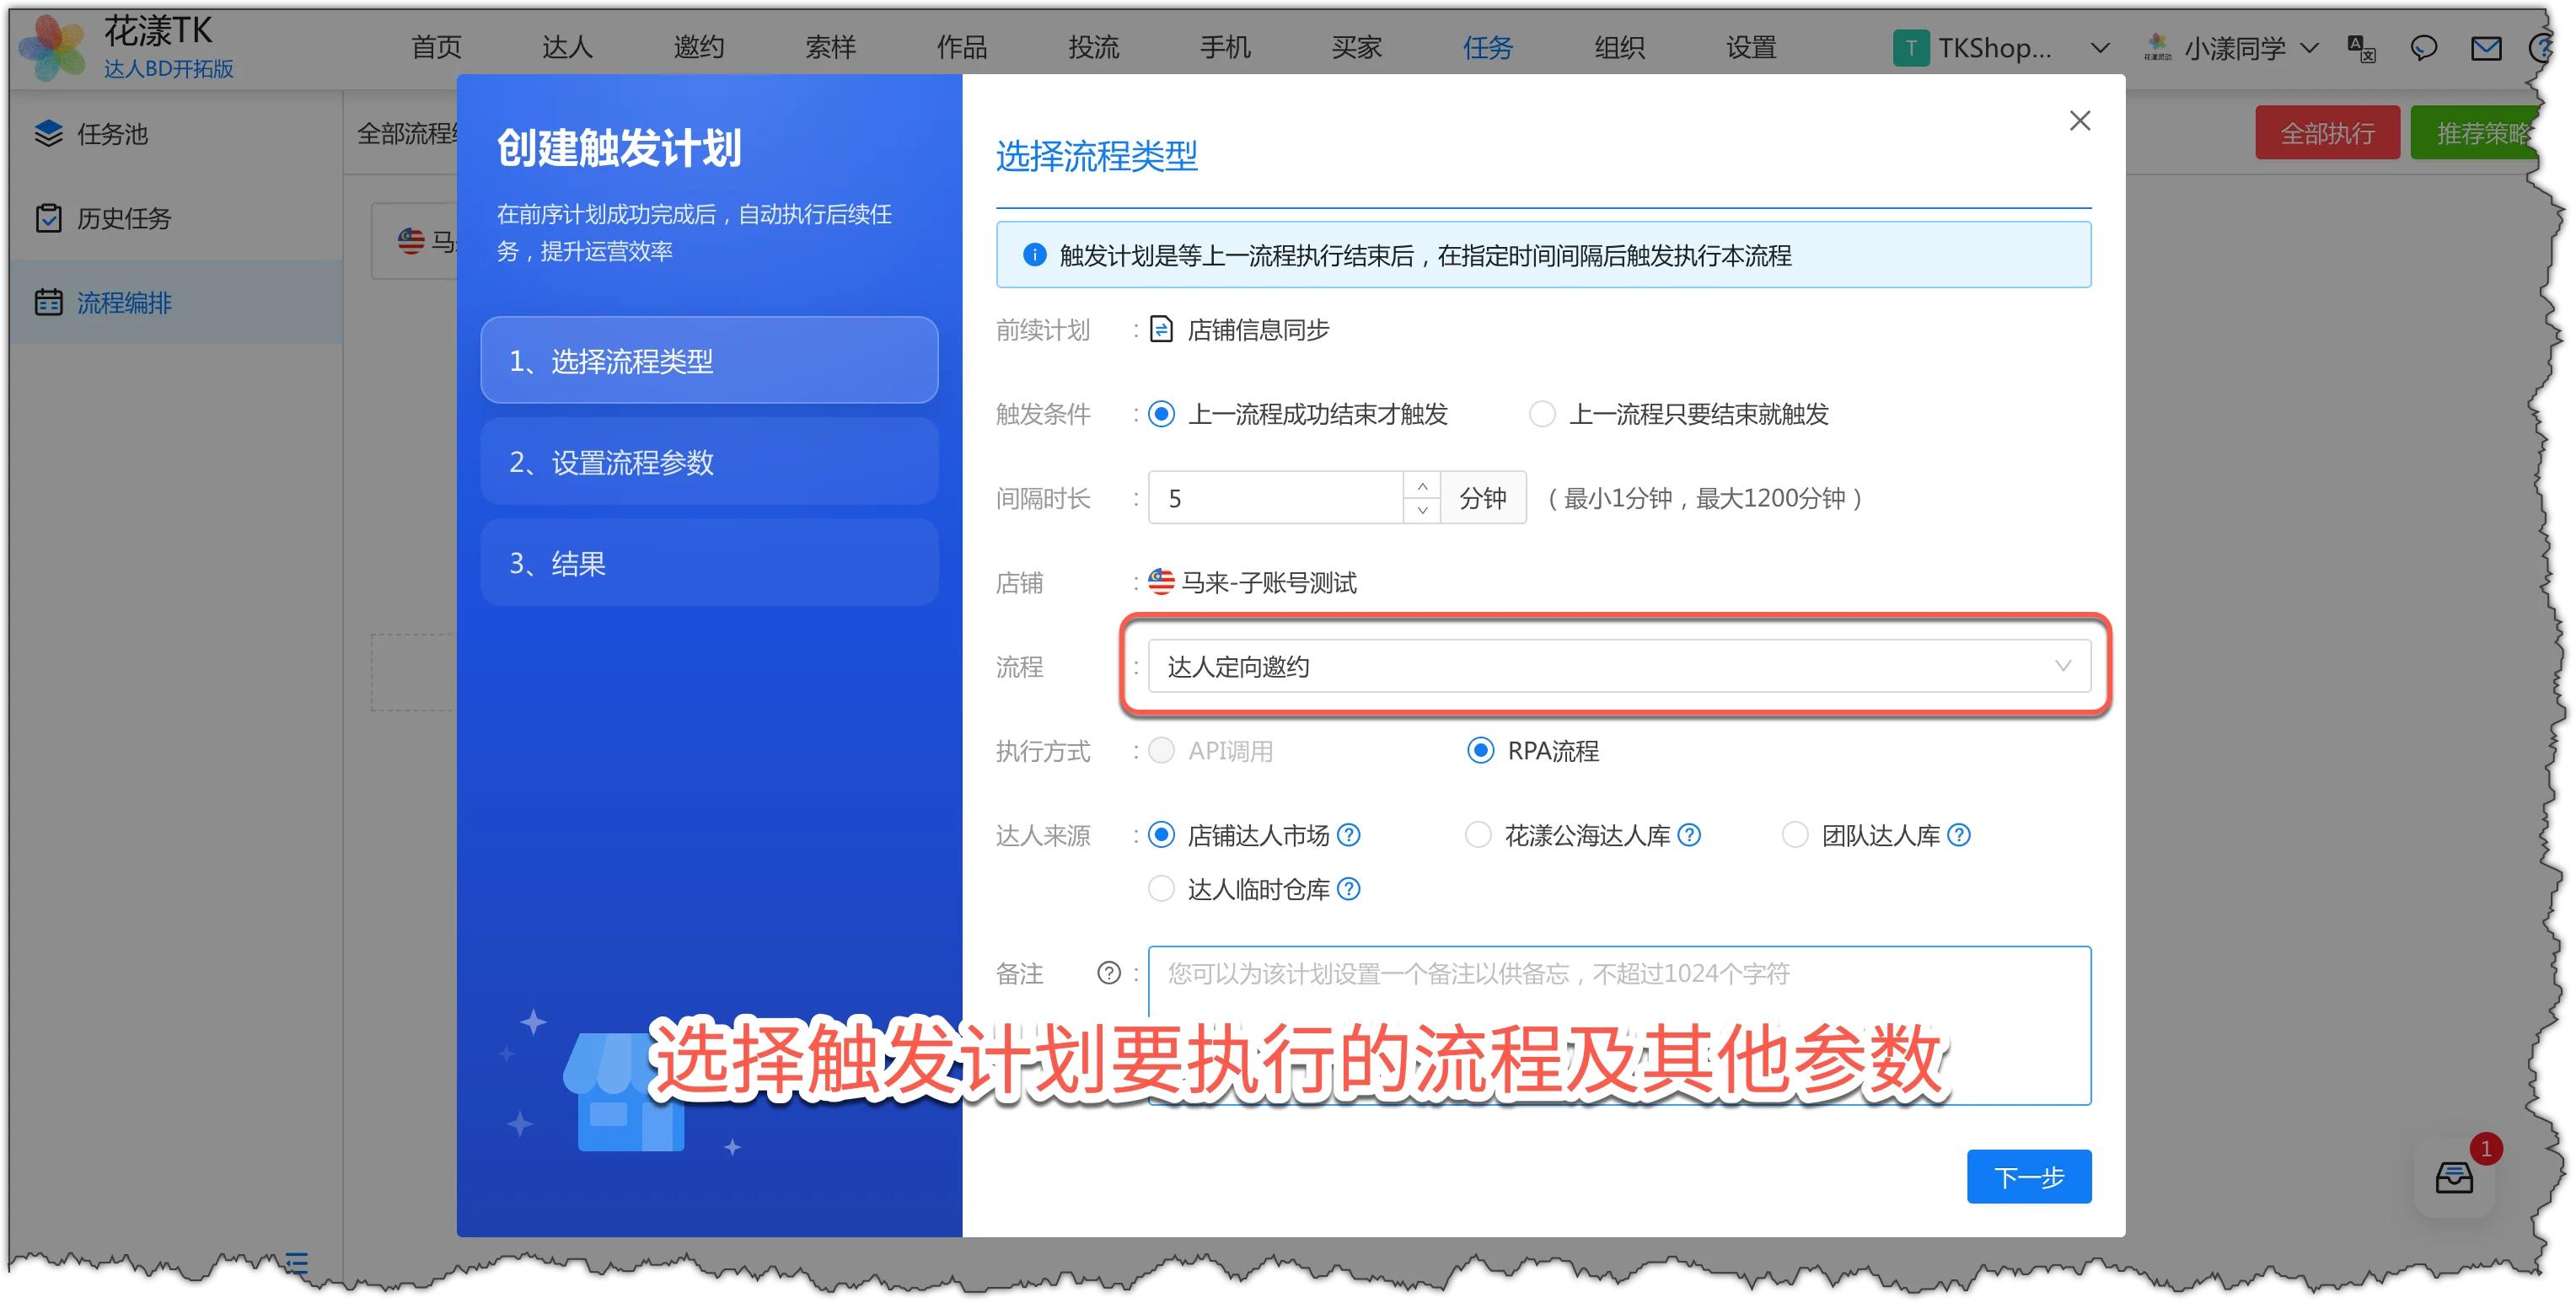
Flow: choose “Targeted Creator Invitation”, and set the other parameters as needed;Choose the flow and parameters for the trigger
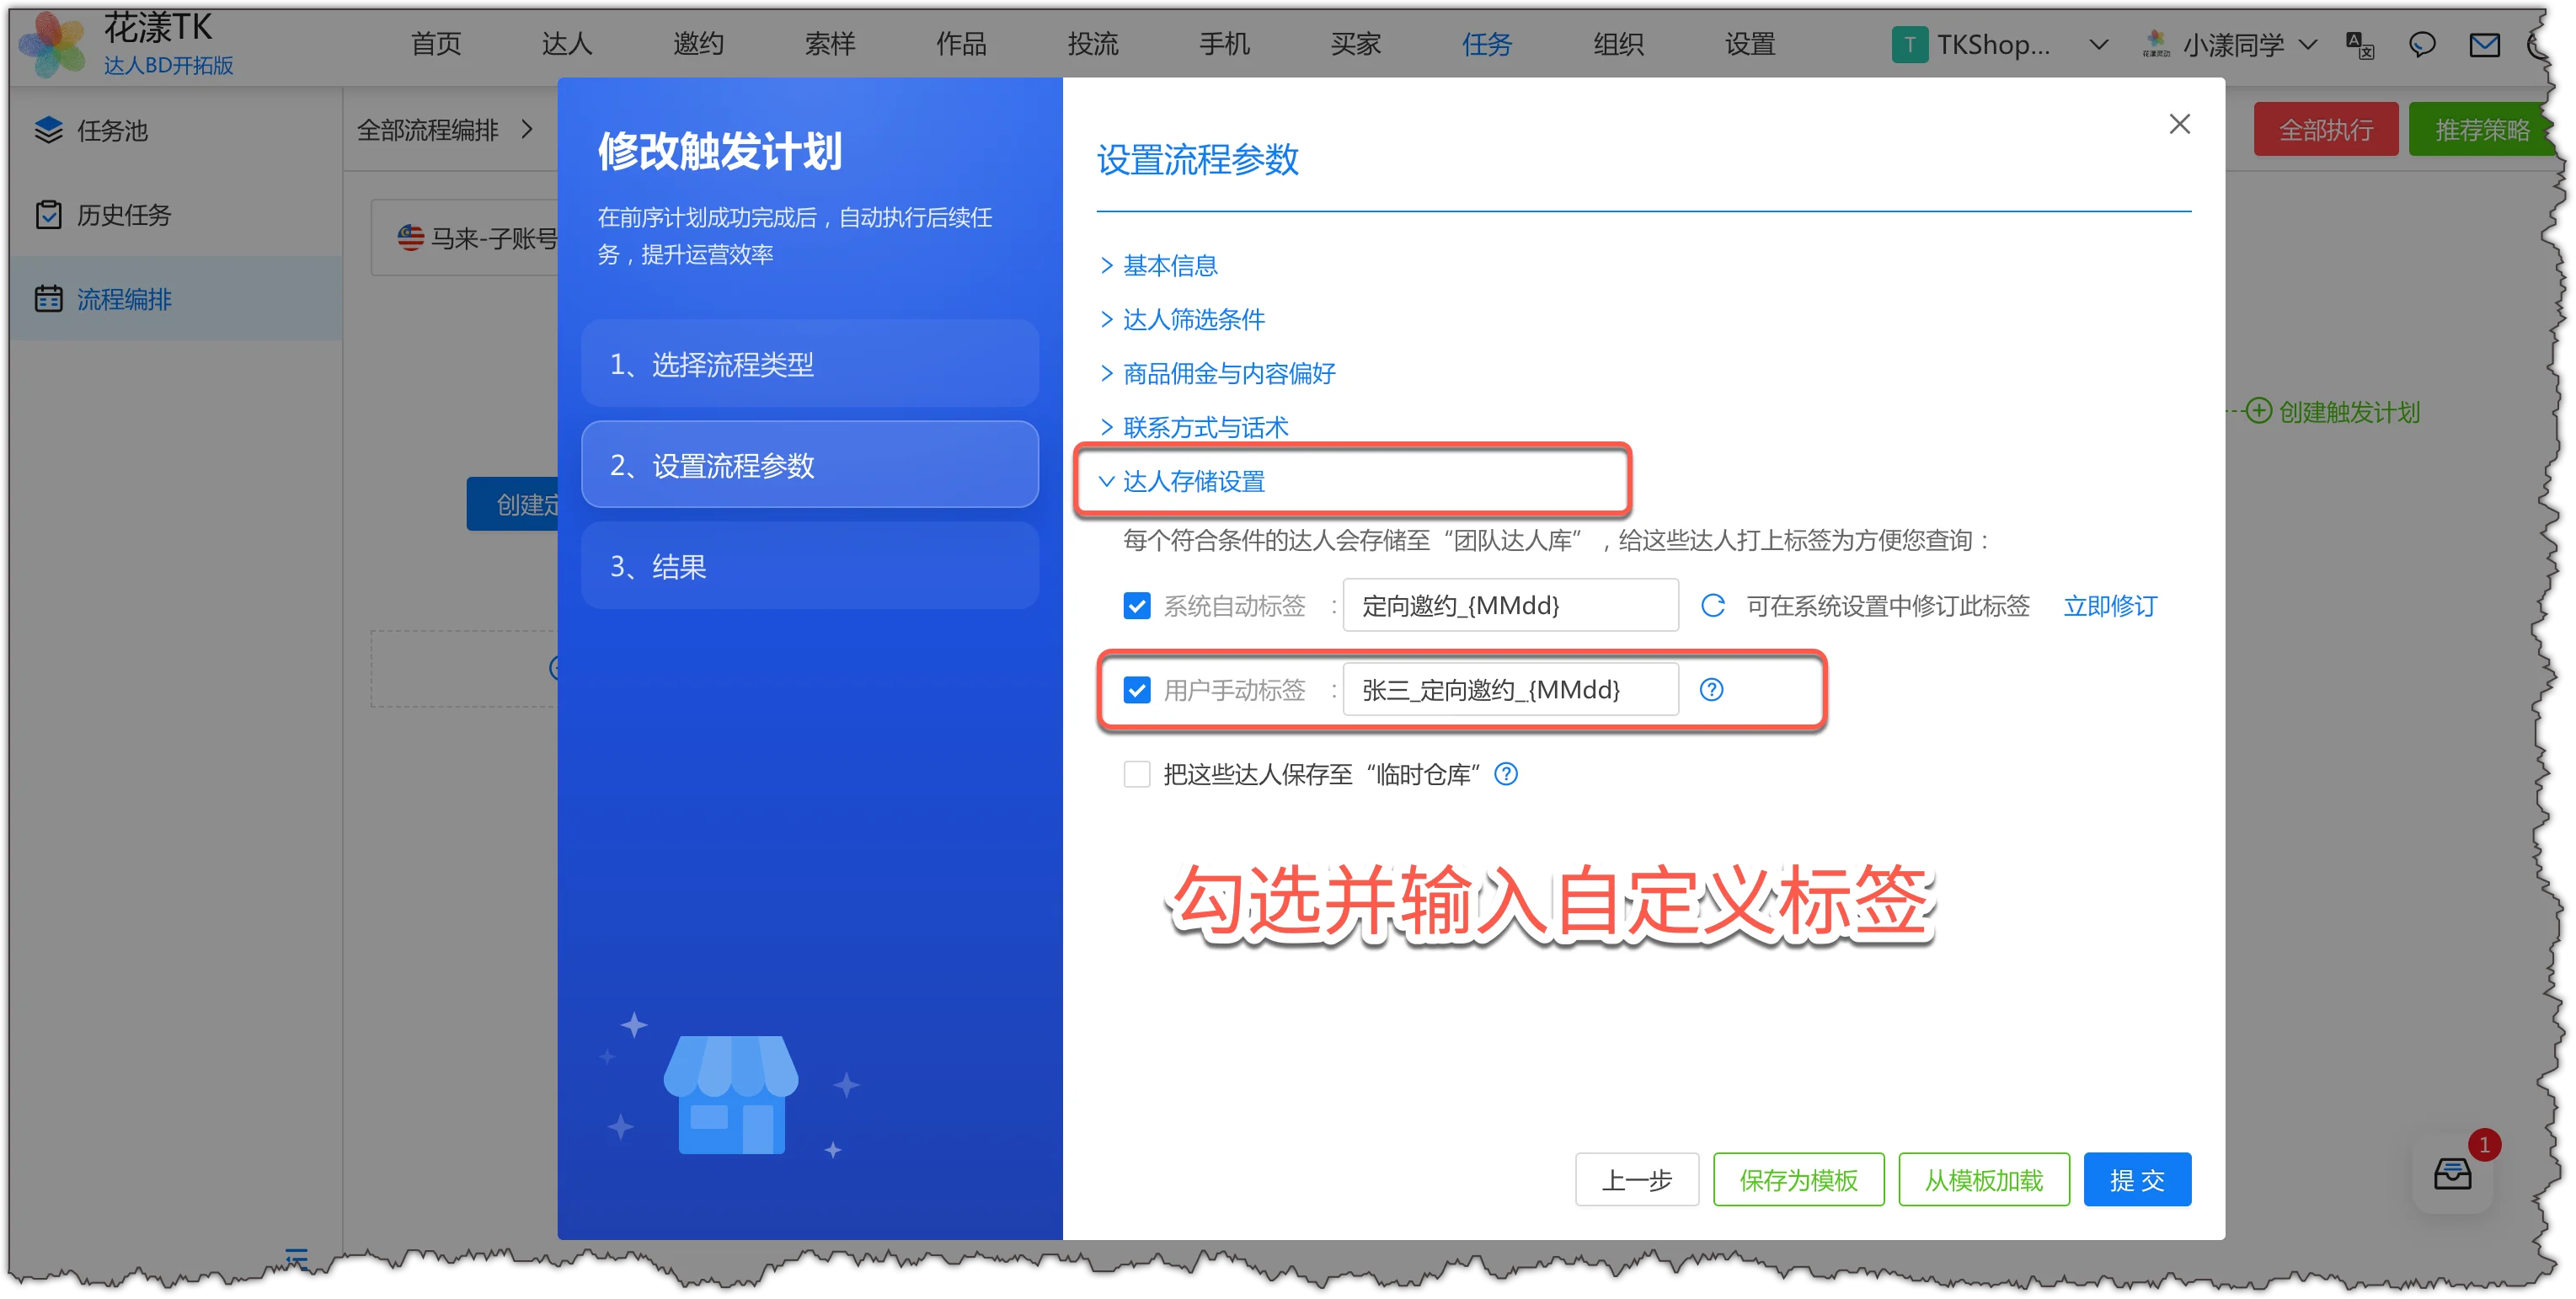
In “Creator Save Settings”, check “Custom Tag” and enter: your name_targeted invitation_{MMdd} — this makes it easy to filter out the creators you invited for follow-up collaboration tracking.Check the option and enter a custom tag
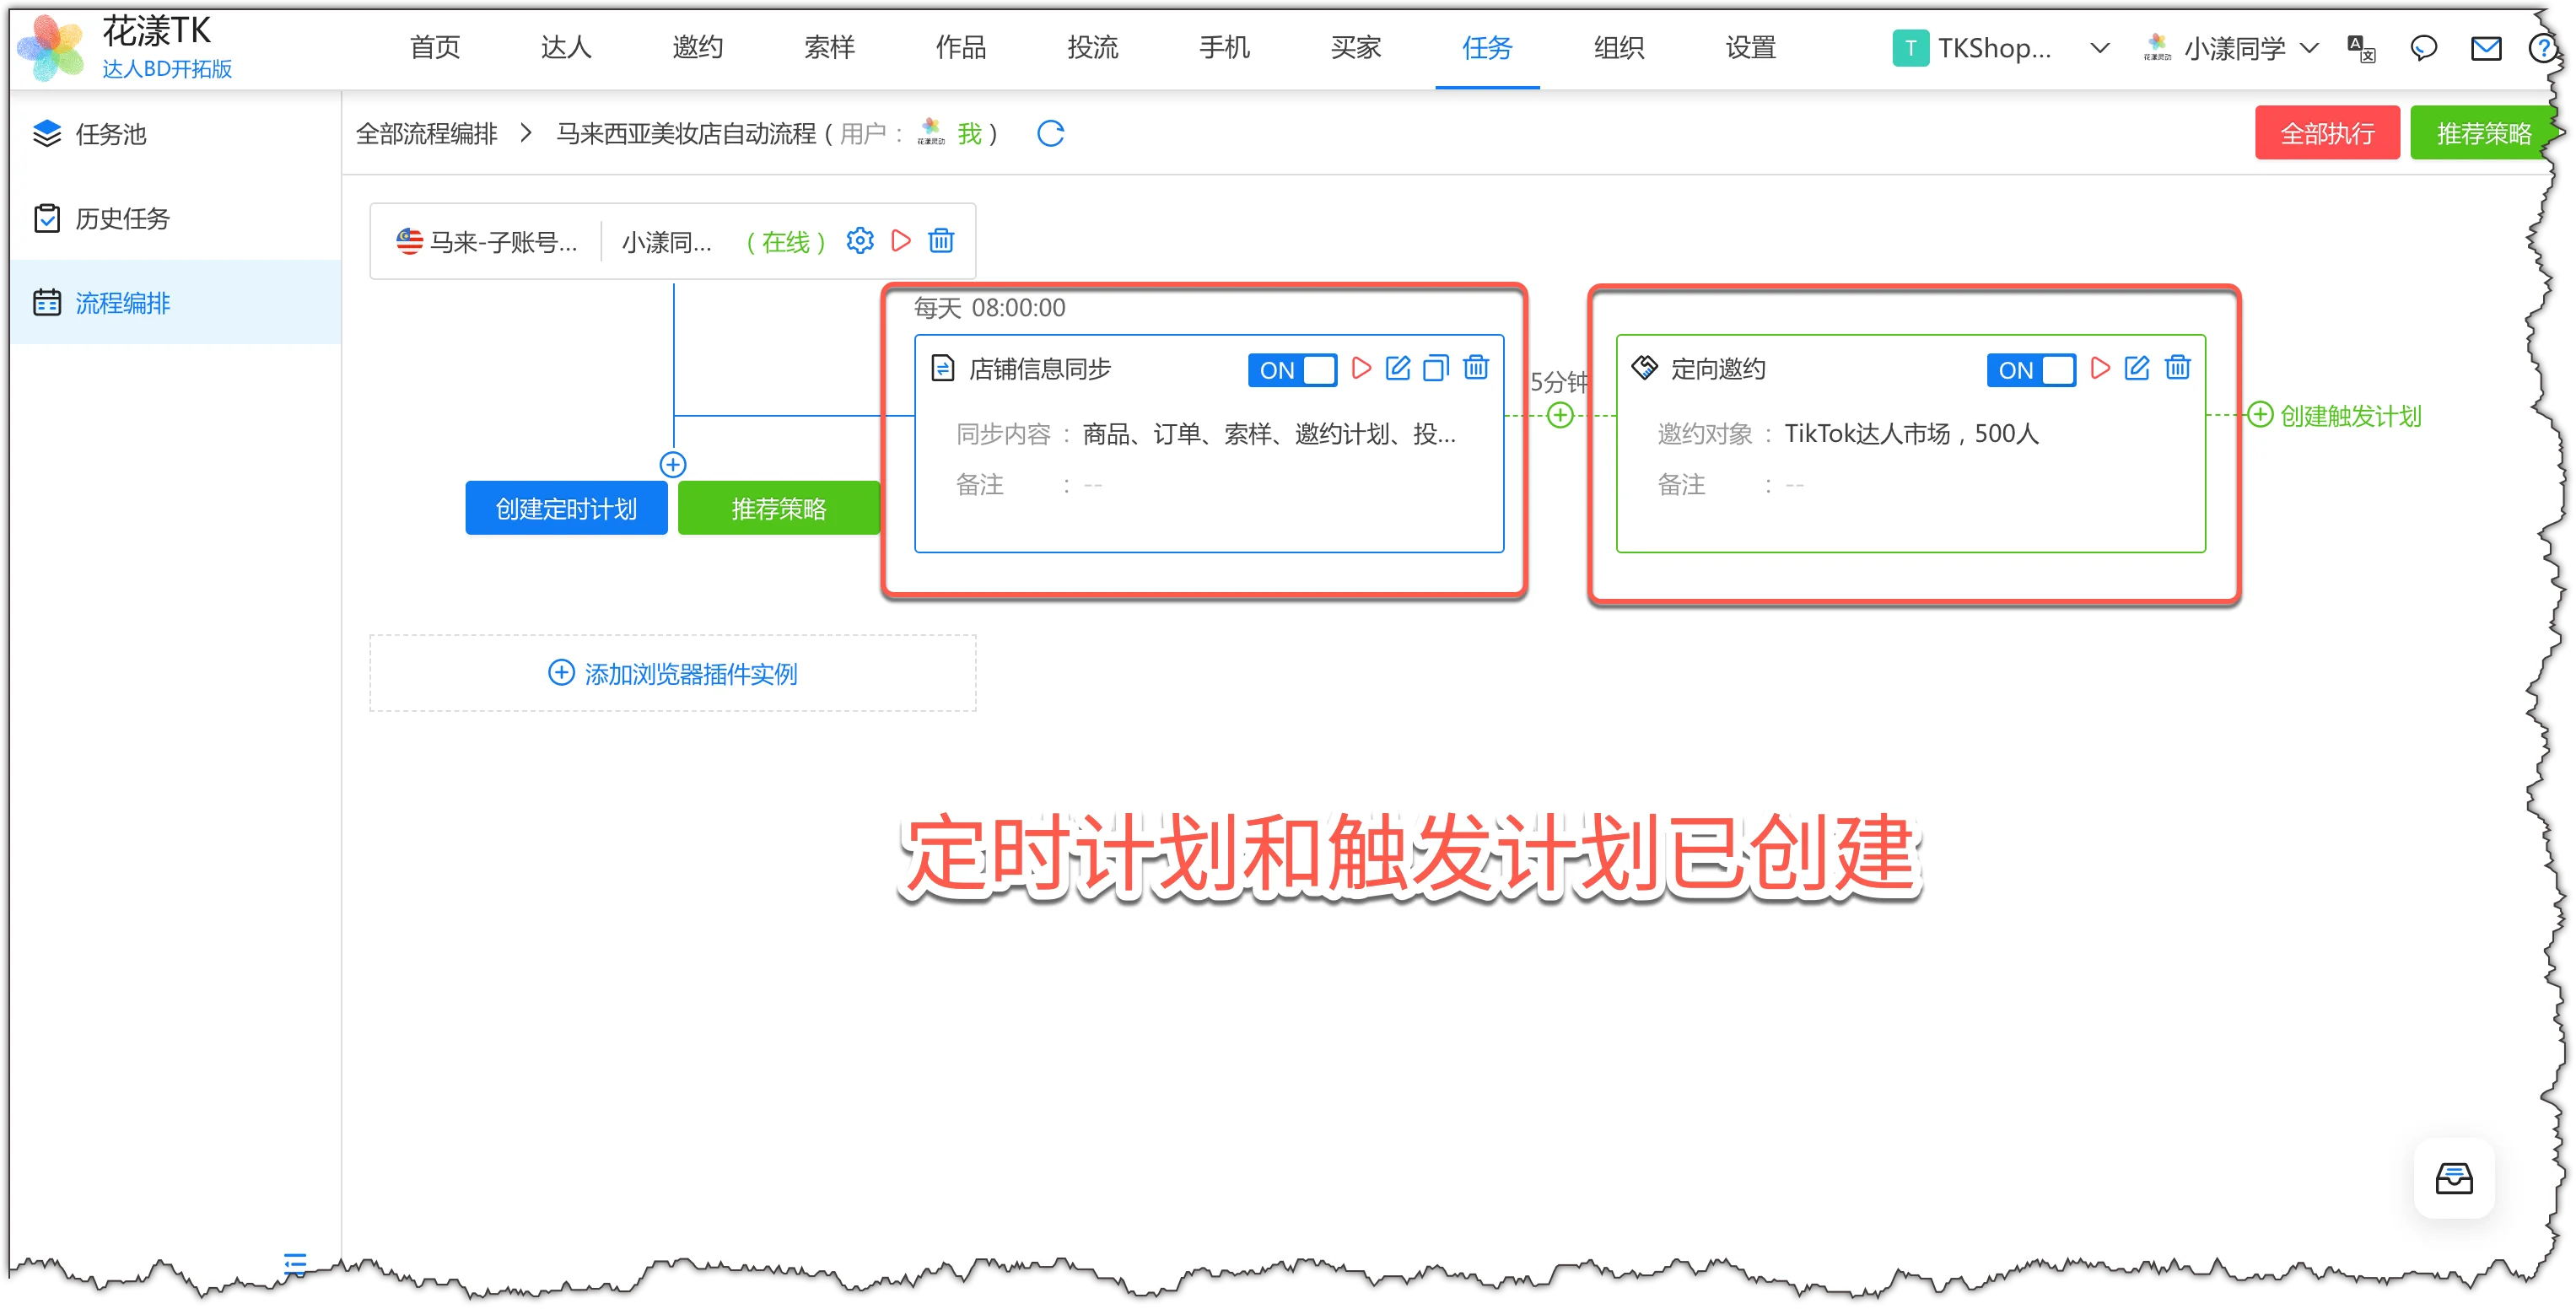
Click Confirm — your trigger is now created.Schedule and trigger created
5.4
Best Practice
Once you understand how to create a schedule and a trigger, you can orchestrate almost any scenario you need.
HuaYoung TK also summarizes the operating experience of top sellers and offers ready-made best-practice workflows you can use directly:
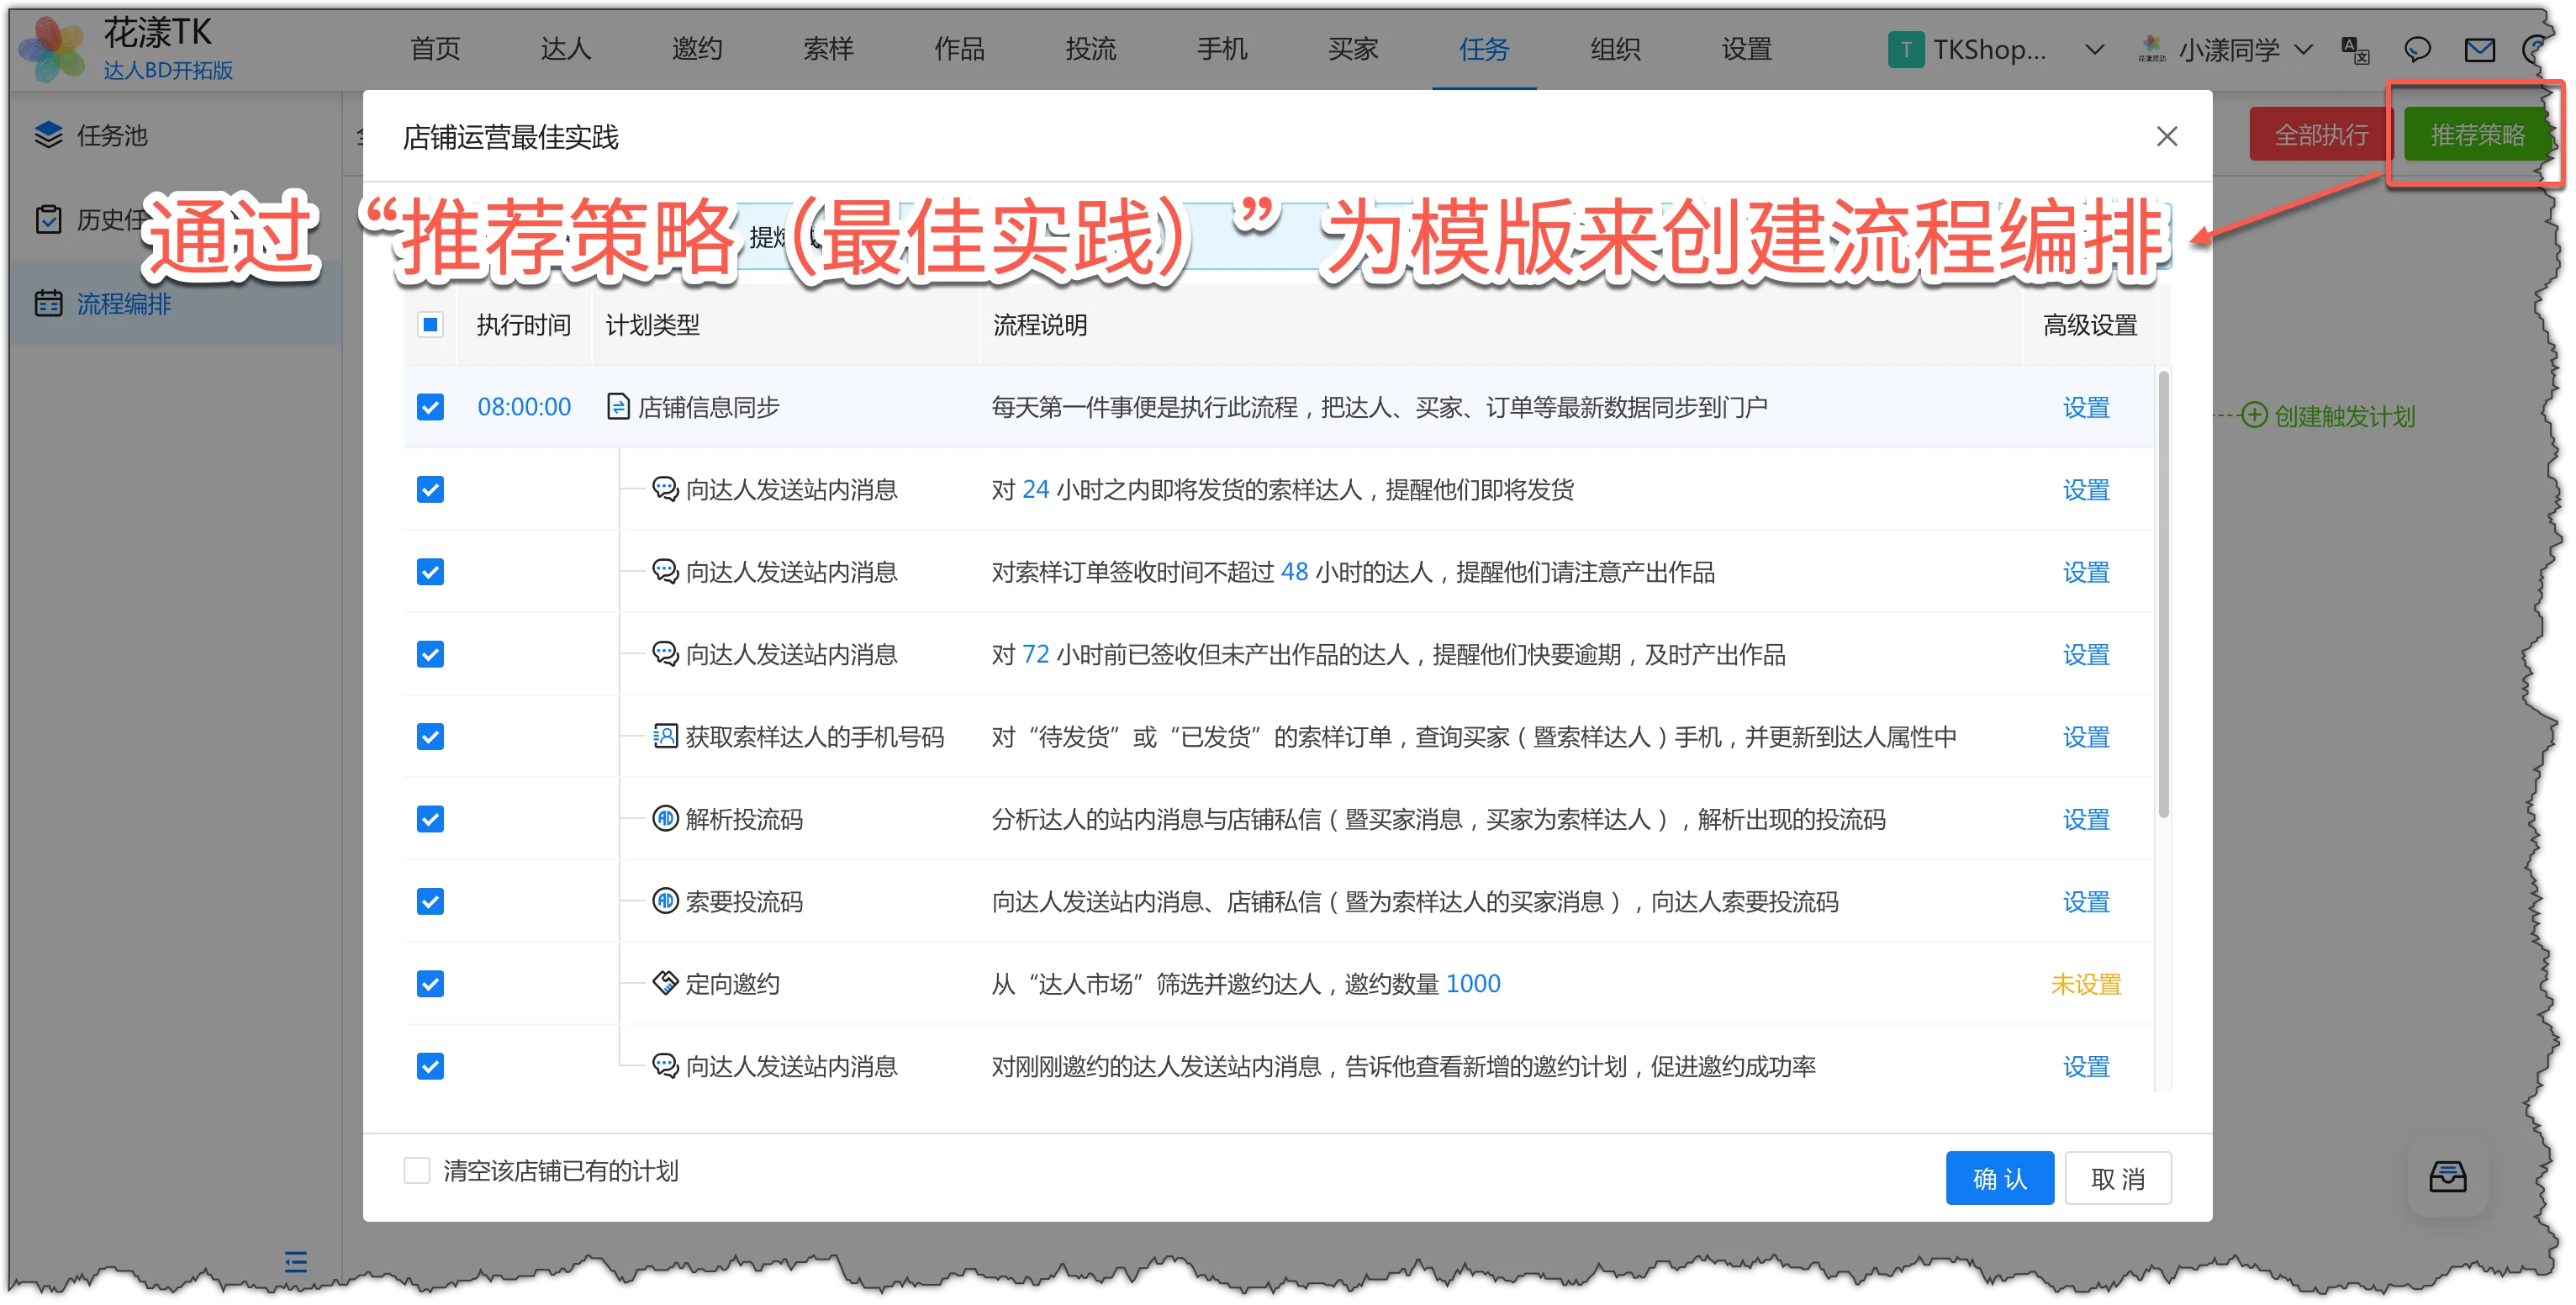
Click “Recommended Strategy” and you will see a preset series of flow execution times and plans. Adjust them as needed — add your invitation products, contact method, etc. — then click “Confirm”. A workflow based on the recommended flow is set up for you.
Use “Recommended Strategy (Best Practice)” as a template to create a workflow
Notes:
For the workflow to run automatically, keep the HuaYoung Client or the browser with the HuaYoung TK extension signed in, and make sure the sign-in account matches the one in the HuaYoung TK portal.